Rules to Better Websites - Development
Do you use .NET MVC over ASP.NET Web Forms?
Use .NET MVC over ASP.NET Web Forms .
Read the Top 5 reasons why you should never use Web Forms again:
- Testability - MVC provides true separation of concerns, and makes it easy to test the whole application from Unit Tests to Coded UI Tests
- Instant Pages - Get your admin pages up and running faster than ever with improved scaffolding. Don't get bogged down doing Create, Edit, Update, Delete
- Better HTML Markup Control - Every layer of obstruction creates new problems down the track. When so much development now involves jQuery or other javascript libraries, MVC simplifies development by putting the developer back in charge of the HTML that is actually rendered
- Simpler Debugging - This means that instead of complicated Webform lifecycles, your code either goes into the Route, Controller or View, so you can jump right into coding without an intimate knowledge of the page lifecycle
- Mobile Support - With Adaptive Rendering, MVC allows the same User Interface to Render on Different Devices, so users can check it out on their PC, their Tablet or even their Smart Phone
Or watch the video:
Top 5 Reasons Why .NET MVC is Great (3 min)<asp:HyperLinkID="HyperLink1"runat="Server"NavigateUrl="http://www.example.com" CssClass="example"Text="Hello World"/>❌ Figure: Figure: Bad example - Using Web Forms
<a href="http://www.example.com" class="example" id="Example1_HyperLink1">Hello World</a>✅ Figure: Figure: Good example - Using MVC 5
Do you know the steps to do after adding a website page?
In order to keep the content you add is healthy (doesn't have grammar or spelling mistakes), follow the below steps once you add a page:
- Check the rule in MS Word (or Grammarly) to see if it has spelling or grammar mistakes
- Run Link Auditor and Code Auditor on that page
- Check the report and fix the errors (if any) Repeat step 2 and 3 until Link Auditor and Code Auditor get all green ticks
Do you have a structured website?
The following structure allows you to keep your website clean of clutter:
- /Images - for all static images
- /Images/Dynamic - for all images used in dynamically generated pages Note: The reason we recommend 2 images directories is so we can exclude images used by dynamically generated pages from our link checking program. This is so we can work out the true orphan images (they multiply quickly...like coat-hangers)
- /Download - downloadable content, like PDFs and documents
- /Includes - for all include files
- /Bin - for mdb's, dll's and udl's
- /Shop - for the shopping basket and related pages
- /Clients - for the client login page and related pages
- /Reports - for any SQL Server Reporting Services
- /zsMaintenance - for the administration section to modify website settings
- /zsValidate - for all web server status and validation checks
The root directory should be clean, having only:
- default (.aspx, .asp, .htm)
- global.asa
- application.sln
Do you always have a default/index page?
Many times a website contains directories that don't have an index page, and this means a user navigating via the URL, see a 404 error. You don't want this to happen, so make sure you always have an index page in every directory, even if it's just to show the files inside it.
It is usually a default.aspx file, however depending on the webserver configuration; it might be index.html or index.php etc.
Do you have a stylesheet file for all your formatting?
A stylesheet file (.CSS) should be used to dictate how the fonts, headings, tables, captions and everything else on your HTML should be displayed.
This makes your site very easy to maintain. If you ever want to change the entire look and feel you should only have to change one file.
Do you know when to use scoped CSS?
On large frontend projects with lots of components it's common to have issues with your CSS classes overwriting each other or conflicting. There are a few different ways to solve this.
It can be very frustrating when CSS classes overwrite and behave differently to how we want them to.
Figure: Overwritten CSS can make our site styles break
Debugging this can be a nightmare on larger projects with huge amounts of styling as you need to comb through the entire file to find what's overwriting the style.
h1 {color: red;}/* 3000 more lines of code... */Utility Classes
One solution to this problem is using a CSS framework such as Tailwind.
Benefits
- Faster setup
- Simple to use
- Faster development speed once devs are familiar with it
Disadvantages
- Poor readability as you add more classes
- Learning curve for class names
Scoped CSS
Most frontend frameworks such as Blazor, Angular and React support scoped CSS, allowing you set CSS classes on a component level.
When you create a scoped CSS file, those classes are only accessible to the component that the CSS file is associated with.
This is useful as you don't need to worry about class names or CSS values conflicting with eachother like you would if all the classes are set at the root level. It also makes it much easier to change styling on individual components without breaking the styling on other classes.
Benefits
- Can reuse class names in each component without conflicts
Disadvantages
- Styles have to be manually written
Blazor
In Blazor scoped CSS files are associated with components with dot syntax. For example, if we have a component called
MyComponent.razor, we can create a file calledMyComponent.razor.cssand the classes set in that file will only apply toMyComponent.Inheritance
Blazor supports having scoped CSS classes inherited by child components.
<MyComponent><MyChildComponent /></MyComponent>In
MyComponent.razor.cs, if we use the::deeppsuedo selector on a class, it will be applied toMyChildComponent.::deep .myClass {/* Styling goes here */}Blazor CSS Isolation - Microsoft Docs
Angular
When you create a component in Angular, a scoped CSS file is automatically created for it along with the HTML and TypeScript files.
myComponent|- myComponent.component.html|- myComponent.component.css|- myComponent.component.spec.ts|- myComponent.component.tsInheritance
Angular also offers the
::ng-deeppseudo selector, but there are some considerations when using this.Component Styles - Angular Docs
React
We can achieve local, component-level styles in React by using importing from a file ending in
module.css:/* component.module.css */.heading {font-weight: 700;}import styles from "component.module.css";const Component = () => {return (<h1 style={styles.heading}>Bold Heading Here</h1>)}This will then render the element with a component specific class, differentiated from other
.headingelements:<h1 class="Component_heading__nEBhk">Bold Heading Here</h1>Do you close quotations of all HTML attributes?
Make sure there are equivalent closing quotations for HTML attributes. A small mistake of missing a quotation could lead to undesired results on a web page.
<div class="info>❌ Figure: Figure: Bad code - Can you spot the missing quote? Code Auditor can
<div class="info">✅ Figure: Figure: Good code - All OK
As you can see from the above example, just missing a quotation makes the whole layout of the text different. So be very careful that you make sure you have closed all opening quotations of attributes with equivalent closing quotations.
We have a program called SSW Code Auditor to check for this rule.
Do you know how to display code in HTML?
Displaying code on a website is an important aspect of creating developer-friendly content, ensuring the code is clear, readable, and accessible. When done correctly, it enhances user experience and helps avoid confusion.
The best way to display a piece of code
Use HTML
<code>and<pre>tags:- The
<code>tag is used for inline or block-level code snippets that are embedded within other text. It applies minimal styling, indicating that the enclosed content is code. However, it does not preserve formatting like indentation or line breaks - The
<code>tag is used to display preformatted text and code blocks where whitespace, line breaks, and indentation are preserved. It’s especially useful for larger code blocks where maintaining the original formatting is essential. This tag ensures that the code appears exactly as written in the source
Using monospace fonts and syntax highlighting
Code should be displayed using monospace fonts (e.g., Courier, Consolas) to ensure that each character takes up the same space, improving readability.
Tools like Prism.js, Highlight.js, or Google Prettify automatically apply syntax highlighting, making it easier for users to read code by color-coding different elements (e.g., keywords, strings, and variables). Learn more on Do you set the language on code blocks?
Tip: Consider scrollbars for long code blocks - When dealing with long code snippets, it's helpful to display them within scrollable containers to maintain page layout without overwhelming the reader.
<font face="Courier, Times, Arial, Verdana" size="3">public class Configuration { public static string MySetting { get; } }</font>❌ Figure: Figure: Bad example - Using `<font>` with a bad inline styling to display some code
<p>The function <code>console.log()</code> prints messages to the console.</p>✅ Figure: Figure: Good example - Using `<code>` for inline code snippets
<pre>function greet() {console.log("Hello, world!");}</pre>✅ Figure: Figure: Good example - Using `<pre>` for code blocks
Warning: Do not use auto-format (Ctrl-K, Ctrl-F) in Visual Studio when updating page with <pre> tags, or it will destroy all the code formatting. We have made a suggestion to Microsoft to fix this.
Do you use heading tags where appropriate (H1, H2, H3...)?
You should understand the hierarchy and try to use the heading tags (<H1>, <H2> or <H3>...) for titles and subtitles.
You should only use one H1 tag on a page. Search engines weight this heavily and can get confused by multiple main headings.
The following are benefits of using heading tags:
- Improves the ranking with the search engines (extra weighting is given to text in H1 and H2)
- Makes cleaner and leaner HTML
Note: It's also important to customize these headings via CSS, making the font bigger, bold or in a different color. This way page looks nice and organized.
<p><span class="Heading">Introduction</span>Lets chatter about...</p>❌ Figure: Figure: Bad example - Using span tags and CSS classes to insert headings to content
<h2>Introduction</h2>✅ Figure: Figure: Good example - Using heading tags
Do you design your website to improve your Google Ranking?
Google is by a country mile the most popular search engine in the world. It's popular because it seems to rank pages so accurately and quickly time and time again. The secret to its success is its top secret PageRank Algorithm. Google developed its page ranking system in an effort to increase the quality of search results and has left all of its competitors for dead. As a result search engine optimization (SEO) gurus are always looking to find new ways to increase their Google rankings.
As we all know, a website is a pretty nifty thing to have for a myriad of different reasons. But the truth is that it's worth is derived from the people that surf it, and if no one is surfing it, then it becomes useless. So who's the biggest website referrer? The answer is Google in almost every case.
Design your website with this in mind. In the eyes of a search engine, there are good and bad ways that you can design your website.
See more ways to improve your Google rankings and other search engine optimization tips.
Do you include Google Analytics in your website?
Google Analytics gives you a great insight into how, when and where your website is used. If you're not using an analytics package in your website, you're flying blind when it comes to understanding how, when and where your website is used.
By using Google Analytics, you will be able to see what your visitors are viewing and what they aren't, what they spend large amount's of time on, what pages are causing errors, what pages are directing visitors to you, which browsers and devices are being used to see your site and more. All this information help you better structure your site to what your visitors like. It also allows you to compare site traffic from one month to another.
The most useful reports:
- Which are the most popular pages of your website
- Which sites are referring the most hits to you
- Which keywords are bringing users to your site
- If you have downloads, which are the most popular
To add Google Analytics to your website:
- Go to Admin ,
- Ensure both Account and Property
- Specify your website details,
- Find your Tracking Code,
- And add the script to your website
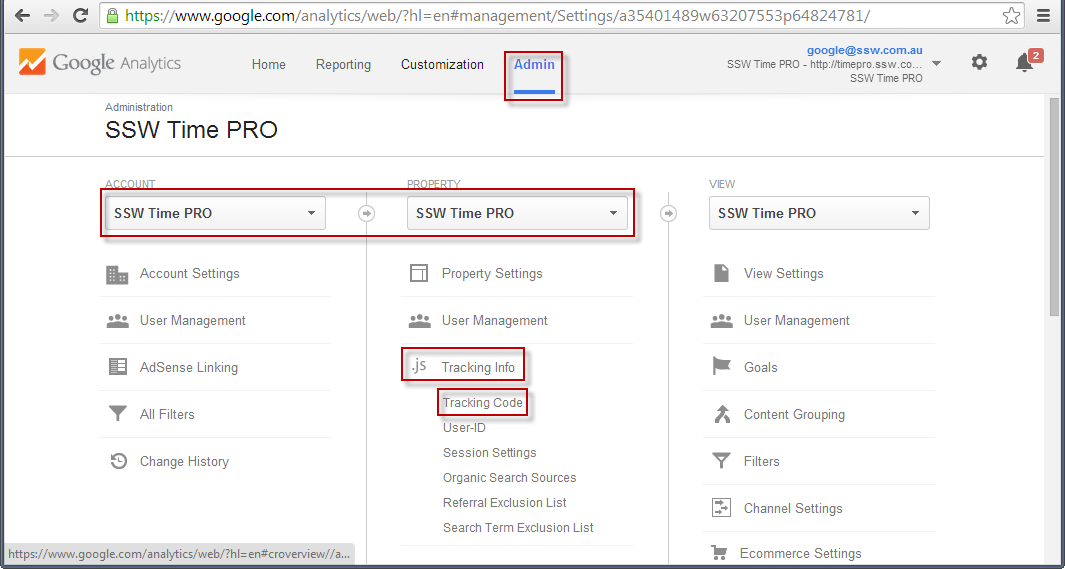
Figure: Navigate to the Tracking Code property
From this page, you will be able to get a JavaScript snippet to include in your application.
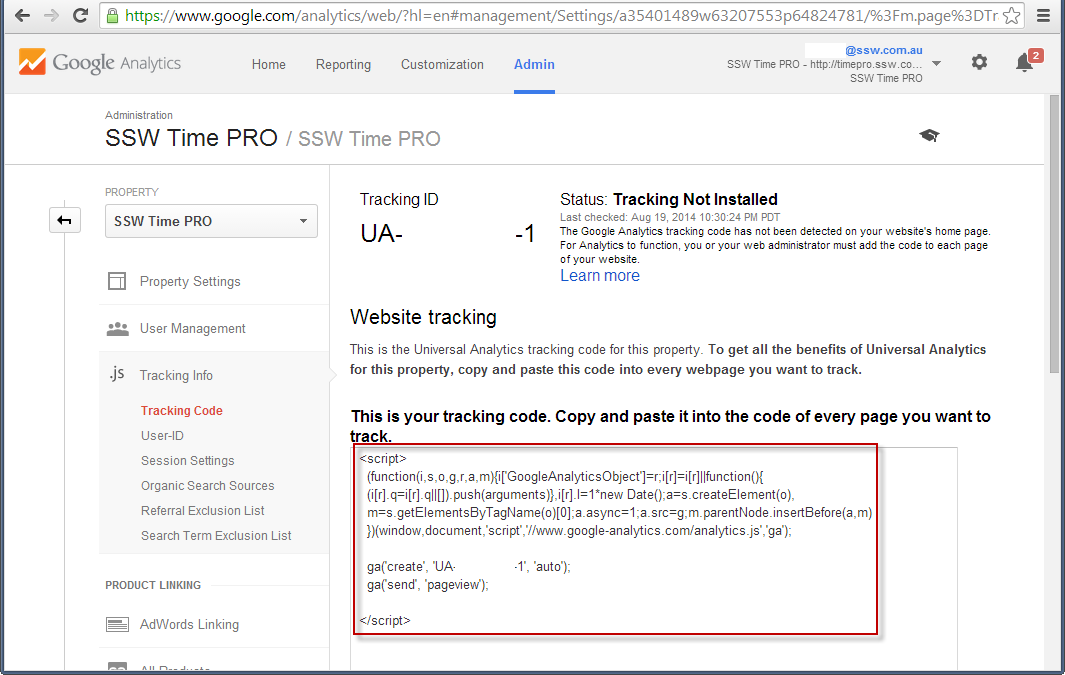
Figure: Include this JavaScript in your web application
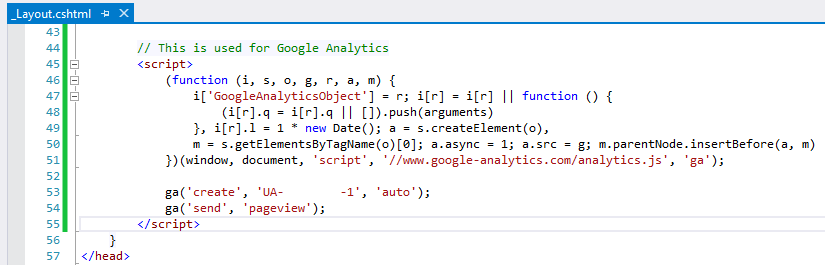
Figure: The JavaScript code in HTML
Once deployed, this script will start tracking metrics and interacting with Google Analytics.
You are good to go!
Adding Google Analytics to your blog
Using the above instructions, you can add Google Analytics to any website, including any blog. However, you may also find that your blogging platform or theme provides a way to set up Google Analytics using a plugin or other simple approach. Check your theme's documentation - sometimes it's as simple as adding the tracking code to configuration. Of course, adding the above JavaScript is easy enough in any case.
Do you make your site easy to maintain?
If you have database driven pages on your website, you need a way of updating the data quickly and easily. Each page should have an 'Edit' link - only visible when the site is running internally or in administrator mode - that takes you directly to the page for editing the content on that page.
The exception to this is if you are using open-source data. SSW.People is a good example of this.
Figure: "New" and "Edit" links allow SSW Employees to maintain testimonial entries easily
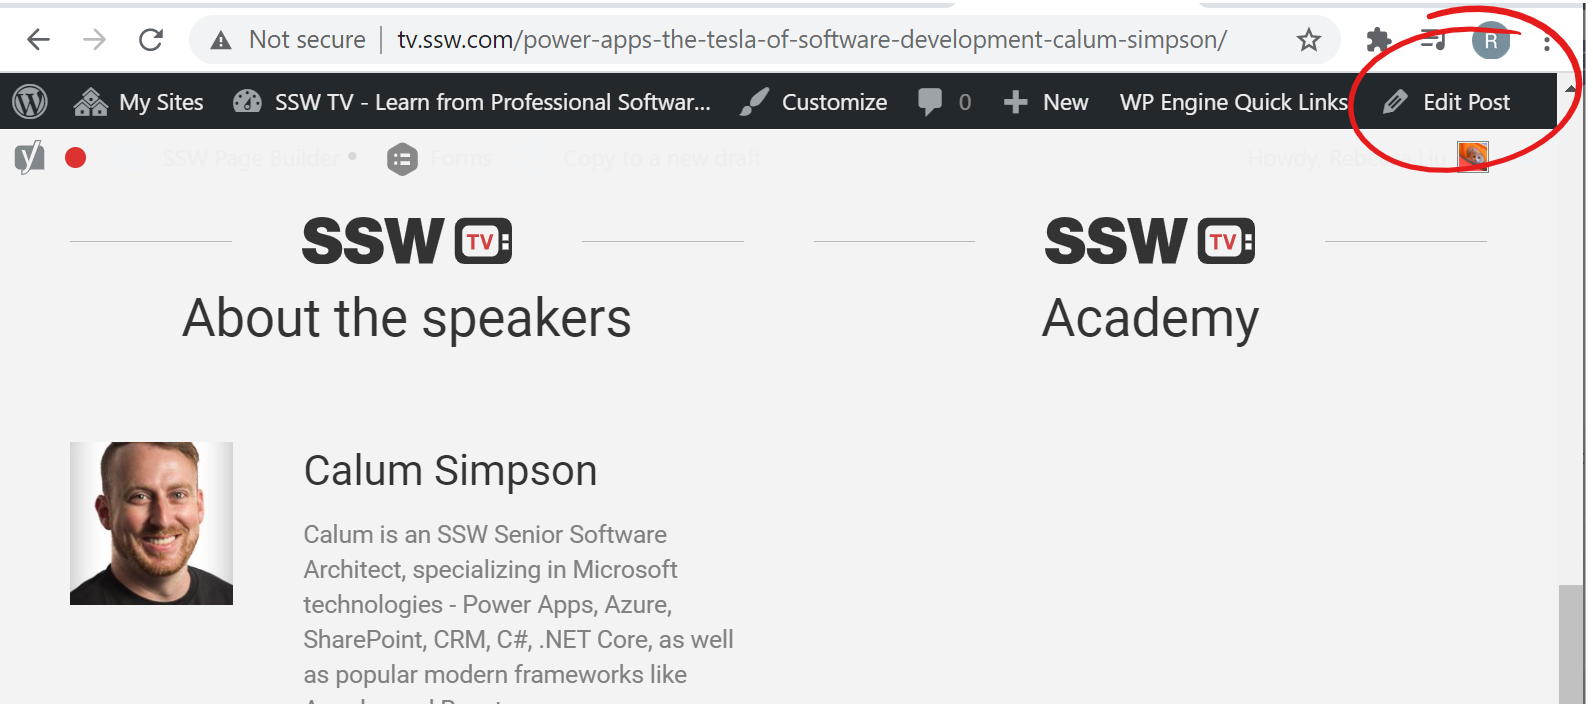
Figure: "Edit" button on WordPress admin bar
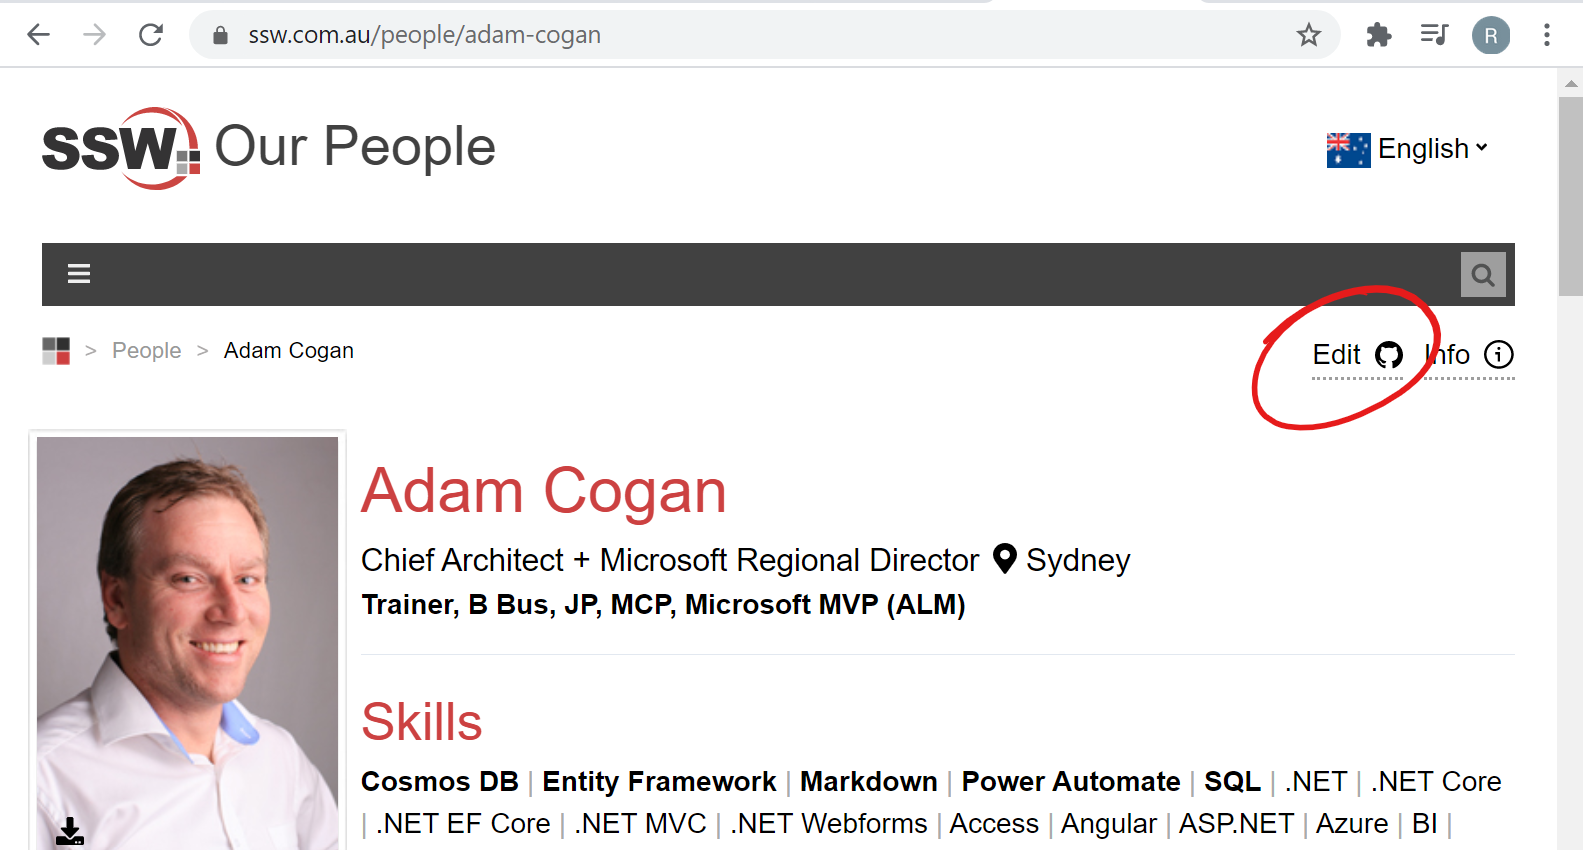
✅ Figure: Good Example - "Edit" button on an Open Source page
From Github, you can edit and submit a pull request. See https://github.com/SSWConsulting/SSW.People.Profiles/wiki (SSW People) or https://github.com/SSWConsulting/SSW.Rules.Content/wiki (SSW Rules) for more details.
This is better than sending a 'Change from X to Y' email as the work can be done immediately with less work and management requirements.
Do you streamline your development process with NPM and Task Runners?
The current trend in web development is to use a large range of front-end libraries to give a great user experience.
However, .NET devs know it is no easy task to manage all of these on top of a large script folder. Previously we tried to improve and streamline the process by using NuGet, but found this package manager was ill-suited.
Another issue was that due to the requirement of checking the library’s files into source control, this has the potential to grind fellow devs to a halt while Visual Studio tries to make sense of the myriad of small JavaScript files. Furthermore, there were many smaller tasks that needed to be completed, such as minification and bundling. In the older versions of Visual Studio, a large portion of these tasks had be performed manually by the developer.
Needless to say, however a developer could try to tackle this task, it was always a challenging and time consuming endeavour.
Enter Visual Studio 2015 with NPM (Node Package Manager) in-built. This package manager has been built from the ground up to make downloading your JavaScript libraries simple. These tools existed outside of the .NET space, but in 2015 they’ve been brought into the fold and made easy to use in Visual Studio 2015.
With NPM, we specify the name of the package and the version number we want to use, and the tool does all of the hard work finding and downloading the library. Because NPM is run on each developer’s machine, libraries are no longer added to source control. Rather, they are quickly downloaded from the trusted NPM CDN.

Figure: Example of NPM in action
Working in tandem with NPM are task runners, which are JavaScript tools that can be used to add automation to your project by having them perform simple yet tedious tasks that are required to get your libraries ready for use, such as compilation, linting, and minification. Just use NPM to install the task runner of your choice, and away you go.
There are a heap of different task runners out there, the two best known are Gulp and Grunt.

Figure: In short they both perform the same job but Gulp is faster and requires less configuration
For example, we could previously use web essentials to do a lot of the necessary bundling and automation, but this was killed off at the start of 2015.

Figure: The updated feature list for Web Essentials 2015
This key feature was removed, but with the addition of tasks runners to Visual studio 2015 we can reimplement the functionality, by using ether Gulp or Grunt. For a number of reasons, Gulp is the better choice over Grunt: seen below is an example of a task for Gulp that will compile
.lessto.css.var gulp = require("gulp");var less = require("gulp-less");var path = require("path");var plumber = require("gulp-plumber");gulp.task("less", function () {return gulp.src("./Content/**/*.less").pipe(plumber()).pipe(less({paths: [path.join(__dirname, "less", "includes")],})).pipe(gulp.dest("./content/"));});Source: Gulp 101 - Getting LESS Up and Running in Visual Studio 2015
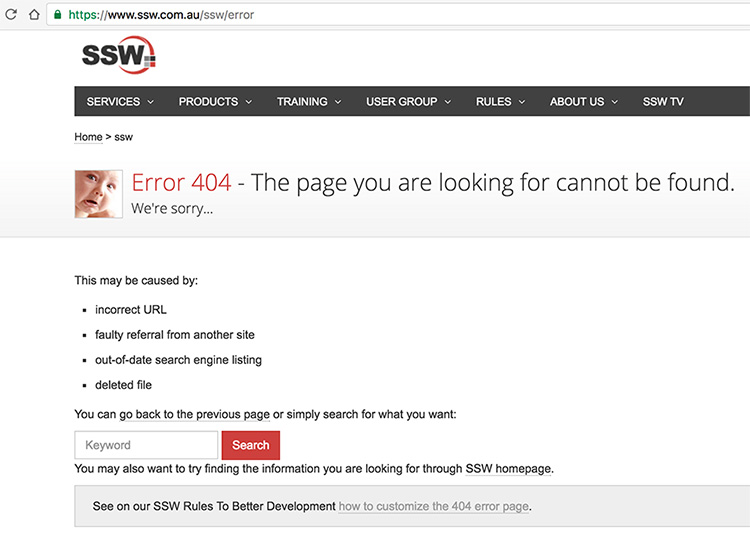
Do you have a useful 404 error page?
Error page, you say? But you worked so hard to make sure everything runs perfectly! The thing is, even the best sites aren’t immune to the occasional misstep. Sometimes users just type a URL wrong. It happens.
A well-designed custom error page encourages surfers to remain in your site and help them to the right page. Although it's possible to redirect error codes straight to your homepage, that doesn't tell visitors what's going on.
A branded 404 (error) page also reinforces your identity and keeps the user experience consistent, even when things go wrong. It shows professionalism and helps maintain trust.
Consider adding a button to your homepage here, or your site's search functionality if applicable.
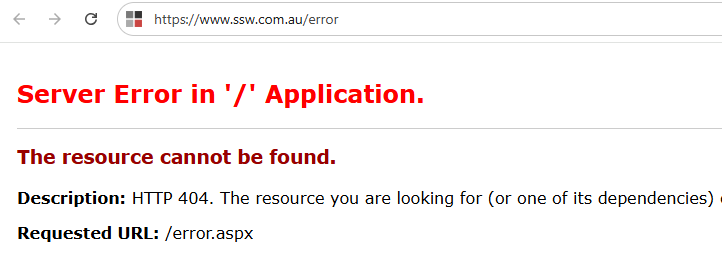
❌ Figure: Bad example - Unhandled error
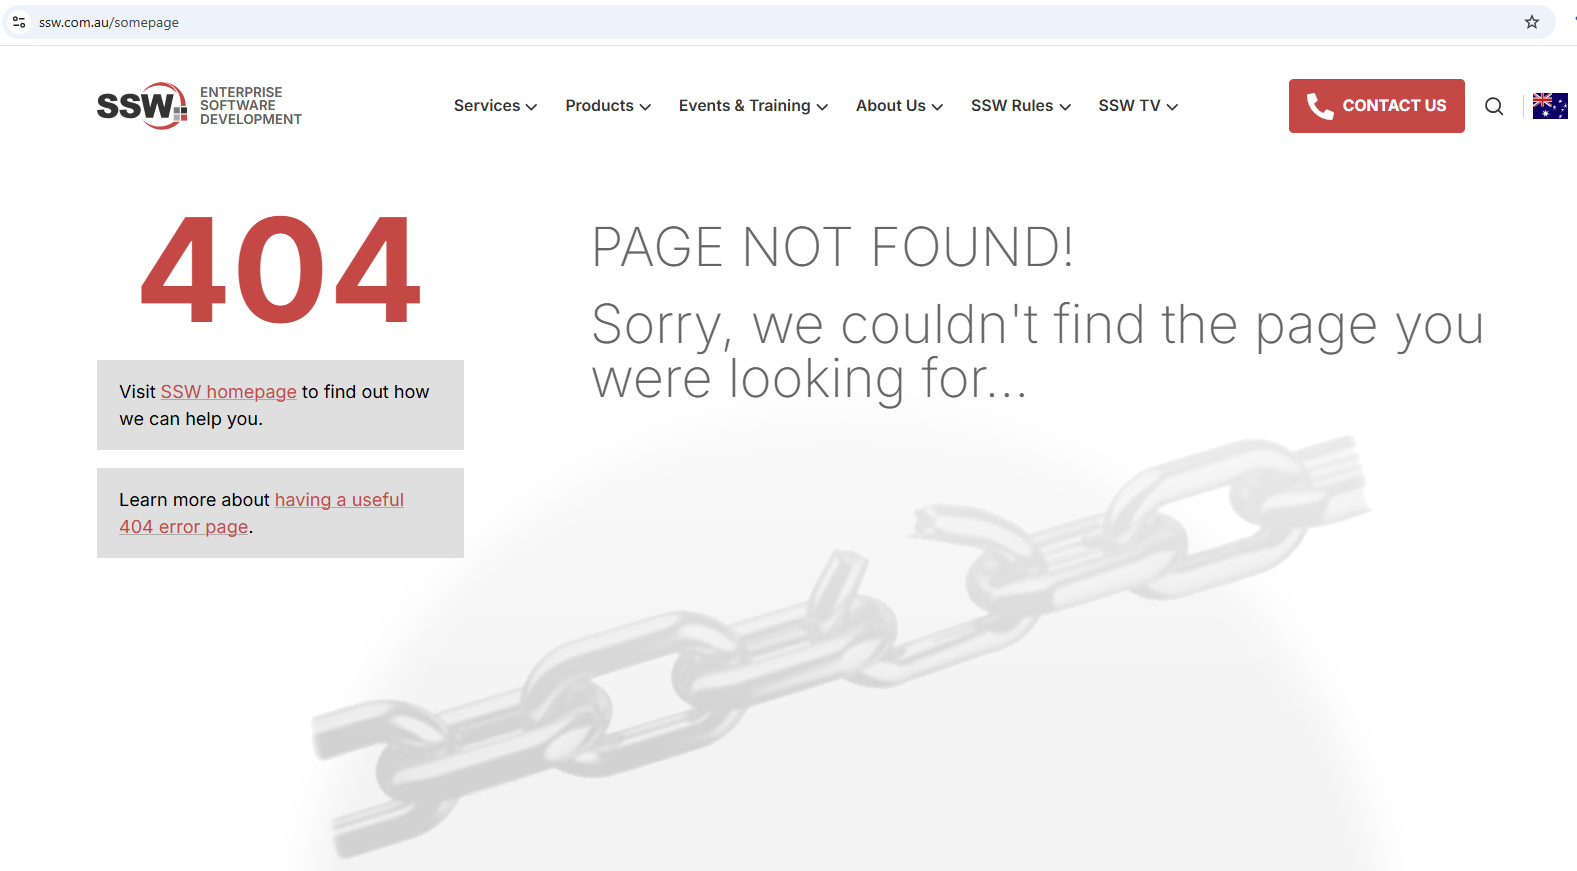
✅ Figure: Good example - Custom error page

✅ Figure: Good example - Playful branding turns an error case into a less negative experience
.NET Core (Server-Side)
var builder = WebApplication.CreateBuilder(args);var app = builder.Build();if (!app.Environment.IsDevelopment()){// Turn on error handling middlewareapp.UseExceptionHandler("/Error");}// Use status code page routes (eg. /Error/404, /Error/500)app.UseStatusCodePagesWithReExecute("/Error/{0}");// Turn on routingapp.UseRouting();// Map your endpointsapp.MapGet("/Error/{statusCode}", async (HttpContext httpContext, int statusCode) =>{// Preserve the status code in the responsehttpContext.Response.StatusCode = statusCode;if (statusCode == 404){// Return a custom "404 Not Found" responsehttpContext.Response.ContentType = "text/html";await httpContext.Response.WriteAsync("<h1>Sorry, we couldn’t find that page.</h1>");}else{// For other status codes, return a generic errorhttpContext.Response.ContentType = "text/html";await httpContext.Response.WriteAsync($"<h1>An error occurred (status code: {statusCode}).</h1>");}});// Any endpoint mappings or other middlewareapp.MapGet("/", () => "Hello World!");app.Run();✅ Figure: Figure: Good example - Wildcard routing of unrecognised paths
Angular (Client-Side)
Inside your Angular project you can update the app-routing module to catch any unrecognised paths
import { NgModule } from '@angular/core';import { RouterModule, Routes } from '@angular/router';import { HomeComponent } from './home/home.component';import { NotFoundComponent } from './not-found/not-found.component';const routes: Routes = [{ path: '', component: HomeComponent },// ... your other routes here ...{ path: '**', component: NotFoundComponent } // wildcard route];@NgModule({imports: [RouterModule.forRoot(routes, { useHash: false })],exports: [RouterModule]})export class AppRoutingModule { }✅ Figure: Figure: Good example - Wildcard routing of unrecognised paths
<!-- not-found.component.html --><div class="not-found"><h1>404 - Page Not Found</h1><p>We’re sorry, but we couldn’t find the page you requested.</p><a routerLink="/">Go back to Home</a></div>✅ Figure: Figure: Good example - The custom 404 html page
React.js (Client-Side)
import React from 'react';import { BrowserRouter as Router, Routes, Route } from 'react-router-dom';import Home from './Home';import NotFound from './NotFound';function App() {return (<Router><Routes>{/* Your valid routes: */}<Route path="/" element={<Home />} />{/* Add other valid routes here */}{/* "Catch-all" or wildcard route for anything that doesn't match */}<Route path="*" element={<NotFound />} /></Routes></Router>);}export default App;✅ Figure: Figure: Good example - The custom 404 pages
ASP .NET
<customErrors mode="Off"></customErrors>❌ Figure: Figure: Bad example - The default code on web.config
<customErrors mode="RemoteOnly" defaultRedirect="/ssw/ErrorPage.aspx"><error statusCode="404" redirect="/ssw/SSWCustomError404.aspx"></customErrors>✅ Figure: Figure: Good example - The custom code in the web.config
For ASP.NET website, the detailed information would be presented to the remote machines when an unhandled error occurs if the customErrors mode is off.
This error information is useful for the developer to do debugging. However, it would leak out some confidential information which could be used to get into your system by the hackers. We can assume that if a SQL exception occurs by accident, which may expose database sensitive information (e.g. connection string; SQL script). So, to prevent these leaks, you should set the "mode" attribute of the tag <customerrors> to "RemoteOnly" or "On" in the web.config file and create a user-friendly customized error page to replace the detailed error information.
<customErrors mode="RemoteOnly" defaultRedirect="GenericErrorPage.htm"></customErrors>✅ Figure: Figure: Good example - Turning on "customErrors" protects sensitive information against Hacker
Do you avoid changing the URL on a 404 error?
When you request a URL of a file that doesn't exist, you will get an error message. You should make sure that the URL in the browser doesn't change. This way, it's easy for the user to correct.
E.g. The user doesn't have to retype the whole URL if there is a spelling mistake or a forgotten/mixed up letter.
In ASP.NET you are allowed to define a custom error page. When a user tries to access a URL which doesn't exist, ASP.NET changes the URL and redirects to the custom error page. The original URL is passed as a parameter to the new URL.
Note: This is for ASP.NET, not ASP.NET Core, the newer iteration handles this situation in a more user-friendly manner by default.
The advantage of this solution is, that the page looks nice and you can customize it according to the design and layout of your whole site.
The disadvantage is, that ASP.NET changes the URL. So if the user wants to correct the URL they entered, for example, because they just mixed up a letter, then this means quite a lot of work for them. They have to retype the whole URL or at least copy and paste the parameter out of the new URL. This is very uncomfortable for the user.

❌ Figure: Bad example - URL changes
Our solution is to show the customized error page while not change the original URL. So if the user wants to do any corrections, e.g. a mixed up letter, they can do that by just editing the URL in the address bar. The advantages of this solution are, that the site looks nice and matches the design of the whole site and that the user can easily change the original URL they typed.
You can try any page name that doesn't exist like xxx.asp on the URL and it will open our 404 error page. The original URL is not changed in the address bar. It should look like this:
✅ Figure: Good example - Customized 404 error page without change the URL
To show the customized error page while not change the original URL, you can use Server.Transfer() to keep the original URL.
Server.Transfer("/ssw/ErrorPage.aspx")Figure: Custom error page handler in Global.asax
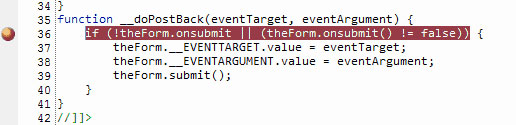
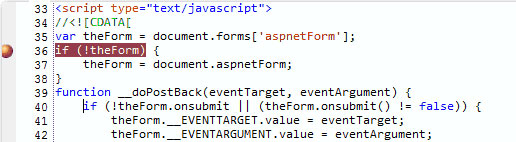
Do you always put JavaScript in a separate file?
ASP.NET injects many lines during page rendering, so if you are using inline JavaScript, the line numbers will change during client side JavaScript debugging in VS.NET, FireBug or IE8 developer Tools.
❌ Figure: Bad Code - Using Inline JavaScript
❌ Figure: Bad Code - On PostBack Line numbers are changed for Inline JavaScript
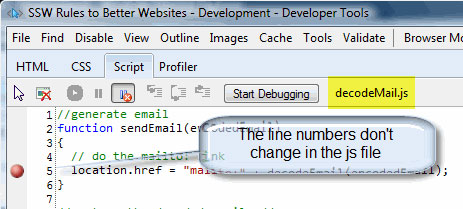
✅ Figure: Good Code - Using JavaScript on Separate file
So you should always put JavaScript in a separate file. Then the line numbers will stay consistent during debugging. Keeping JavaScript in a separate file is also good for production as it improves performance due to browser caching.
Note: During development, remember to hit CTRL-F5 to force the browser to re-fetch the files from the server or you may be debugging old version of the JavaScript file.
Do you always use query strings?
When you build a web application, any dynamic page you think a user may wish to bookmark directly should be controlled through query string values rather than form values. In other words, search mechanisms should use the HTTP GET Request and Querystring values, rather than a POST with Form values. This allows:
- Bookmarking of the pages
- Gives the user to the ability to change the query string values in the address bar, rather than having to go back to the input form.
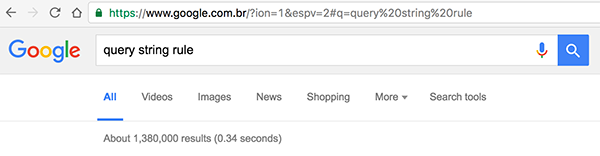
✅ Figure: The URL should always have all the parameters the user enters. Here Google is a good example
You may hear that query strings are bad and they leave you wide open to SQL Injection Attacks (especially when you use SQL statements in the URL). I don't subscribe to the security issues being the determining factor... if I am determined enough, I can write a little application to send POST data to the webpage instead of in the query string. Both methods are open to SQL injection and invalid parameters, so you need to code to prevent that either way.
The bottom line is that if you are not giving appropriate parameters in the query string then you are reducing functionality.
Note: We all agree bookmarks are useful - it's the same for query strings.
Do you optimise your website favicon?
Favicons are more than just a single icon, and they require proper optimisation to display correctly on all devices.
What is a Favicon?
Favicons are most commonly used to display a custom icon on a browser tab, but they can also be used to alter the display of your website in other cases such as Android, iPhone, Windows, and Mac icons.
How to Check Your Favicon
Even if your website has a favicon, it may not be fully compliant. You can use realfavicongenerator.net to check your website.
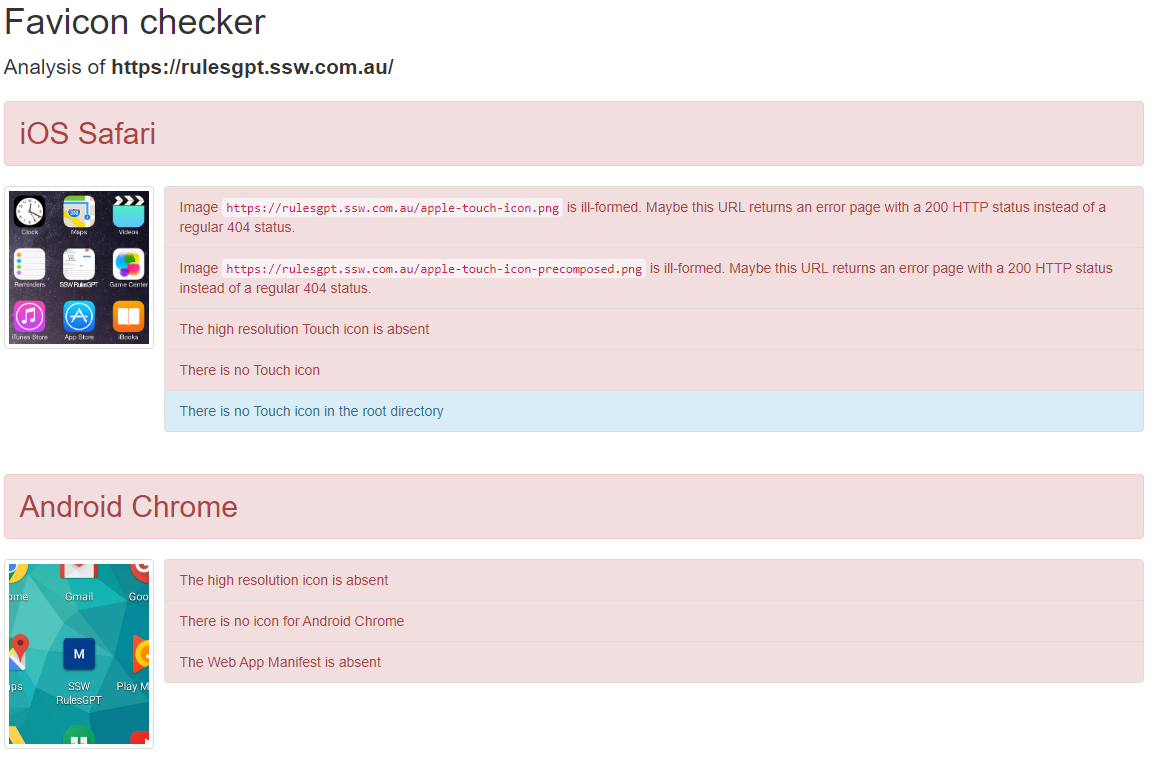
❌ Figure: Bad example - Favicon does not display properly on all devices
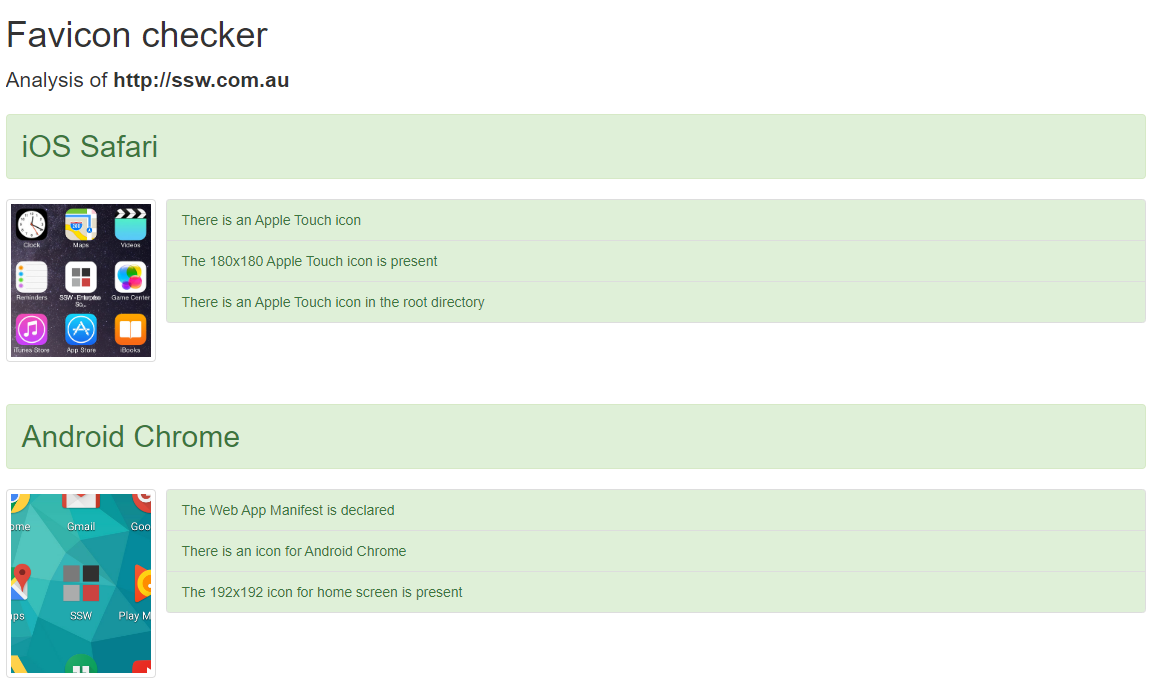
✅ Figure: Good example - Favicon displays properly on all devices
How to Update Your Favicon
realfavicongenerator.net also has a favicon generator that you can use to generate a set of icons and meta tags from a single image.
The site will guide you through all the settings and display a preview of how your favicon will look on each device.
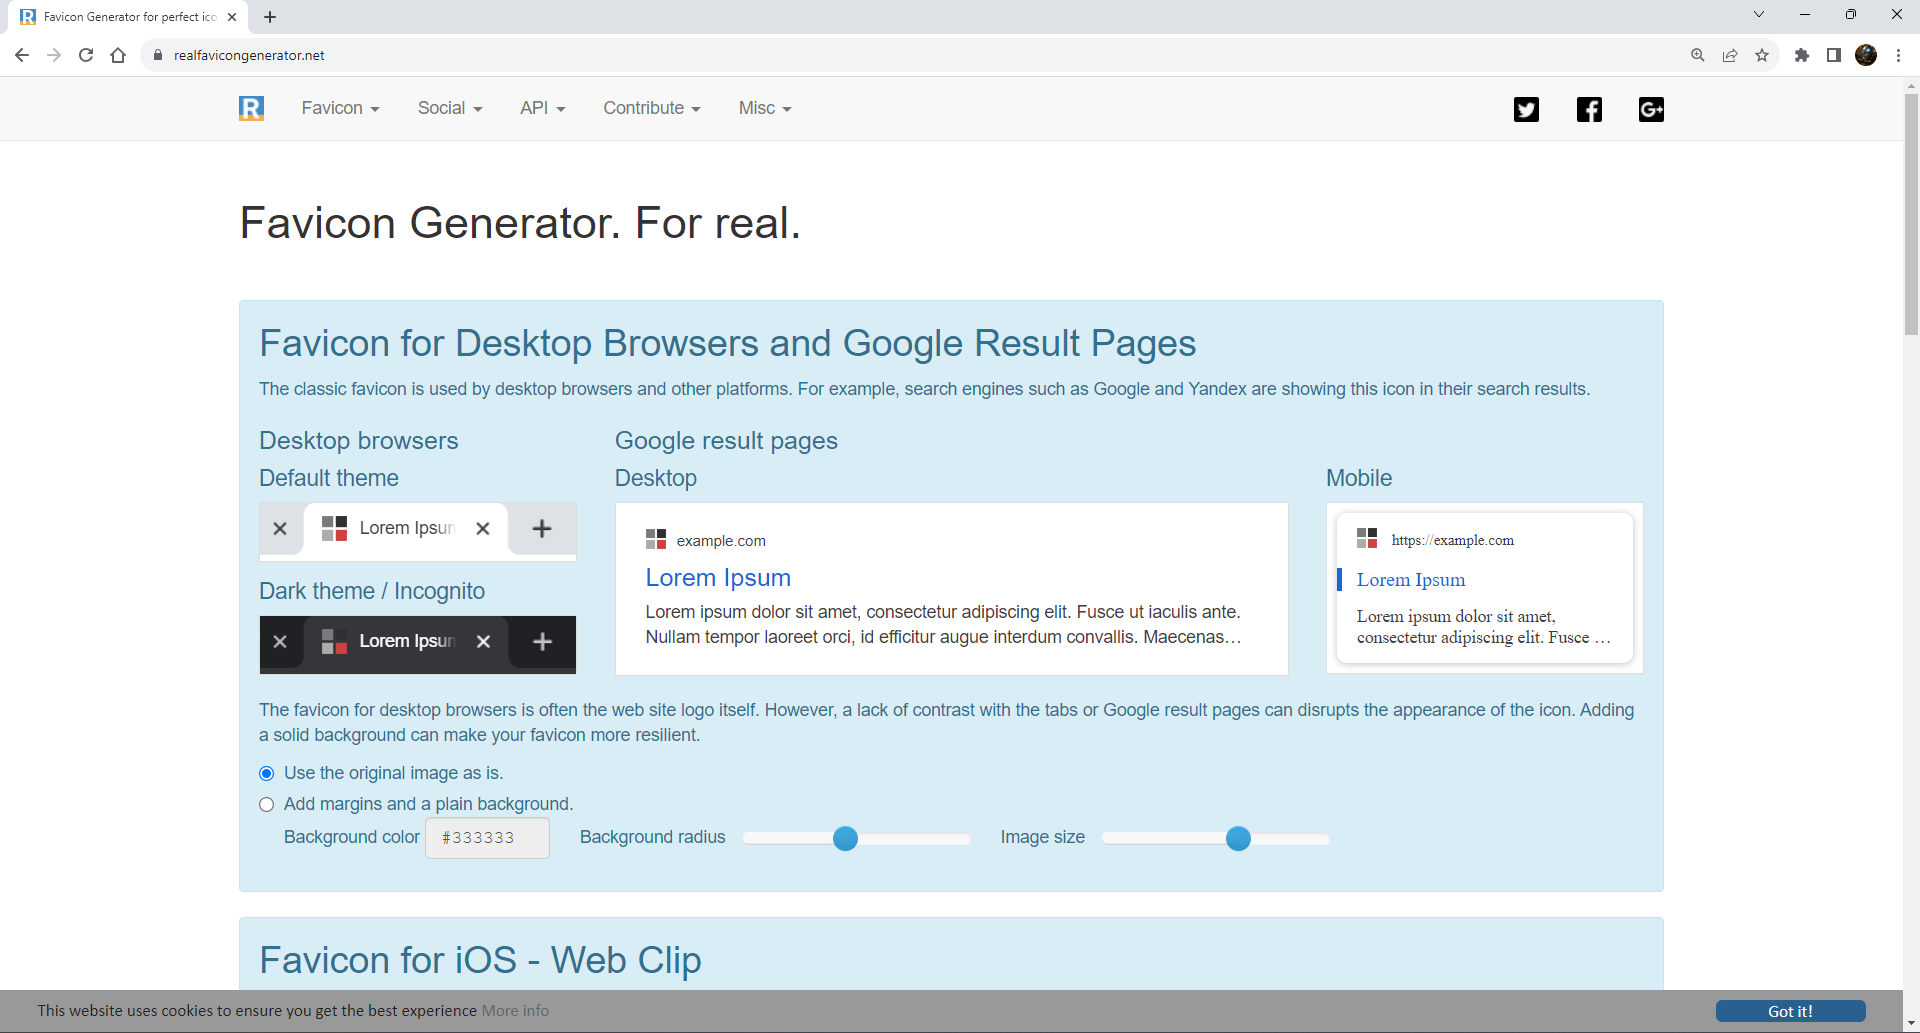
Figure: Choosing our favicon settings
Once you're happy with how it looks, click
Generate your Favicons and HTML codeand you will be given instructions on how to install your new favicon with a number of popular technologies, such as HTML5, ASP.NET Core and NodeJS.Do you avoid deploying source code on the production server?
When you are deploying an ASP.NET project (no matter it's a website or a Web application), do not copy all files of this project to the production server because source code will be deployed during this simple copy and it makes easier for others to access or tamper the source code of your site.
Instead, please use 'Publish' utility to deploy your website or Web application. This utility can remove the source code from the site.
1. Website Project
Publish Website dialog box is designed to precompile and deploy your website to a new location (whatever it is, ftp://, http:// or drive:\path). During the deployment, source code are removed automatically. Besides, the precompilation process finds any compilation errors and identifies the errors in the configuration file.j
To access this dialog box, please open a website that you want to deploy and click Build menu, then click Publish Website .
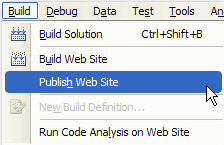
Figure: How to open Publish Website dialog box
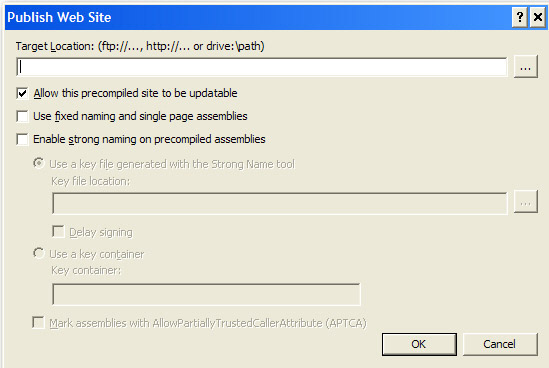
Figure: Publish Website dialog box
See more about Publishing Websites.
2. Web Application Project
The Publish Web dialog box enables you to build and publish a Web application project to a new location. Like Publish Website dialog box, this utility can remove source code. However you have to select Only files needed to run this application to specify it. Other benefit of this utility is that potential errors and compile-time errors in the Web.config file and in other non-code files can be found.
To access this dialog box, open a Web application project that you want to publish and click Publish ApplicationName on the Build menu.
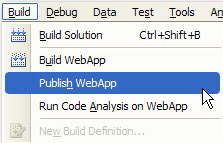
Figure: How to open Publish Web dialog ('WebApp' is the name of this application)
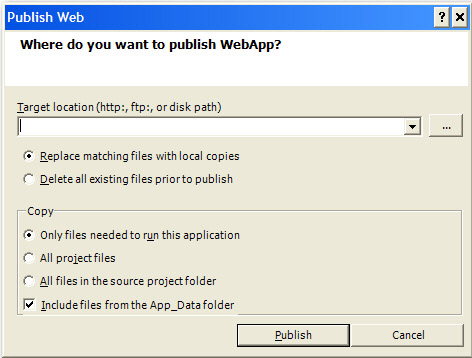
Figure: Publish Web dialog box
See more about How to Publish Web Applications.
Do you avoid using UNCs in HREFs?
Initially, errors of this nature would be picked up in the link checking utility. However, that is not the case because the link checker will not report any problems if you run it locally - which is the normal method.
The reason it won't see the problems is because the link checking utility does not check hard coded links to local servers (e.g. localserver/ssw/Default.aspx). Therefore, it is testing a page that will exist internally, but the page will not exist when uploaded to the web (e.g. ssw.com.au/ssw/Default.aspx).
<a href="//ant/ssw/LookOut.htm"></a>❌ Figure: Bad example
<a href="/ssw/LookOut.htm"></a>✅ Figure: Good example
Do you check if your website is running?
If you want to know your website is working or not, you need to add a ping check to the machine also an HTTP Content Scan to the website in WhatsUp. We use WhatsUp to do real-time monitoring. Follow these steps to check your website in WhatsUp:
- Add your website as a new device.
Figure: New device
- Ping monitor is added automatically.
Figure: Ping monitor
- Add an HTTP Content Scan monitor.
Figure: HTTP Content Scan
- Edit the scan script. In the script, you can see 2 keywords "Send" and "Expect". "Send" expression is an HTTP request to your website. "Expect" expression is a regular expression to check the key word in response from your website.
Figure: Edit scan script
- Add the monitor to your device.
Figure: Add monitor
Once a device is down or up, a WhatsUp action will tell SQL Reporting Services to send out a notification report. Our report looks like this:
Figure: Website doesn't work

Figure: Website works
Do you have a PWA (Progressive Web App)?
Progressive Web Apps have transformed the mobile web practices to provide a native app like experiences for the users. They work just like native apps and include features such as smoother navigations, offline modes and push notifications, but are much more economical and do not use the device storage.
Progressive Web Apps are reliable which means they load instantly and the performance isn't compromised even if the network is shaky.
On the mobile the 'Add to homescreen' option can be used to create an icon on you phone.
PWAs also account for higher user engagements and conversions which is probably why many organizations are now adapting this technology to grow their businesses.
In order to be a PWA, your app should:
- Use a responsive design - So it works on desktop or mobile
- Be fast - Use a service worker to precache the app resources (HTML, CSS, JavaScript, images) needed to run, and cache the data at runtime to improve performance
- Be installable - Use a web app manifest and the beforeinstallprompt event to notify the user that it is installable
Examples of Progressive Web Apps can be seen at 10 Best Progressive Web Apps.
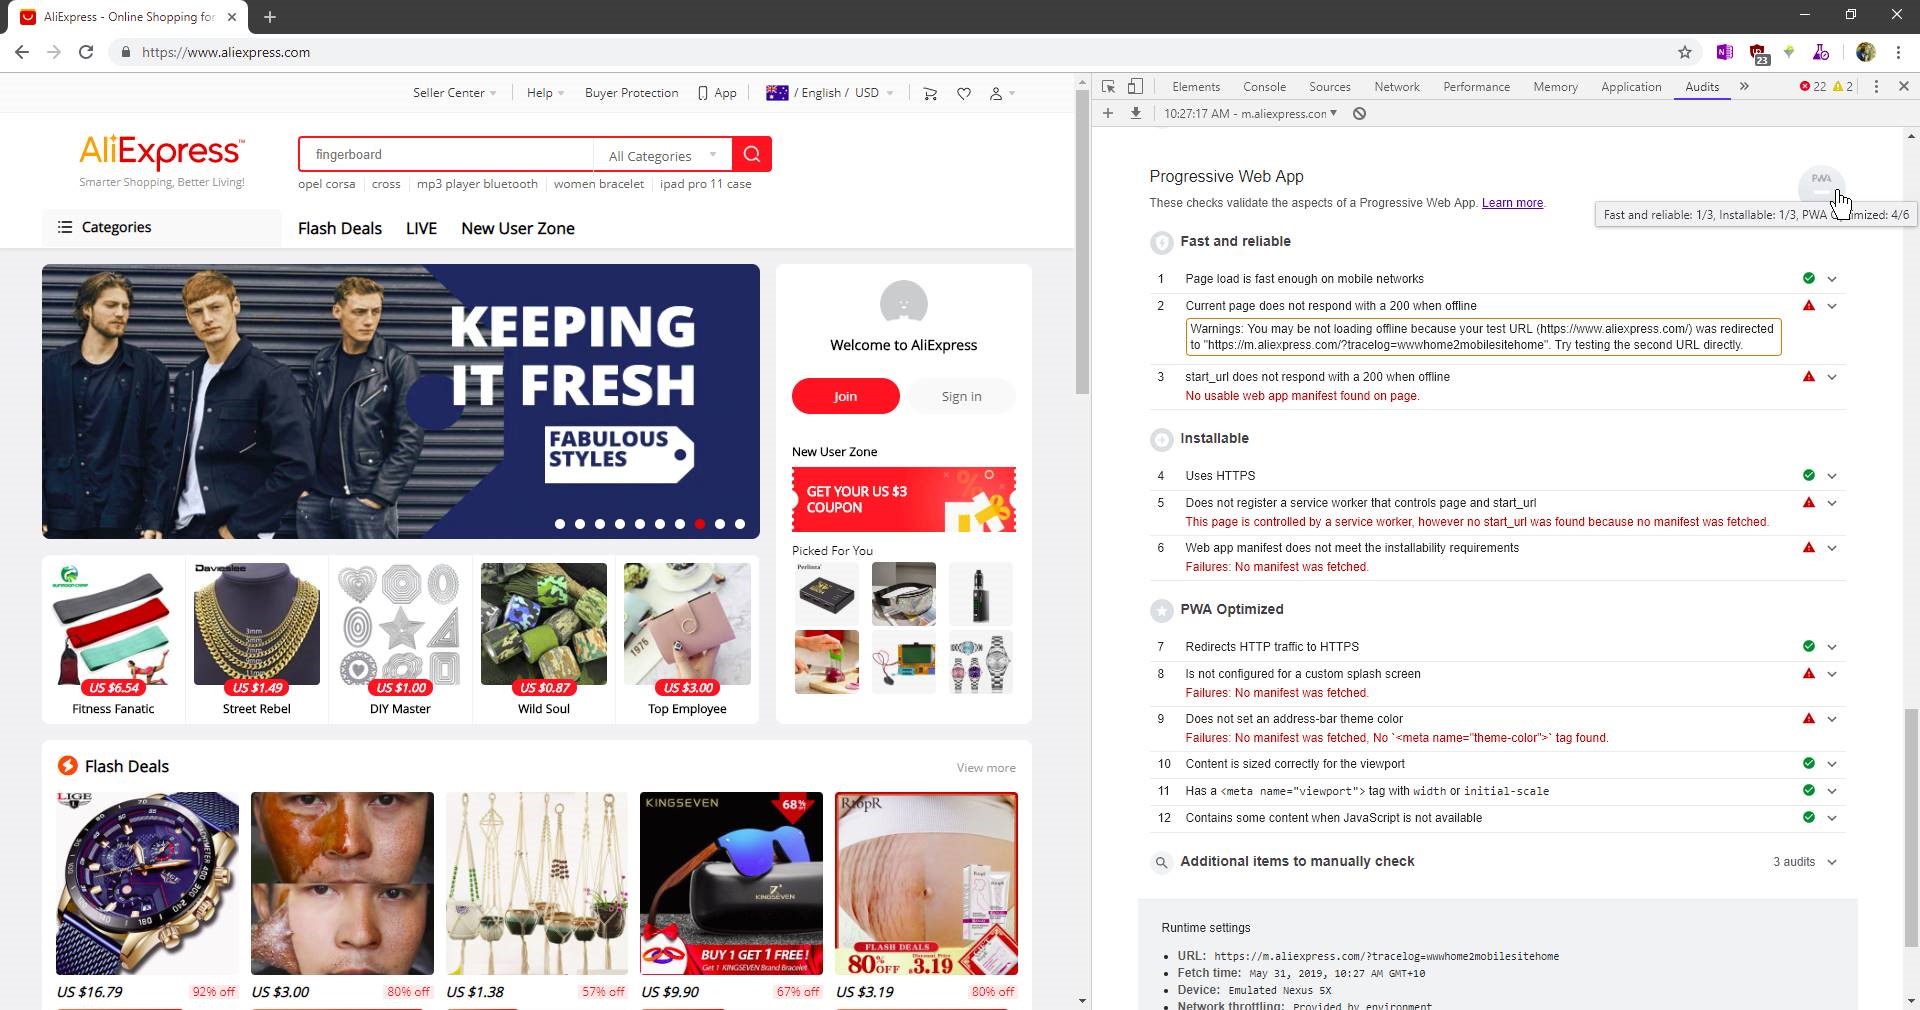
❌ Figure: Bad example - Aliexpress get a mark of 6/12 (see tooltip) and cannot be used as a PWA
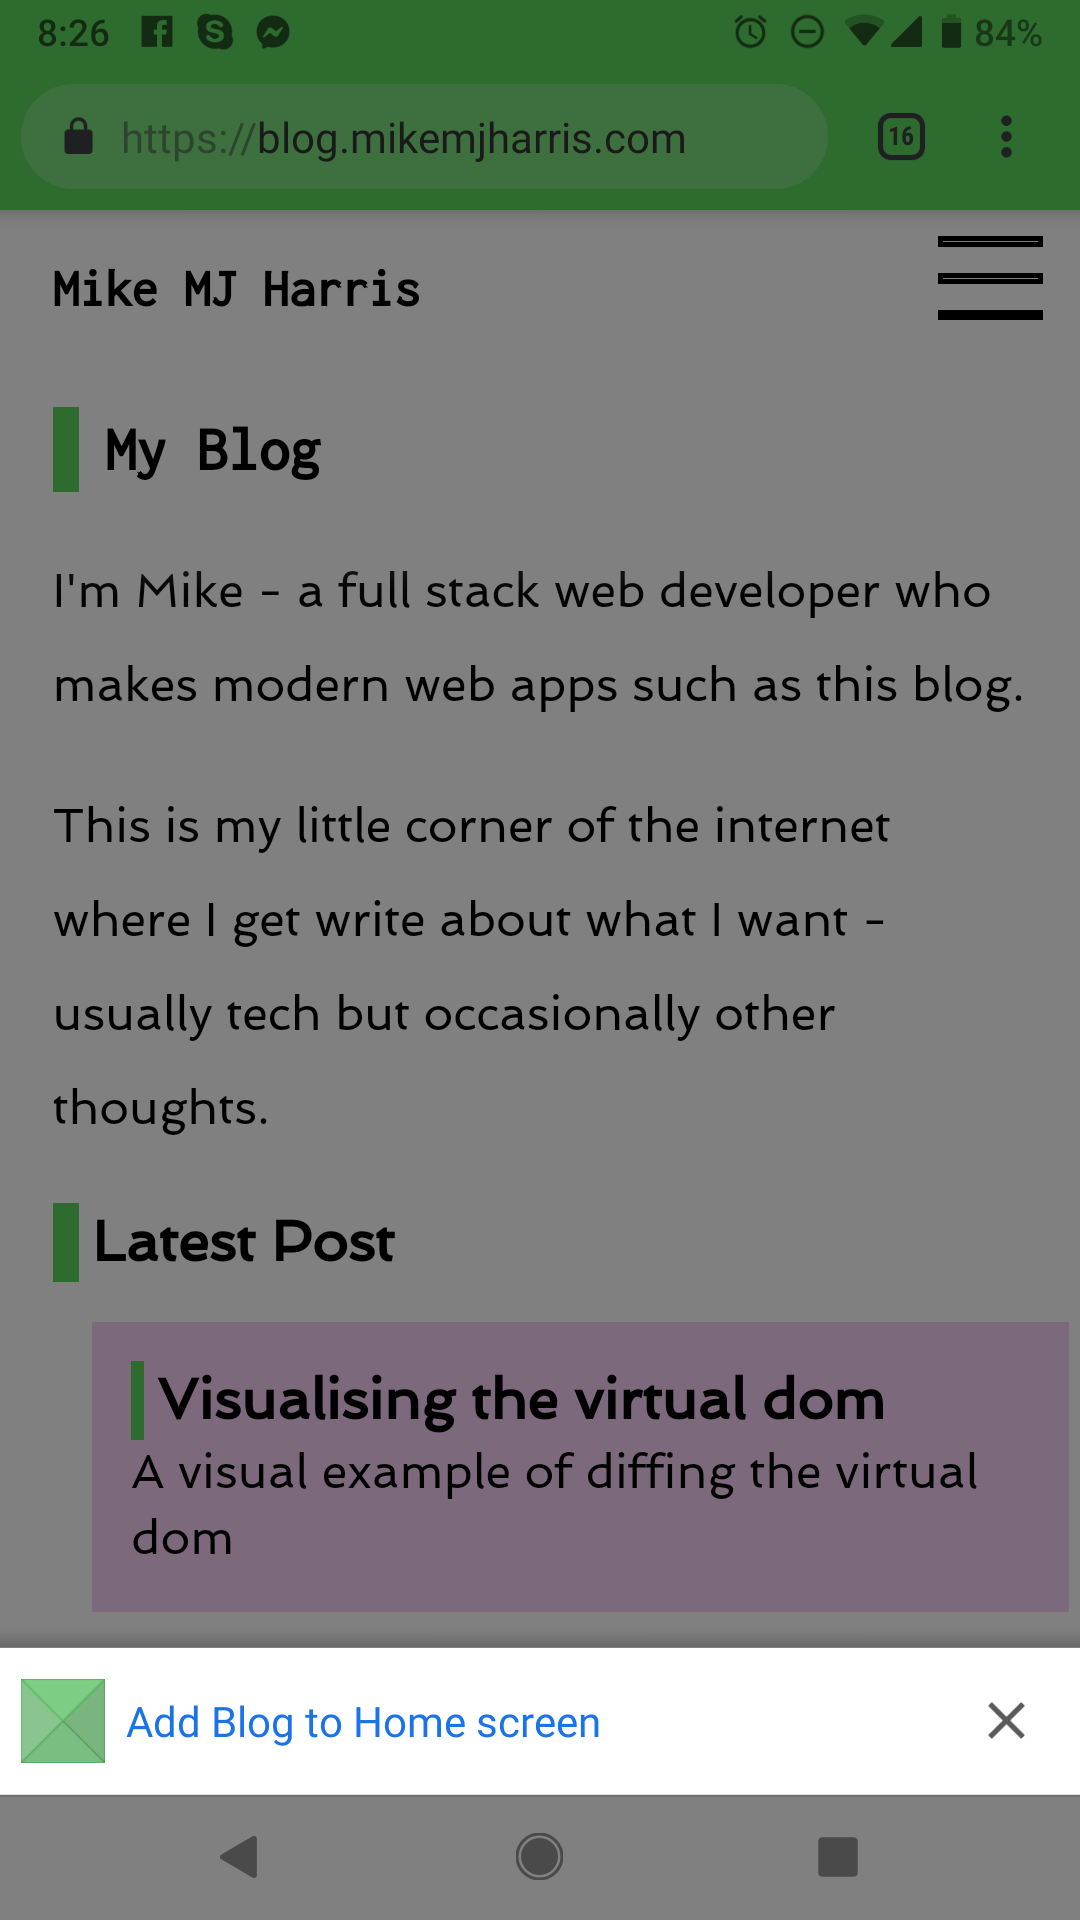
Figure: Accessing a PWA on your mobile will prompt adding it on your Home screen. E.g. https://blog.mikemjharris.com
You can check the Progressive Web App score of your application using Chrome's Developer tools.
Note: See how to generate a PWA report on Run Lighthouse in Chrome DevTools.
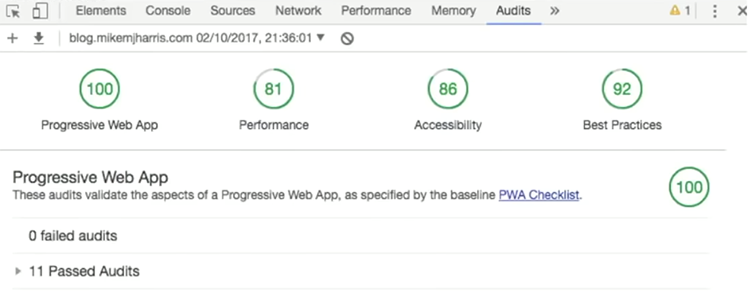
✅ Figure: Good example - Aim for a good Progressive Web App score
Do you use dynamic viewport units?
In today's mobile-first era, ensuring your website looks great on all screen sizes is crucial.
On mobile devices, viewport sizes fluctuate due to dynamic toolbars like address bars and tab bars, causing elements to potentially overflow beyond the viewport.
To address this issue, the CSS Working Group introduced dynamic viewport units (like dvw, dvh, dvi, dvb, dvmin, dvmax).
Implementing these units into your website allows it to be responsive across desktop and mobile platforms.
Dynamic viewport units are compatible with every browser and is even supported in popular CSS frameworks like Tailwind CSS (as of v3.4)
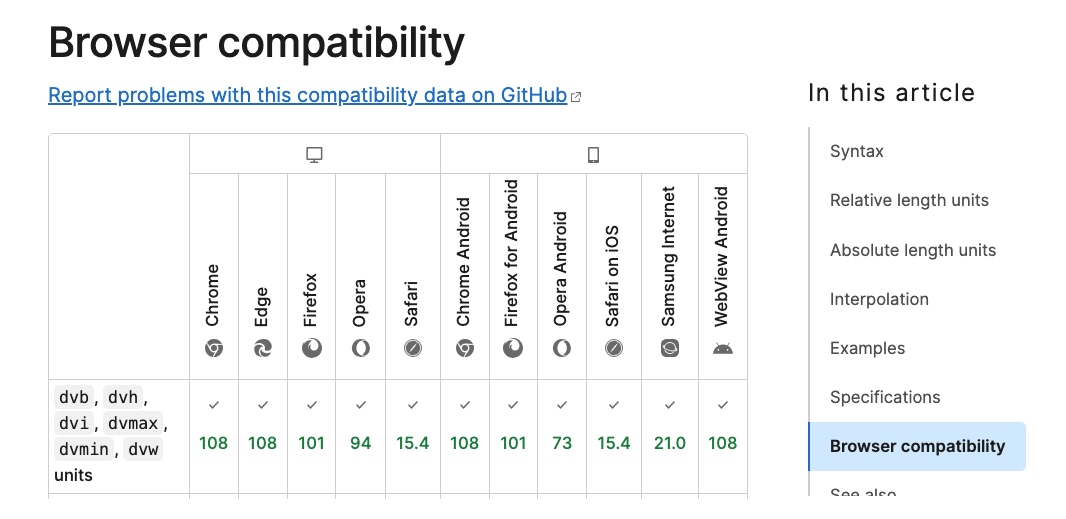
Figure: Browser compatibility list for dynamic viewport units
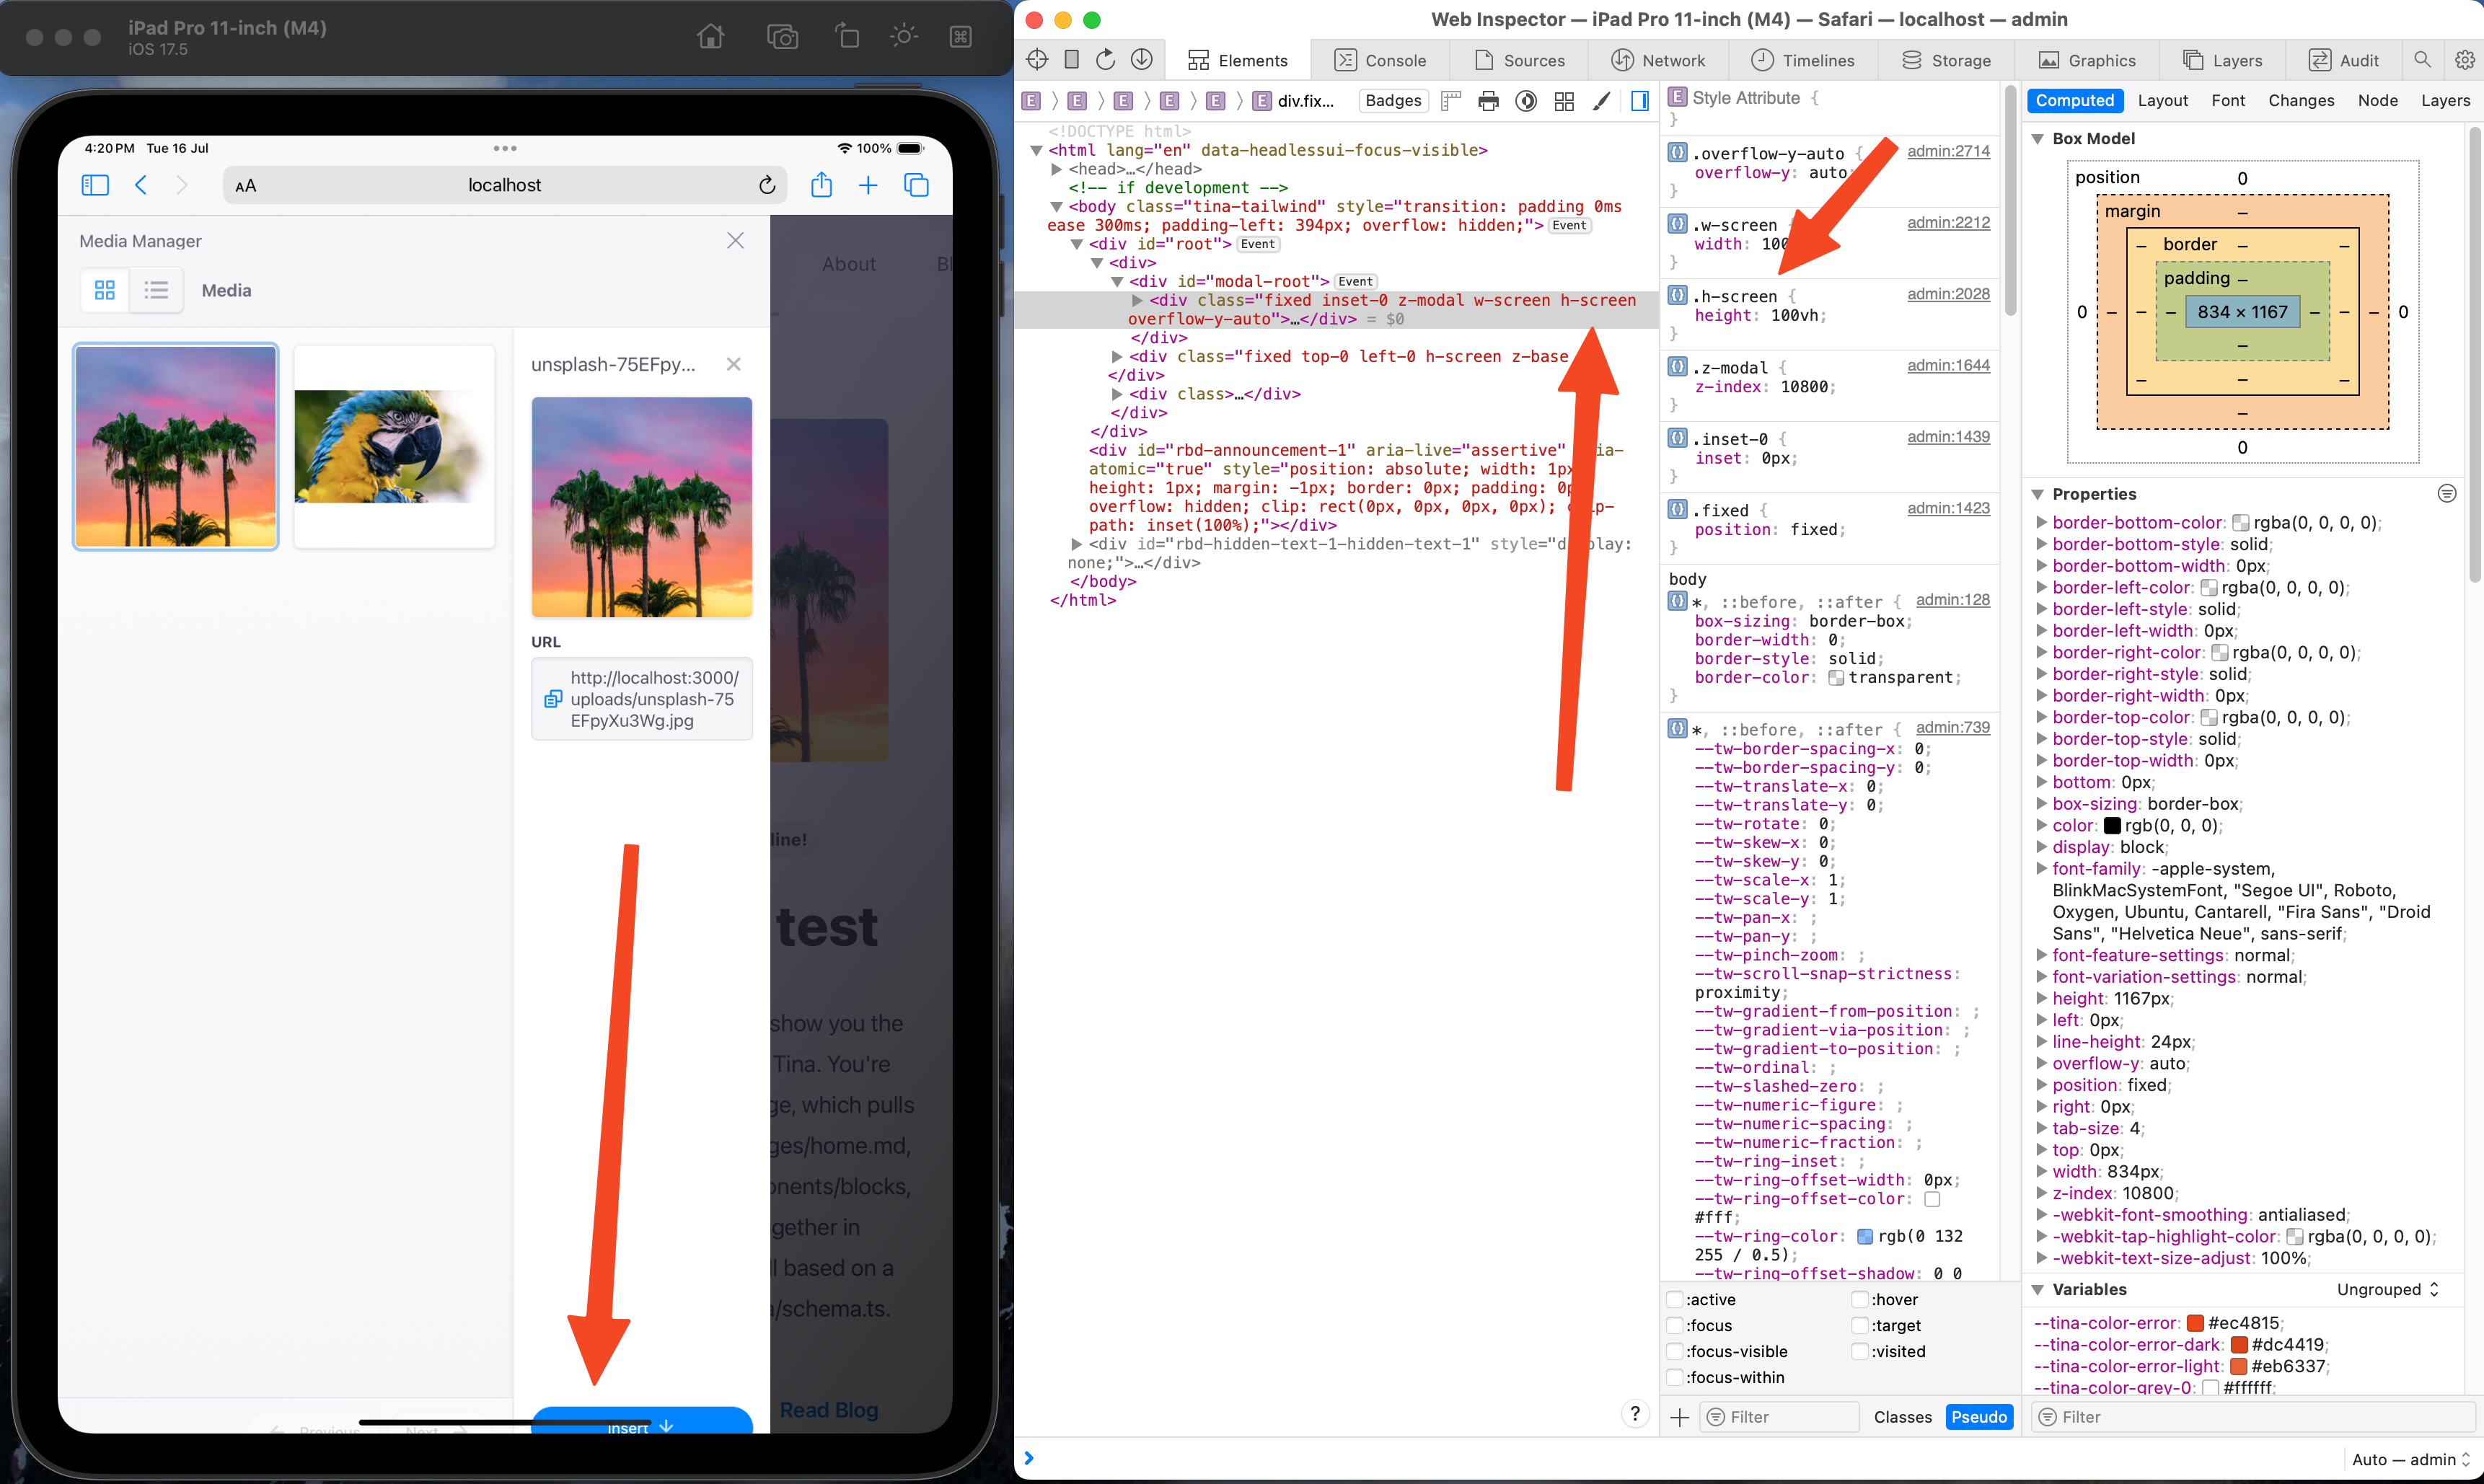
❌ Figure: Bad example - TinaCMS media manager window overflowing when open on iPadOS Safari when using view height

✅ Figure: Good example - TinaCMS media manager window responding properly when open on iPadOS Safari when using dynamic view height
Do you improve web page performance with lazy loading of media assets?
<introEmbed body={<> If you are dealing with Content Management System (CMS), you are likely to play with pages with large amount of images and embedded videos. To improve the performance of those pages, and save bandwidth for the readers, loading content asynchronously (also called “lazy loading”) is recommended. It means the browsers will only load images and embedded videos in the visible area by default, then load the rest images and videos while users are scrolling down to them. </>} /> ### Real case scenario On our SSW Rules website, one of the pages’ initial loading size of images reduced from 4.8MB to 500KB after being applied “lazy loading” of images: <imageEmbed alt="Image" size="large" showBorder={false} figureEmbed={{ preset: "badExample", figure: 'Bad example - Load all images by default', shouldDisplay: true }} src="/uploads/rules/improve-performance-with-lazy-loading-of-media-assets/load-images-1.jpg" /> <imageEmbed alt="Image" size="large" showBorder={false} figureEmbed={{ preset: "goodExample", figure: 'Good example - Do not load all images by default, only load them when they are visible while scrolling down the browsers', shouldDisplay: true }} src="/uploads/rules/improve-performance-with-lazy-loading-of-media-assets/load-images-2.jpg" /> The page's initial loading size of JS scripts reduced from 2.3MB to 518KB after being applied “lazy loading” of embedded YouTube videos: <imageEmbed alt="Image" size="large" showBorder={false} figureEmbed={{ preset: "badExample", figure: 'Bad example – Load all embedded YouTube videos by default', shouldDisplay: true }} src="/uploads/rules/improve-performance-with-lazy-loading-of-media-assets/load-images-3.jpg" /> <imageEmbed alt="Image" size="large" showBorder={false} figureEmbed={{ preset: "goodExample", figure: 'Good example - Do not load all embedded YouTube videos by default, only load them when they are visible while scrolling down the browsers', shouldDisplay: true }} src="/uploads/rules/improve-performance-with-lazy-loading-of-media-assets/load-images-4.jpg" /> ### Implementing lazy loading for images 1. Check if the browser supports IntersectionObserver, if the browser supports IntersectionObserver, we will only load images and videos in the areas are visible to users by default. If the browser doesn’t support it, we will have to load all images and embedded videos on the page immediately after the page is loaded. ```js if (!("IntersectionObserver" in window)) { console.log("No Intersection"); } else { console.log("Support intersection"); } ``` **Note:** You can use a polyfill library to add **IntersectionObserver** support to older browsers. 2. If the browser supports IntersectionObserver, in your page html, change the “src” of “<img>” to “data-src” From ```html <img alt="flight.jpg" src="https://ssw.com.au/images/flight.jpg" /> ``` to ```html <img alt="flight.jpg" data-src="https://ssw.com.au/images/flight.jpg" /> ``` 3. Use the below Javascript to change “data-src” back to “src” for the <img> html objects, which become visible, so that those images will be loaded ```js function onIntersection(entries) { // Loop through the entries entries.forEach((entry) => { // Are we in viewport? if (entry.intersectionRatio > 0) { // Stop watching and load the image observer.unobserve(entry.target); //console.log(entry); //console.log(entry.target); preloadImage(entry.target); } }); } function preloadImage(target) { console.log(target); if (target.getAttribute("data-src")) { target.setAttribute("src", target.getAttribute("data-src")); } } // Get images of class lazy const images = document.querySelectorAll(".sswRuleSummaryUCDiv img"); const config = { // If image gets within 50px go get it rootMargin: "50px 0px", threshold: 0.01, }; let observer = new IntersectionObserver(onIntersection, config); images.forEach((image) => { observer.observe(image); }); ``` 4. More details can be found at [Updating jQuery-based Lazy Image Loading to IntersectionObserver](https://www.hanselman.com/blog/updating-jquerybased-lazy-image-loading-to-intersectionobserver) article. ### Implementing lazy loading for embedded YouTube videos 1. Use the same code as lazy loading images above, to check if IntersectionObserver is supported by browsers 2. In your page html code, convert “<iframe>” to “<div>” (width, height, src has been converted too): From ```html <iframe width="853" height="480" src="https://www.youtube.com/embed/OhVYTOKCsWI" frameborder="0" ></iframe> ``` To ```html <!-- (1) video wrapper in div instead of iframe --> <div data-iframewidth="853" data-iframeheight="480" data-iframecode="OhVYTOKCsWI" data-iframesrc="https://www.youtube.com/embed/OhVYTOKCsWI" frameborder="0" > <!-- (2) the "play" button --> <div class="play-button"></div> </div> ``` 3. Use the below code to convert “<div>” to “<iframe>” to load the embedded videos when they are visible while scrolling down: ```js let youtube = document.querySelectorAll("div[data-iframesrc]"); for (var i = 0; i < youtube.length; i++) { let source = "https://img.youtube.com/vi/" + youtube[i].dataset.iframecode + "/sddefault.jpg"; let image = new Image(); image.src = source; image.addEventListener( "load", (function () { youtube[i].appendChild(image); })(i) ); youtube[i].addEventListener("click", function () { let iframe = document.createElement("iframe"); iframe.setAttribute("frameborder", "0"); iframe.setAttribute("allowfullscreen", ""); iframe.setAttribute("width", this.dataset.iframewidth); iframe.setAttribute("height", this.dataset.iframeheight); iframe.setAttribute( "src", this.dataset.iframesrc + "?rel=0&showinfo=0&autoplay=1" ); this.innerHTML = ""; this.appendChild(iframe); }); } ``` More details can be found at [How to “Lazy Load” Embedded YouTube Videos](https://webdesign.tutsplus.com/how-to-lazy-load-embedded-youtube-videos--cms-26743t).Do you use the right site search for your website?
When it comes to site search, managing various search requirements can be challenging. Using the appropriate search tools can greatly improve the overall search experience. Here are some options to help you create an effective search feature for your website.
Algolia

Algolia is a cloud-based search platform that offers a powerful and customizable search-as-a-service solution. It is known for its excellent real-time search performance.
✅ Excellent performance: Algolia is known for its fast and efficient search performance ✅ Developer-Friendly APIs and Rich Features ✅ Provides a free plan suitable for small projects ✅ Hosted Search: Algolia is a fully hosted search solution, eliminating the need for server setup and maintenance
❌ Cost can become a concern at scale due to pricing model ❌ Closed-source
Typesense

Typesense is designed for simplicity and integration, making it a suitable choice for smaller to medium-sized applications that require a user-friendly search experience.
✅ Designed for simplicity and ease of integration ✅ Good performance, supports complex queries ✅ Open source and free version available (self-hosting required) ✅ Suitable for smaller to medium-sized applications
❌ May have limitations in handling very large datasets or extremely complex use cases ❌ Limited advanced customization options compared to Elasticsearch
Meilisearch
Video: Next Generation Search Engine with Meilisearch (15 min)Meilisearch is a search engine that focuses on providing a simple and easy-to-use search solution with features like prefix searching, typo tolerance, and fast response times out of the box. It's designed to be developer-friendly and can be quick to set up for basic search needs.
✅ Easy to use and quick to setup for basic search needs ✅ Open source and free version available (self-hosting required) ✅ Good performance and built-in typo tolerance for user-friendly searching
❌ May have limitations in handling very large datasets or extremely complex use cases ❌ Less suitable for complex search requirements
ElasticSearch

Elasticsearch is a search engine based on the Lucene and designed as a backend search engine. It's a powerful, scalable, and feature-rich option suitable for large-scale and complex search needs, but it requires significant server management and expertise.
✅ Scalable and suitable for handling large datasets and complex use cases ✅ Supports advanced features like text analysis, multilingual search, and more ✅ Open-Source Version Available (self-hosting required)
❌ Requires more effort and expertise to set up and configure ❌ Free version requires self-hosting, may incur additional operational costs
Conclusion
Selecting the right site search tool depends on your project's specific requirements, budget, and expertise. If you have a budget, you can consider choosing Algolia. It solves the problem of complex configuration and allows you to set up on-site search quickly with just a few lines of code. If you prefer a free and more customized option, both Typesense and Meilisearch are good choices to consider. Elasticsearch is effective and particularly good at searching and analyzing logs. You can use it for on-site searches too, but unless your website is huge, using Elasticsearch might be excessive, and setting it up could get very complicated.
Do you know not to use LinkButton?
If we want to refresh and data bind the same page from client side, we can use the javascript function calls "__doPostBack". We shouldn't fire this post back in LinkButton. Otherwise, there will be an error.

Figure: Right click the link with __doPostBack event
Figure: New window with incorrect URL
<asp:Panel runat="server" ID="mUpdatePanel" OnLoad="mUpdatePanel_Load"><asp:Label runat="server" ID="lblTime" /><br /><asp:GridView ID="gvList" runat="server" AutoGenerateColumns="false"><Columns><asp:BoundField DataField="ID" HeaderText="ID" /></Columns><Columns><asp:BoundField DataField="Name" HeaderText="Name" /></Columns></asp:GridView><br />ID:<asp:TextBox ID="txtID" runat="server"/>Name:<asp:TextBox ID="txtName" runat="server"/></asp:Panel>C#:protected void mUpdatePanel_Load(object sender, EventArgs e){lblTime.Text = DateTime.Now.ToLongTimeString();ArrayList mList = (ArrayList)ViewState["List"];if (txtName.Text.Length > 0){Client mClient = new Client();mClient.ID = Int32.Parse(txtID.Text);mClient.Name = txtName.Text;mList.Add(mClient);ViewState["List"] = mList;gvList.DataSource = mList;gvList.DataBind();}}Sample Code
<a href="javascript:__doPostBack('mUpdatePanel','');">Refresh</a>❌ Figure: Bad code
<input type="button" onclick="javascript:__doPostBack('mUpdatePanel','');" value="Refresh" />✅ Figure: Good code
We have a program called SSW Code Auditor to check for this rule.
Do you know why you choose .NET Core?
Cross platform
.NET Core works on multiple platforms like MacOS, Linux and Windows. So developers can code on their operating system of choice using Visual Studio, Visual Studio for Mac or Visual Studio Code, working on the same code base as developers on a different operating system, and best of all they can also deploy to Linux.
Performance
.NET Core is fast, and you get that performance out of the box.
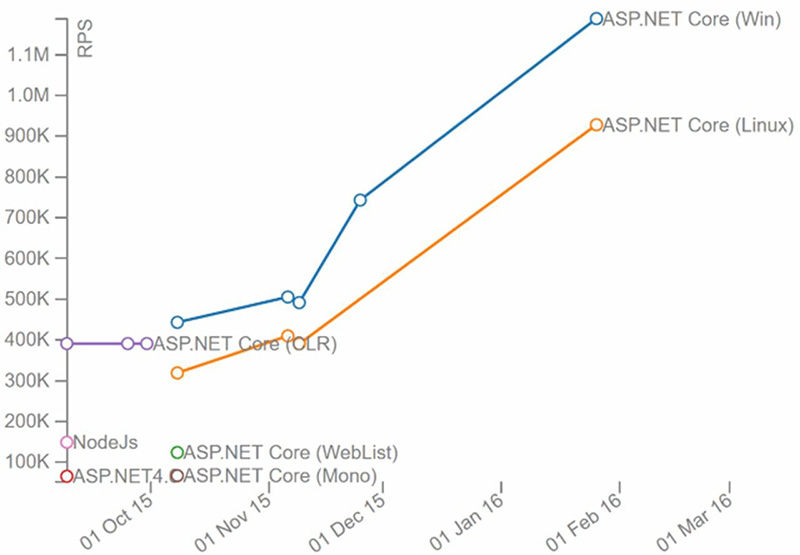
Figure: ASP.NET Core easily trounces ASP.NET 4 in number of requests per second (view source)
Do you name web pages to be consistent with database tables?
In a database-driven page, it is important that the name of the page is based on the data that the page contains. For example, if a page shows client details and is based on the Client table, then the page should be called Client.aspx. Other examples are:
- a search page. This page ssw/Kb/KBSearch.asp is for searching a table obviously called KB
- a search results page. This page ssw/KB/KBResult.aspx?searchOn=Words&searchFor=problem is returning the records for a table called KB
- a detail page. This page is showing the detail record for a record in the table 'KB'
Do you precompile your ASP.NET 1.1 and 2.0+ sites?
It always much better for your developers to find errors rather than your clients and end-users. ASP.NET 2.0 has precompilation built-in. However, you can perform similar validation in ASP.NET 1.1 as well.
For more information go to Precompile ASP.NET Sample in SSW Knowledge Base (broken link removed).
Do you provide modern contact options?
The evolution of website development can be summarized by:
- 1990 - Cool website – content focus (static HTML content)
- 1995 - Cool graphics – interface focus (dynamic HTML content)
- 2000 - Nice flow – usability focus (focus on user experience)
- 2005 - Good marketing – conversion focus (SEO and visitors to customers conversion)
- 2010 - Happy customer– interactions focus (customer experience)
It's important that your website is focused on CX (Customer Experience) which means you need modern contact options.

❌ Figure: Bad example - The only way to contact the company is via email

✅ Figure: Good example - Chat is available along with other ways of contact, such as voip, IM, KB etc
✅ Figure: Zendesk explain how you can use mulitple channels of support to give your customers a better CX
Do you remove the debug attribute in Web.config compilation element?
The debug attribute in the web.config file is very useful for ASP.NET developers. When an error occurs the developer gets detailed error report containing the stack trace, line number and what the error is.
But when debug attribute in the Web.config file is set to true it generates symbolic information (.pdb file) every time the compiler compiles your views as well as disables code optimization. So, it slows down the execution of every page.
So if you are a developer remember to remove the debug attribute and instead use custom error messages for your web pages
We have a program called SSW Code Auditor to check for this rule.
Do you run load tests on your website?
You don't want to see your company's website on the front page of the news after it fails to deal with high levels of load.
Load testing helps you to ensure that your apps can scale and stay up when peak traffic hits. Load testing is typically initiated for high-traffic seasonal events such as tax filing season, Black Friday, Christmas, summer sales, etc. but you should be regularly running load testing during development to catch any issues as early as possible.
Once you have a website up and running, it is important to make sure that it keeps running under load. Local testing of the website will not always reveal the latent problems in the website when it is subjected to thousands of users.
Typical issues that result from failures to handle high loads are:
- 503 "Service Is Temporarily Unavailable" errors
- Very slow page load times
- Application crashes due to:
- Insufficient resources - so application pools are recycled
- Too many concurrent users - causing race conditions
- Too many users trying to connect to the database - causing connection pool exhaustion
Load testing can help you to reveal these issues before you go live. Some issues might be resolved by getting a better web server, while others might require code changes and optimizations.
Load testing tools are designed to help you perform load testing, by recording metrics about the application as the load is varied and allowing you to visualize where user load impacts performance and/or causes application errors.
Visual Studio 2019 Enterprise Edition is the last version of Visual Studio with built-in load testing functionality. However, it only supports Internet Explorer so Visual Studio is not a recommended load testing option .
Note: Azure Load Testing is a fully managed load-testing service that enables you to generate high-scale load. It uses JMeter to generate the loads. Note that this service is currently only in Preview.
Do you use CSS Validation Service to check your CSS file?
CSS Validation Service allows you to check your webpage against the W3C recommendations. When developing web pages you want to create a clean and valid web page. It makes it easier for someone else to read and add new parts to a web page. Every web language like CSS has its own Syntax it must follow in order to produce a clean and valid web page, CSS Validation Service allows you to achieve that goal.
Go to CSS Validation Service:
- Enter the URL or ppload file or by Direct Input to check
- Review the results and make changes to fix errors
Do you choose the best way to send emails for your application?
Sending email from your application is easy, most programming languages allow you to send an email. Formatting and getting proper feedback and data on your emails is a bit more complicated.
Enterprise software generally need to send emails for a range of reasons e.g. inviting users, multifactor authentication, registering users, marketing campaigns, so it is important to know the best ways to send an email.
1. Built-In Email commands
Generally, programming languages have a built-in way to send email e.g. PowerShell with Send-MailMessage and System.Net.Mail in .Net, and those commands generally use an SMTP server (external or internal). If you need a quick and dirty email, this is a good way.
2. Microsoft Graph API - Microsoft Recommended
Microsoft's recommended way of sending mail is through the Graph API. This is much more secure than just using any built-in commands and the command itself to send it is not much more complicated. You can check how to send email through the Graph API
3. Sendgrid - Recommended if you need a lot of features
Another way to send email is to use a third-party solution e.g. Sendgrid that gives you many more features over the normal email-sending mechanisms above e.g:
- Integrated API
- Click tracking
- Spam management
Do you use jQuery instead of JavaScript?
jQuery is the MUST HAVE tool for web developers. There are 3 good reasons why you should use jQuery.
- Cross Browsers (Edge, Firefox, Safari, Opera, Chrome)
- Powerful and easy to use
- Same selectos as CSS
- Designer can learn it fast
- More readable JavaScript code
- Plugins - Tons of useful plugins and functionalities
window.onload = function () {alert("Welcome");};❌ Figure: Figure: Bad example - Using JavaScript 'onload' event
$(document).ready(function () {alert("Welcome!");});✅ Figure: Figure: Good example - Using jQuery document 'ready' event
Do you use Link Auditor to tell you about bad links?
Many developers work with sites that have grown large over time and have consequently become difficult to maintain. They fix problems as customer report bugs. A better approach is to use SSW Link Auditor, a tool that will analyze your whole site and report bad links and many other problems.
Do you use Markdown to store your content?
<introEmbed body={<> You want users to easily edit content, so you put an "edit" button on the page. From there, you can choose between the power of HTML or the limitations of Markdown. </>} /> <imageEmbed alt="Image" size="large" showBorder={false} figureEmbed={{ preset: "default", figure: '"Edit" button to encourage users updating the content', shouldDisplay: true }} src="/uploads/rules/using-markdown-to-store-your-content/edit-button.jpg" /> **HTML** is frightening for unfamiliar users, as one wrong tag or an inline styling can break the whole page view. **Markdown** is simpler and encourages more editing without breaking the page. The [original spec for Markdown](https://daringfireball.net/projects/markdown/syntax) does not specify the syntax unambiguously – so there are different flavours of the spec available. Some popular ones include: * [Commonmark Spec](https://spec.commonmark.org/0.29/) * [GitHub Simple](https://guides.github.com/features/mastering-markdown/) * [GitHub the Spec](https://github.github.com/gfm/) * [markdown-it](https://github.com/markdown-it/markdown-it) (really flexible, pluggable library based on CommonMark) The [Markdown Cheatsheet](https://github.com/adam-p/markdown-here/wiki/Markdown-Cheatsheet) is a great page to reference when learning Markdown. Depending on the Markdown parser you choose, there are many plugins that allow you to extend it. [SugarLearning](https://sugarlearning.com) and [SSW.People](https://ssw.com.au/people) provide more extensive cheatsheets which include a number of custom templates and plugins: * [SugarLearning cheatsheet](https://my.sugarlearning.com/SSW/items/13308/markdown-cheatsheet) (using Markdown-it parser) * [SSW.People cheatsheet](https://ssw.com.au/people/sample) (using CommonMark parser) * [SSW.Rules cheatsheet](https://github.com/SSWConsulting/SSW.Rules.Content/wiki/Using-Markdown) (using CommonMark parser) <imageEmbed alt="Image" size="large" showBorder={false} figureEmbed={{ preset: "default", figure: 'Markdown Icon', shouldDisplay: true }} src="/uploads/rules/using-markdown-to-store-your-content/markdown.jpg" /> <asideEmbed variant="info" body={<> **Tip:** To make it extra easy for editors, use [TinaCMS](https://tina.io/markdown-cms) into your Markdown-based project to provide a WYSIWYG (what you see is what you get) editor experience. </>} figureEmbed={{ preset: "default", figure: 'XXX', shouldDisplay: false }} /> ### Videos <youtubeEmbed url="https://www.youtube.com/embed/p_SsHtKRj-8" description="Video: "Markdown - How to use it, What is it and Why Use it | Ask a Dev" (9 min)" /> --- <youtubeEmbed url="https://www.youtube.com/embed/j3ix99MdSic" description="Using GitHub and Markdown to store you content by Thiago Passos (4 min)" /> ### Don't store content as HTML - It's a trap Rich HTML Editors make your life easier at the beginning and produce content that looks nice and clean, but behind the scenes, it generates HTML which can get out of control quickly especially if you need to edit the source code (E.g. include a special style). It becomes incredibly difficult to maintain over time. Some examples of rich HTML editors that you can embed in your web applications: * [Kendo Editor](https://www.telerik.com/kendo-angular-ui/components/editor/) * [TinyMCE](https://www.tiny.cloud/) * [CKEditor](https://ckeditor.com/) **Note:** None of these are recommended because of the HTML that is generated. <imageEmbed alt="Image" size="large" showBorder={false} figureEmbed={{ preset: "badExample", figure: 'Bad example - HTML generated by a rich editor gets harder to maintain over time', shouldDisplay: true }} src="/uploads/rules/using-markdown-to-store-your-content/HTML-bad.jpg" /> ### Store content in Markdown Content is typically either stored in files (eg. git) or a database. When stored in files, it is common to use a static site generator with a JAMStack approach (e.g. Gatsby, Vuepress, Hexo, etc). That is, you commit content into git and a CI/CD pipeline is executed. The resulting files (HTML and CSS) are then served from storage which is cheaper and typically more scalable than compute resources in the cloud. In this case, the workflow will be a development style workflow (commit to git, push, etc) and the editor will be the one you choose. (e.g. GitHub editor or VS Code) These editors are not likely to produce a rich editing experience, nor do they need to. For a non-technical audience, it helps to store your content as Markdown in a database and convert to HTML on the fly. This removes the code repository/CI/CD pipelines and can feel more natural for a non-developer audience. In this case, you will provide an editor and it is recommended that this be a rich editor. #### Markdown rich editors The Markdown rich editors are not as good as the HTML ones, but at least the content they produce is maintainable over time. Some example of rich Markdown editors are: * [ProseMirror](http://prosemirror.net/) * [Editor.Md](https://pandao.github.io/editor.md/) **Note:** It is the #1 editor on [Top 7: Best Markdown editors Javascript and jQuery plugins](https://ourcodeworld.com/articles/read/359/top-7-best-markdown-editors-javascript-and-jquery-plugins) * [ToastUI Editor](https://ui.toast.com/tui-editor/) (recommended) **Note:** ToastUI provides more customization options (menu and language) than Editor.md <imageEmbed alt="Image" size="large" showBorder={false} figureEmbed={{ preset: "goodExample", figure: 'Good example - Markdown looks clean', shouldDisplay: true }} src="/uploads/rules/using-markdown-to-store-your-content/markdown-good.jpg" /> ### Markdown can have rich content too Markdown is simple and limited, but you can make it richer. One way is to use inline HTML, this allows you to use HTML tags that you are familiar with (only if you need to) and embed things like YouTube videos or JavaScript. <imageEmbed alt="Image" size="large" showBorder={false} figureEmbed={{ preset: "default", figure: 'OK Example – you can use raw HTML in your Markdown, and mostly it will work pretty well. But you can’t use Markdown’s syntactic sugar in the HTML', shouldDisplay: true }} src="/uploads/rules/using-markdown-to-store-your-content/use-html-in-markdown.png" /> The other way is to use templates or containers: ::: bad img-medium <imageEmbed alt="Image" size="large" showBorder={false} figureEmbed={{ preset: "default", figure: 'Bad example – The danger of using HTML in your Markdown files is that you add too much formatting e.g. use Bootstrap classes that create a tight coupling between the content and the presentation', shouldDisplay: true }} src="/uploads/rules/using-markdown-to-store-your-content/danger-html-and-markdown.png" /> ::: A better way is to use a plugin (if your Markdown engine supports it). ::: good img-medium <imageEmbed alt="Image" size="large" showBorder={false} figureEmbed={{ preset: "default", figure: 'Good example – VuePress has a custom container that generates nice alert boxes like Bootstrap but without tying the presentation to the CSS framework in the content', shouldDisplay: true }} src="/uploads/rules/using-markdown-to-store-your-content/vuepress-custom-container.png" /> ::: Unfortunately, Markdown does not support YouTube videos embedding out of the box. However, there is a workaround to embed it. ``` markdown [](http://www.youtube.com/watch?v=dQw4w9WgXcQ) ``` <figureEmbed figureEmbed={{ preset: "goodExample", figure: 'Figure: Good example - Workaround to embed YouTube video using YouTube\'s generated thumbnail', shouldDisplay: true } } /> If your site is using "[markdown-it](https://www.npmjs.com/package/markdown-it)" parser, you can also install "[markdown-it-video](https://www.npmjs.com/package/markdown-it-video)" to allow YouTube videos directly embedded into the page, rather than providing just an image and a link. ``` markdown @[youtube](http://www.youtube.com/embed/dQw4w9WgXcQ) ``` <figureEmbed figureEmbed={{ preset: "goodExample", figure: 'Figure: Better example - YouTube video embedding using a plugin', shouldDisplay: true } } /> ### Markdown to HTML rendering processes <imageEmbed alt="Image" size="large" showBorder={false} figureEmbed={{ preset: "default", figure: 'The Markdown rendered either Client-side or Server-side', shouldDisplay: true }} src="/uploads/rules/using-markdown-to-store-your-content/markdown-rendering.jpg" />Do you keep your images and content self-contained in your TinaCMS + Next.js project?
When building a website using TinaCMS and Next.js, not all images need to live next to your content. Shared assets like logos, icons, or other global visuals are best stored in a central media folder (e.g. /public/uploads). This keeps things simple and avoids duplication.
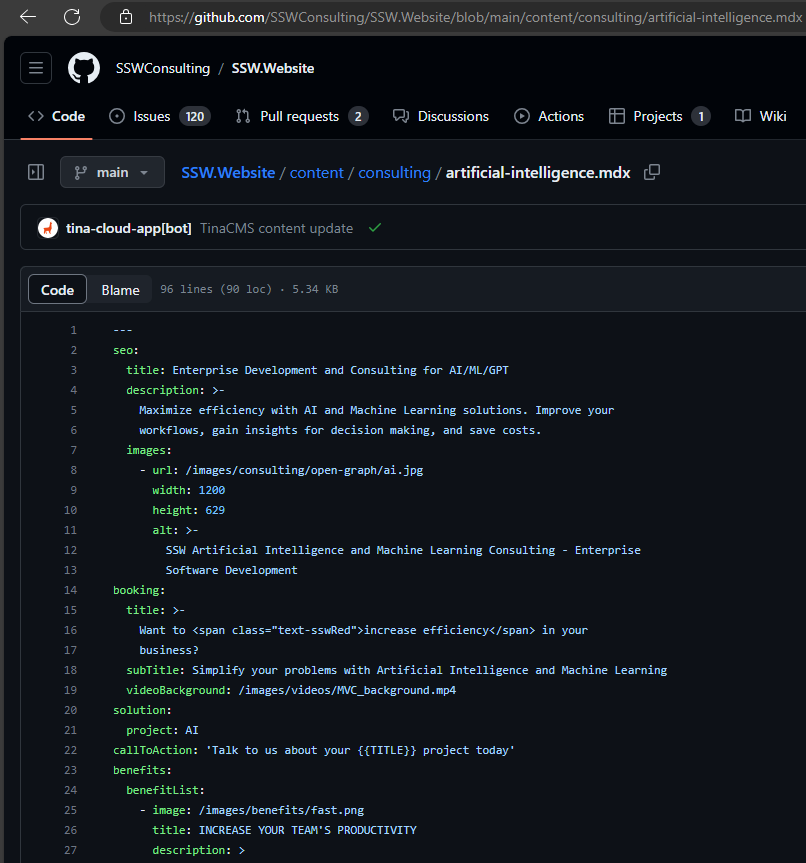
However, for documents that embed images—like blog posts or rules like this one—it’s important to keep the content (Markdown/MDX files) and related media together in the same folder. This self-contained structure improves maintainability, makes GitHub editing clearer, and supports portability.
Video: Tina.io - The 3 options for storing markdown in GitHub for TinaCMS (5 min)By default, Tina stores content in a
/contentfolder and images in/public, which breaks self-containment and can cause confusion.Let's explore three solutions to fix that and store content and images together.
You have 3 options:
1. Default structure + matching folders
- Content in
/content - Images in
/public - Add a link to image folder in frontmatter of content file
✅ Pros
- Works out of the box
❌ Cons
- Not self-contained
- Prone to errors when renaming/moving files
- You must manually manage matching folder names and use frontmatter to point to images.
2. Everything inside content folder
- Each document gets a folder in
/content - Images are stored alongside the MDX file

Figure: Option 2 - Folder structure - rules example
✅ Pros
- Fully self-contained
- Tina Media Manager works
❌ Cons
- Requires extra setup: update config, collections, and add a middleware
Example implementation (Rules)
import { NextResponse } from 'next/server';export function middleware(req) {if (process.env.DEVELOPMENT !== 'true') {return NextResponse.next();}const url = req.nextUrl;// Check if the request is for an image in the content/rules folderif (url.pathname.startsWith('/rules/') && url.pathname.match(/\.(png|jpg|jpeg|gif|webp)$/i)) {const escapedUrl = encodeURIComponent(url.pathname);const apiUrl = `http://localhost:3000/api/serve-image?filepath=${escapedUrl}`;console.log('Redirecting to API for image:', apiUrl);return NextResponse.redirect(apiUrl);}return NextResponse.next();}export const config = {matcher: ['/rules/:path*'],};Figure: Middleware to intercept media requests and call internal API
import { NextApiRequest, NextApiResponse } from 'next';import fs from 'fs';import path from 'path';export default function handler(req: NextApiRequest, res: NextApiResponse) {if (process.env.DEVELOPMENT !== 'true') {res.status(403).send('API route is disabled in production');return;}const { filepath } = req.query;if (!filepath || typeof filepath !== 'string') {res.status(400).send('Filepath is required');return;}const unescapedFilepath = decodeURIComponent(filepath);const imagePath = path.join(process.cwd(), 'content/', unescapedFilepath);try {const imageBuffer = fs.readFileSync(imagePath);const contentType = `image/${path.extname(unescapedFilepath).slice(1)}`;res.setHeader('Content-Type', contentType);res.send(imageBuffer);} catch (error) {console.error('Error reading image:', error);res.status(404).send('Image not found');}}Figure: Internal API to serve images from content folder
You can find more details on this repository
3. Everything inside public folder (✅ Recommended)
- Each document has a folder in
/public/uploads - Images and MDX file live together

Figure: Option 3 - Folder structure - rules example
✅ Pros
- Fully self-contained
- Tina Media Manager works
- No custom middleware needed
❌ Cons
- MDX files live in
public, which is unconventional—but works
This option is clean, simple, and works with Tina’s Media Manager out of the box — no special setup required.
Example Collection config (Rules)
import { Collection } from "tinacms";const Rule: Collection = {label: "Rules",name: "rule",path: "public/uploads/rules",fields: [...],...};export default Rule;Figure: Path pointing to public/uploads folder
See more on Tina.io - Storing Media With Content.
Do you know when to use MDX over Markdown?
Let's face it, not all content is created equal. Sometimes you just need a simple document, and other times you want something more dynamic and interactive.
When to use Markdown (.md)
Markdown is perfect for straightforward content. Think of it like writing a clear, no-frills document. You'll want to use Markdown when:
- You're creating something simple like a blog post, documentation, or guide
- Your team includes people who aren't tech experts
- You want your page to load quickly
- You just need basic formatting like headings, lists, and images
Example: A recipe blog post with some text, headings, and a few pictures. Markdown handles this beautifully without any extra complexity.
When to use MDX (.mdx)
MDX steps up when you need something more powerful. It lets you add interactive elements and custom components to your content. You'll want MDX when:
- You need interactive features that go beyond static text
- You want to include custom components from different web frameworks
- Your content requires some programming logic
- You're creating tutorial content with live examples
Example: A coding tutorial with an interactive chart showing performance metrics, or a documentation page with a live code editor where readers can try out code in real-time.
Things to consider
MDX isn't perfect for every situation. Before you jump in, consider:
- Complexity - Since it's more advanced than plain Markdown, non-technical teams might find it tricky
- Performance - Too many fancy components can slow down your page
- Extra setup - You'll need to manage more technical dependencies
The golden rule ⭐️
Choose Markdown for simple, fast content. Choose MDX when you need more interactive and dynamic features.
The key is to start simple. Use Markdown for most of your content, and only switch to MDX when you truly need those extra capabilities.
Do you know the best practices for Frontmatter in markdown?
Frontmatter is a critical component in Markdown files, especially when generating static sites or handling content management. It allows authors and developers to embed metadata directly at the beginning of a Markdown document. This metadata can include information about the document's title, author, date, and other attributes. A well-structured Frontmatter ensures that the Markdown processor can quickly extract the necessary metadata and use it for various purposes, like generating page titles or categorizing posts.
However, when not structured properly, it can lead to parsing errors, inconsistencies, and even disrupt the rendering of the entire page. To avoid these pitfalls and ensure a seamless integration of your Markdown files, it's essential to follow best practices when defining Frontmatter.
Tip: You can simplify the workflow for editors unfamiliar with Git or Markdown by utilizing Tina, a CMS with user-friendly interface integrated with your Git repository.
Use Key-Value Pair Organization
Frontmatter is metadata serialized into a plain text format primarily yaml but can also be toml, or json. In Frontmatter, each key represents an attribute, like the title or the author, and the value associated with it provides specific information related to that attribute.
- Keys are always strings and should be descriptive enough to indicate the type of data they hold
- Values can be strings, numbers, dates, or even arrays, depending on the data you're representing
Using key-value pairs ensures a standardized format, which in turn makes it easier for both humans and machines to read and interpret the data. Moreover, this structured approach ensures that Markdown processors can reliably extract and utilize the metadata, whether it's for rendering a webpage title, categorizing posts, or any other function. However, avoid non-standard practices like mixing data types or adding unnecessary complexity:
–––title+author: My Article by John2023-10-31–––❌ Figure: Figure: Bad example - Non-standard practices can lead to parsing errors and inconsistencies
–––title: My Articleauthor: Bob Northwinddate: 2023-10-31–––✅ Figure: Figure: Good example - Clear key-value pairs make it easy to understand and extract the metadata
Use Arrays for Complex Data
Arrays in Frontmatter are particularly useful when you have to represent multiple values for a single attribute. In Markdown, an array is essentially a list of values that are associated with a common key.
- Why Use Arrays? Sometimes, a single key might have multiple associated values. Instead of creating multiple keys, or stringing values together, arrays provide a clean and organized method to capture this complex data
- Accessibility: Arrays make it straightforward for Markdown processors to loop through multiple values, making tasks like generating a list of tags or authors on a webpage much simpler
- Flexibility: Arrays can hold strings, numbers, or even other objects, giving you a versatile tool to represent complex structures
However, avoid the common mistake of listing values in a continuous string. This format is harder to parse, and you lose the distinct advantage of the array's structure:
–––authors: John Doe, Jane Smith, Bob Johnson–––❌ Figure: Figure: Bad example - Listing values in a string reduces clarity and makes data extraction challenging
Here's how you can effectively use arrays:
–––authors:- Bob Northwind- Jane Smith- Bob Johnson–––✅ Figure: Figure: Good example - Using arrays helps in listing multiple values under a single key efficiently
Use Meaningful Keys
The keys you choose for your Frontmatter should be meaningful and descriptive. They act as identifiers for the associated values, so it's essential that they clearly convey the data they represent.
- Descriptive Names: Instead of using
desc, usedescription. Instead ofauth, useauthor - Consistency: Stick to a consistent naming convention, whether it's camelCase, snake_case, or kebab-case
Avoid non-descriptive keys:
–––t: My Articleauth: Bob Northwind–––❌ Figure: Figure: Bad example - Shortened or unclear keys can lead to confusion
Use clear, meaningful keys:
–––title: My Articleauthor: Bob Northwind–––✅ Figure: Figure: Good example - Descriptive keys make Frontmatter easy to understand and work with
Use Explicit Datatypes
It's crucial to be explicit about datatypes in Frontmatter. This clarity helps Markdown processors understand how to handle the provided metadata correctly.
- Strings vs. Numbers: If you're representing a year, use a number, e.g.,
2023. If you're mentioning a title or name, use a string, e.g.,"My Article" - Booleans: For binary choices, like true or false, use booleans. For example,
published: true
Avoid ambiguous datatypes:
–––year: '2023'published: "yes"–––❌ Figure: Figure: Bad example - Ambiguous datatypes can lead to parsing errors
Be explicit with your datatypes:
–––year: 2023published: true–––✅ Figure: Figure: Good example - Explicit datatypes ensure accurate data representation and extraction
Avoid Inline HTML
While Markdown allows the integration of inline HTML, it's recommended to avoid using it within Frontmatter. Using HTML can lead to rendering issues, especially when the Markdown is processed by static site generators or other tools.
- Simplicity: Sticking to Markdown syntax within Frontmatter keeps the metadata clean and straightforward
- Portability: By avoiding HTML, you ensure that the Frontmatter remains compatible with various Markdown processors and platforms
However, some might try to use HTML for additional formatting or structure:
–––title: <em>My</em> Articleauthor: <strong>Bob Northwind</strong>–––❌ Figure: Figure: Bad example - Using inline HTML can cause unexpected rendering or parsing issues
Stick to plain Markdown:
–––title: "My Article"author:- name: "Bob Northwind"role: "Writer"published: trueyear: 2023tags:- Technology- Writing- Markdownmetadata:created_at: "2023-10-30"modified_at: "2023-11-06"–––✅ Figure: Figure: Good example - Keeping Frontmatter free of HTML ensures consistent rendering
Do you have a page owner for each webpage?
Managing webpages can be challenging, especially in projects with many contributors. When editing a page, a common problem is not knowing who the original author was. This is bad, because it's important not to change something that was there for a reason!
The best way to solve this is by having a page owner for each webpage.
Why?
A designated page owner ensures someone is responsible for the accuracy of the page content. It avoids confusion about who to approach for major changes, and it allows the page owner to keep an eye on changes.
Steps
- Markdown files - Add an 'owner' field in the frontmatter metadata for each page.
- New pages - The field should be required when creating a page.
- Pull requests - Automatically add the page owner as a reviewer for any pull requests that modify their page.
Tip: this can be done automatically with a GitHub Action (or similar automation)
✅ The "owner" (person responsible) is aware of and can approve any changes
✅ People know who to consult about changes to the page
🤔 We don't use
CODEOWNERSfor this because we don't want to block pull requests for minor edits❌ When trying to work out who is the page owner, version history is not good enough - often the creator of a page is not the actual author e.g. a dev makes the page for a Marketing person
❌ Figure: Bad example - No owner field. Impossible to see who wrote this page!

✅ Figure: Good example - Frontmatter with an 'author' field.
Do you set the language on code blocks?
<introEmbed
  body={<>
You should have a syntax highlighter to show pieces of code on your pages for a better readability. By specifying the language within your code block, you can enable color coding similar to that in an IDE.

Tools like [Prism](https://prismjs.com), [highlight.js](https://highlightjs.org), or [Code Prettify](https://github.com/googlearchive/code-prettify) automatically apply syntax highlighting, making it easier for users to read code by color-coding different elements (e.g., keywords, strings, and variables).
  </>}
/>
<asideEmbed
  variant="info"
  body={<>
    See this [json file](https://unpkg.com/gatsby-remark-vscode@1.0.3/lib/grammars/manifest.json) for all supported languages and their aliases that can be used in SSW Rules.
  </>}
  figureEmbed={{
    preset: "default",
    figure: 'XXX',
    shouldDisplay: false
  }}
/>

To activate this feature, add the language name right after the opening 3 backticks (used to [write a code in Markdown](https://www.ssw.com.au/rules/rule/#11-code)).

For example, instead of starting a **JavaScript** code example with: **<code>\`\`\`</code>**, you should use **<code>\`\`\`js</code>** or **<code>\`\`\`javascript</code>** for syntax highlighting.

```none
let iceCream = 'chocolate';

if (iceCream === 'chocolate') {
  alert('Yay, I love chocolate ice cream!');
} else {
  alert('Awwww, but chocolate is my favorite...');
}
```

<figureEmbed figureEmbed={{
  preset: "badExample",
  figure: 'Figure: Bad example - No syntax highlighting',
  shouldDisplay: true
} } />


```javascript
let iceCream = 'chocolate';

if (iceCream === 'chocolate') {
  alert('Yay, I love chocolate ice cream!');
} else {
  alert('Awwww, but chocolate is my favorite...');
}
```

<figureEmbed figureEmbed={{
  preset: "goodExample",
  figure: 'Figure: Good example - This JavaScript code block shows its syntax highlighted',
  shouldDisplay: true
} } />


<asideEmbed
  variant="codeauditor"
  body={<>
    [SSW CodeAuditor enforces this rule](https://codeauditor.com/rules).
  </>}
  figureEmbed={{
    preset: "default",
    figure: 'XXX',
    shouldDisplay: false
  }}
/>
Do you use Markup Validation Service to check your HTML and XHTML code?
Markup Validation Service allows you to check your web page against the W3C recommendations. When developing web pages you want to create a clean and valid web page. It makes it easier for someone else to read and add new parts to a web page. Every web language like HTML has its own syntax it must follow in order to produce a clean and valid web page, Markup Validation Service allows you to achieve that goal.
Go to Markup Validation Service:
- Enter the URL or upload file to check
- Review the results and make changes to fix errors
Do you use Unicode Hex codes for special HTML characters?
In HTML coding, using special characters into HTML content elevates visual appeal and enhances the user experience. Utilizing Unicode Hex codes is a powerful technique to accurately render these special characters in HTML.
Benefits of Using Unicode Hex Codes
- Compatibility: Unicode Hex codes ensure consistent display across platforms, browsers, and devices, guaranteeing that special characters appear correctly regardless of the user's system or font support.
- Versatility: Unicode encompasses a wide range of characters, including symbols, emojis, foreign language characters, and mathematical symbols. By employing Unicode Hex codes, you can seamlessly incorporate various special characters into your HTML content.
- Accessibility: Unicode Hex codes contribute to enhanced accessibility by accurately representing special characters, enabling visually impaired users or those using screen readers to access and comprehend the content effectively.
Practical Examples
- Registered Trademark Symbol (®): Represented by the Unicode Hex code
®. - Heart Emoji (❤): Displayed using the Unicode Hex code
❤. - Euro Symbol (€): Utilize the Unicode Hex code
€.
By integrating these Unicode Hex codes into your HTML, you ensure consistent rendering of special characters across browsers and devices.
Do you know how to generate PDFs for download?
Some projects call for being able to export data as a PDF. In these instances, it's great to be able to fully generate the file in the back-end and then provide it for download.
As with most software problems, there's many ways to achieve the same end result, each with their pros and cons.
Paid libraries
There are many paid .NET libraries available which can generate PDFs for you like:
If the project has budget for a paid PDF solution, these are great and will get you generating PDFs quickly.
Pros:
✅ Mostly works out-of-the-box ✅ Potential for commercial support from the library developer
Cons:
❌ Project might not have the budget for such an option ❌ Is often closed source (see more)
Free libraries
Unfortunately, the vast majority of libraries which can generate PDFs directly are paid. To get around this, the PDF generation function of a browser testing library can be used instead. Using this method, the desired content is rendered in a headless browser and that browser is then used to generate a PDF.
Pros:
✅ Free! ✅ Open source ✅ Can easily reuse existing web layouts
Cons:
❌ Support is often limited ❌ May require more configuration to get working
Example
One library which makes this really easy (and is free!) is Playwright.
Generating a PDF here takes just a few lines, see the demo and docs for more info.
public async Task<byte[]> ExportView(string url, CancellationToken cancellationToken){var playwright = await Playwright.CreateAsync();var browser = await playwright.Chromium.LaunchAsync();var page = await browser.NewPageAsync();await page.GotoAsync(url);if (cancellationToken.IsCancellationRequested) { return Array.Empty<byte>(); }return await page.PdfAsync(new PagePdfOptions { Format = "A4" });}Figure: A simple method to return a PDF using Playwright
Do you centralize downloadable files?
Efficient management of downloadable content, like PDFs and documents, is a critical component of website maintenance. Simplify the process of making files public on your website by following these guidelines.
Centralized file storage
- Primary directory - Use 'public/downloads' as the central directory for all downloadable files to simplify organization, updating, and tracking of content
- Subdirectory use (optional) - If needed, employ subdirectories for additional organization (based on the volume and diversity of the files)
- Uniform linking - Direct all download links to this central location to eliminate duplication and streamline site maintenance
Efficient file naming
- Descriptive naming - Use clear, descriptive file names with SEO-friendly keywords for easy identification and discoverability
- Version control - Keep version information within documents, not in file names, to maintain consistent URLs
Optimizing file accessibility
- File compression - Compress larger files to improve download speed and site performance
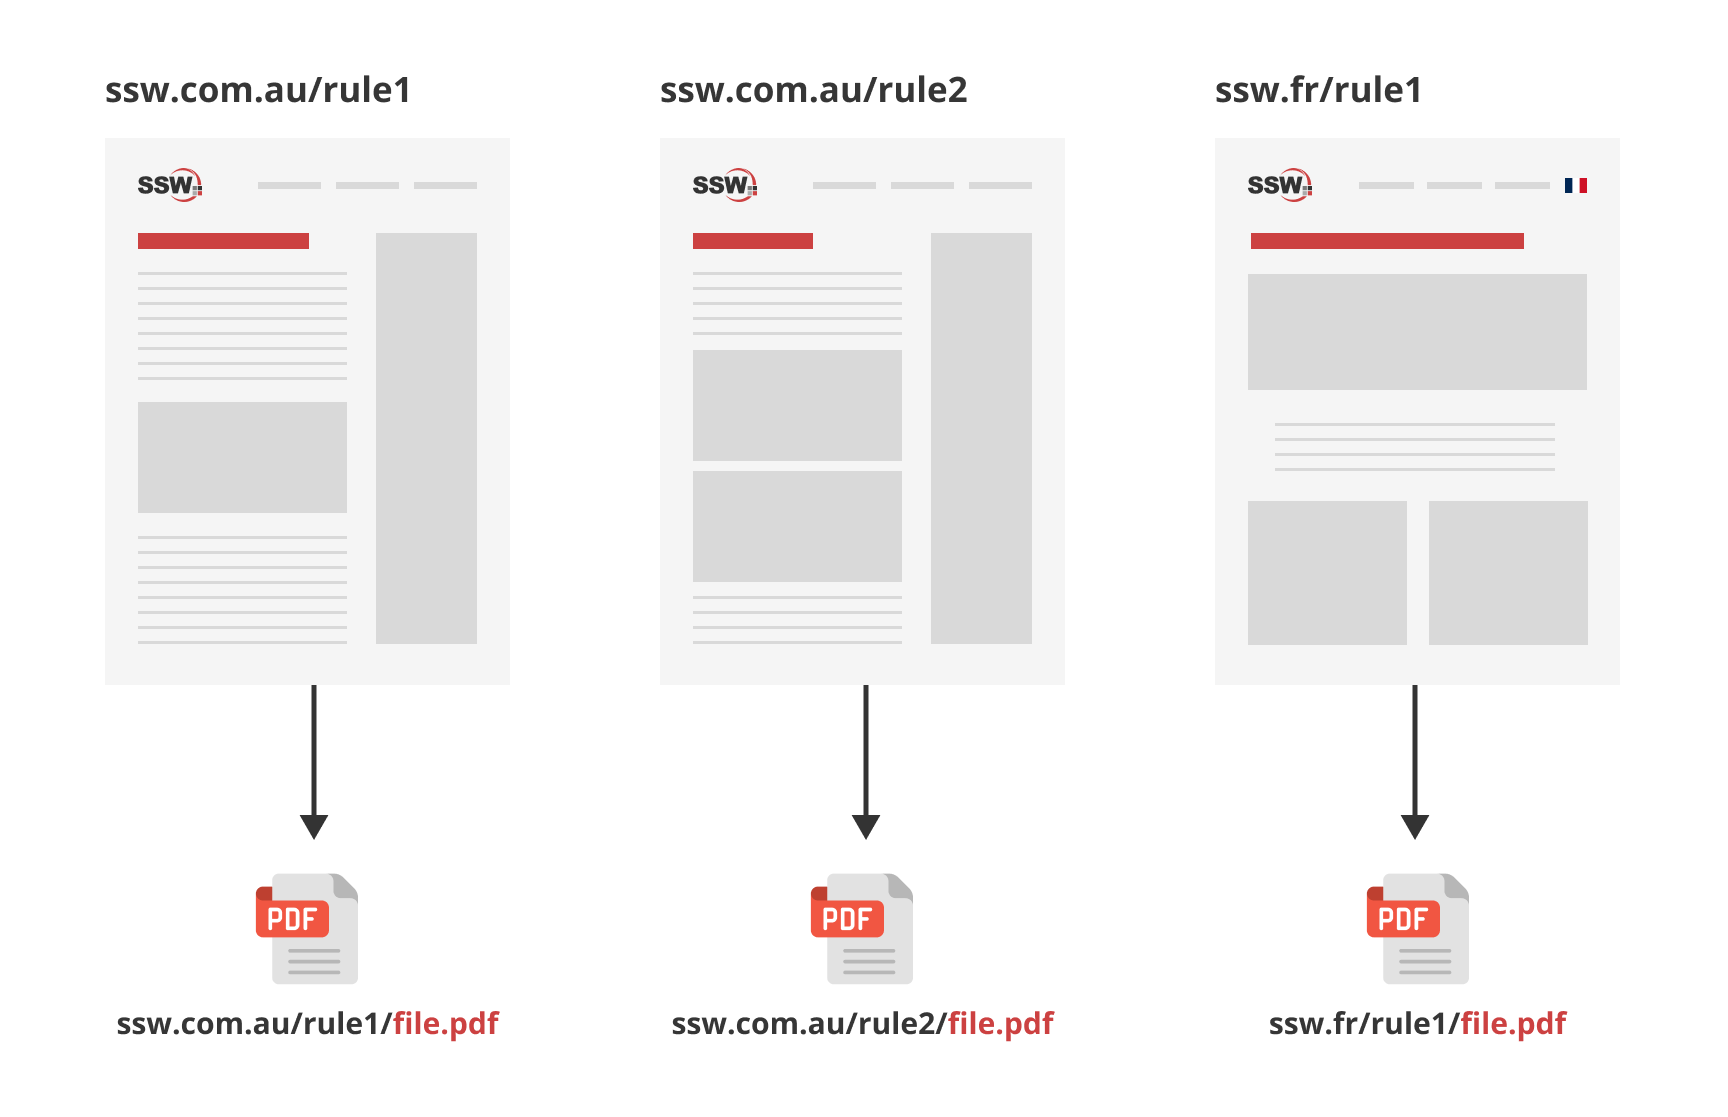
❌ Figure: Bad example - Saving the same file in multiple places (cumbersome to update)
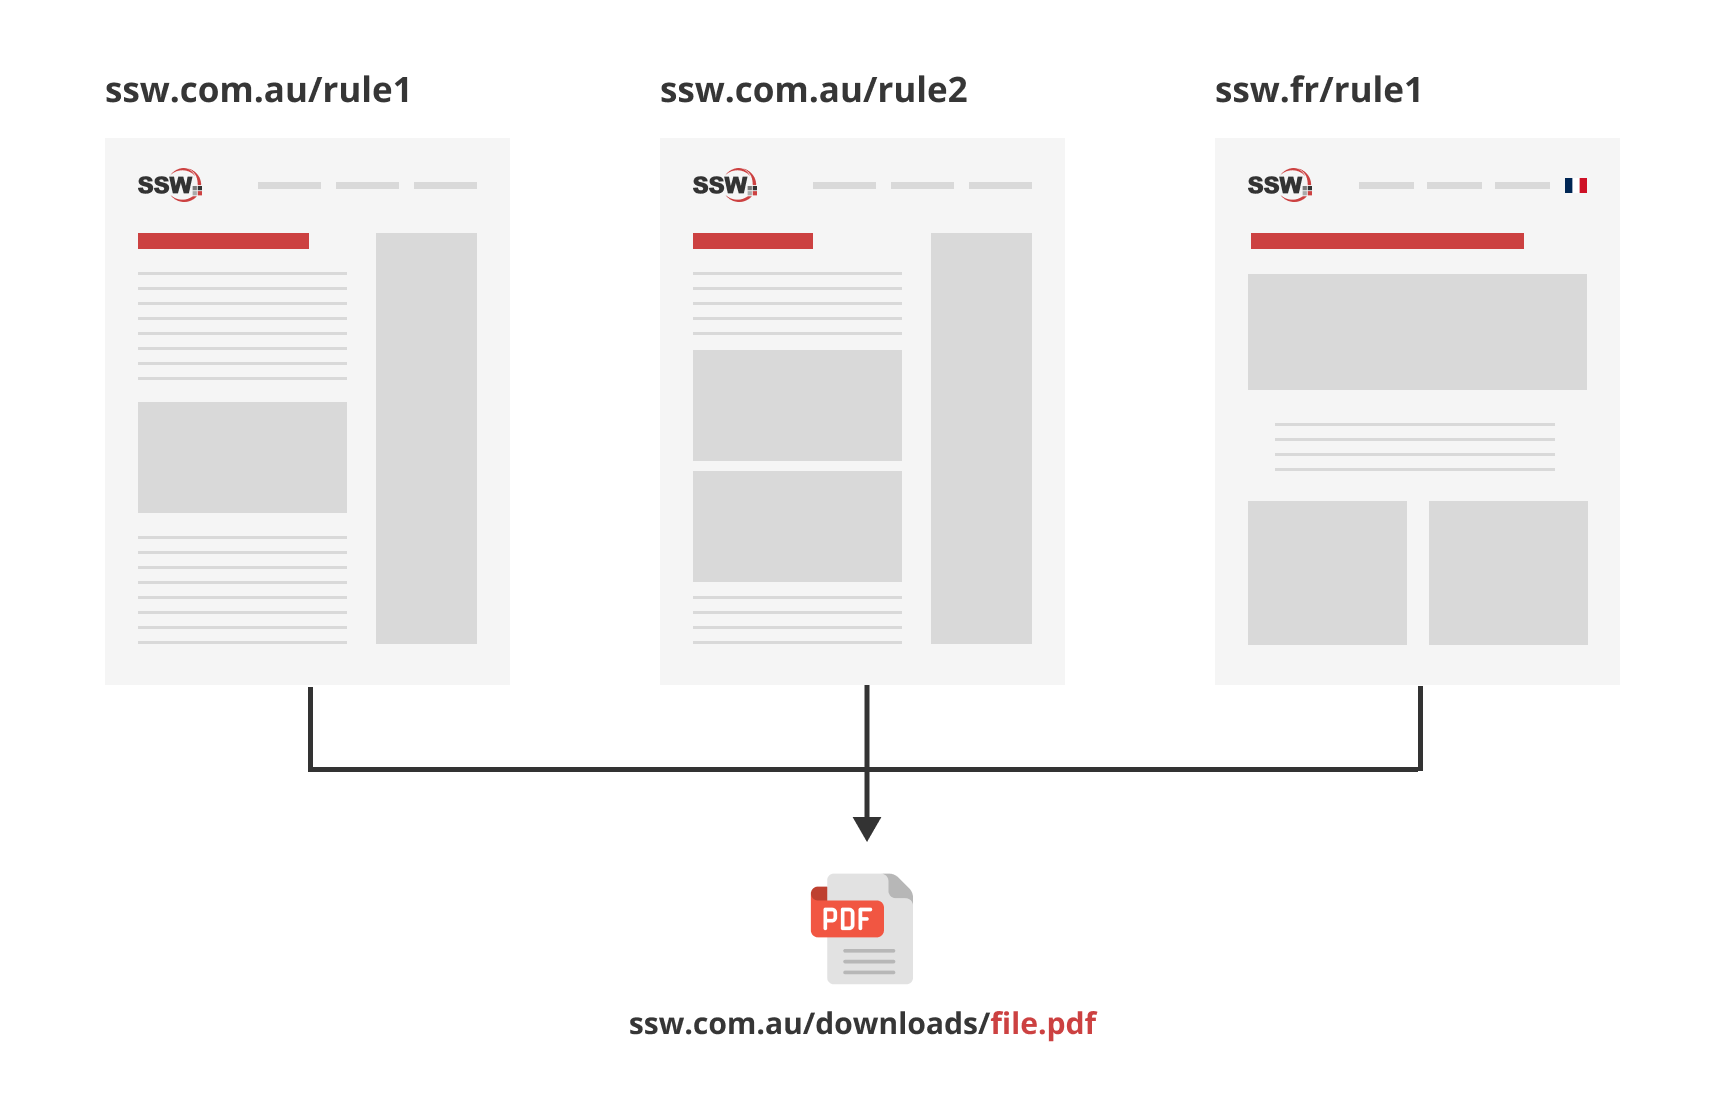
✅ Figure: Good example - Single URL for file, referenced across websites (simplifies updates and generates backlinks)
Step-by-step guide
- Optimize files - Compress file sizes without compromising quality and use clear, descriptive filenames
- Upload files - Place files in the central directory or relevant subdirectories
- Streamline URLs - Use and reference a single, stable URL for each file to avoid creating multiple links for the same content
- Ensure accessibility - Ensure that the files are accessible and functional across different browsers and devices
Improve your website's management of downloadable content by centralizing file storage, utilizing clear naming conventions, and ensuring accessibility.
Do you use Open Graph to control how your links are shared?
<introEmbed body={<> Open Graph is a metadata tag that allows you to control what content shows up when a page is shared on social media networks. </>} /> It should be placed on the <head> section of your page. The most used properties are: ```xml <meta property="og:title" content="Your Custom Title" /> <meta property="og:description" content="Your custom description of the page." /> <meta property="og:image" content="https://www.YourCustomImage.jpg"/> ``` <imageEmbed alt="Image" size="large" showBorder={false} figureEmbed={{ preset: "badExample", figure: 'Bad example - Shared link has no image and the title was "guessed" by LinkedIn', shouldDisplay: true }} src="/uploads/rules/use-open-graph/open-graph-bad.jpg" /> <imageEmbed alt="Image" size="large" showBorder={false} figureEmbed={{ preset: "goodExample", figure: 'Good example - Shared link has a nice image and title, both defined via Open Graph tags', shouldDisplay: true }} src="/uploads/rules/use-open-graph/opengraph-good.jpg" /> <asideEmbed variant="info" body={<> **Note:** For LinkedIn you might need to add the prefix as following: ```xml <metaprefix="og: http://ogp.me/ns#" property='og:title' content="Microsoft Azure | SSW Consulting - Sydney, Brisbane, Melbourne"/> ``` </>} figureEmbed={{ preset: "default", figure: 'XXX', shouldDisplay: false }} /> More information and other properties can be found at [The Open Graph protocol](https://ogp.me/).Do you use server side comments?
Use server side comments:
- Use <%-- Comment Here --%> instead of <!-- Comment Here --> (Does not get rendered to the client, saves us a few precious kilobytes)
- Use CTRL + K, C to comment and CTRL + K, U to uncomment
Do you use the best static site tech stack?
Pure HTML pages are the fastest website around. However, server-side scripting languages enable richer functionality. Static sites solve this problem by providing the best of both worlds. Static sites are:
- Cheap
- Easy to use
- Fast
On the other hand, complex functionality can be a bit more limited and time consuming to implement.
Here are some popular static site generators:
Features
Name NextJS (Recommended) Gatsby 🪦 Astro Hugo Builder.io Language React React Most major JS frameworks via islands Go Customizable Data Handling Fully customisable GraphQL Fully customisable Customizable Fully customisable Data Sources Fully customisable Filesystems, CMS, APIs, Databases, Local files Fully customisable Filesystem CMS, APIs, Customizable GitHub Pages Integration Requires setup Seamless deployment via config files Deployment via GitHub Actions Deployment with GitHub Actions Customizable TinaCMS integration ✅ ✅ ✅ ✅ ✅ Note: 🪦 Gatsby is no longer being actively developed.
Market Share
(Data captured in late 2024)
Name Next.js (Recommended) Gatsby Hugo Astro Builder.io GitHub Stars 127,000 👑 55,000 75,000 47,000 8,000 NPM Downloads (Weekly) 6,000,000 👑 260,000 N/A 247,000 N/A Stack Overflow Questions 92,000 👑 15,000 6,000 2,000 100 BuiltWith Sites 1,400,000 👑 126,000 167,000 483,000 N/A State of JS (2023) 57% used it 👑 17% used it N/A 17% used it N/A Google Trends Rank 1st 👑 4th 3rd 2nd 5th (almost 0 data) 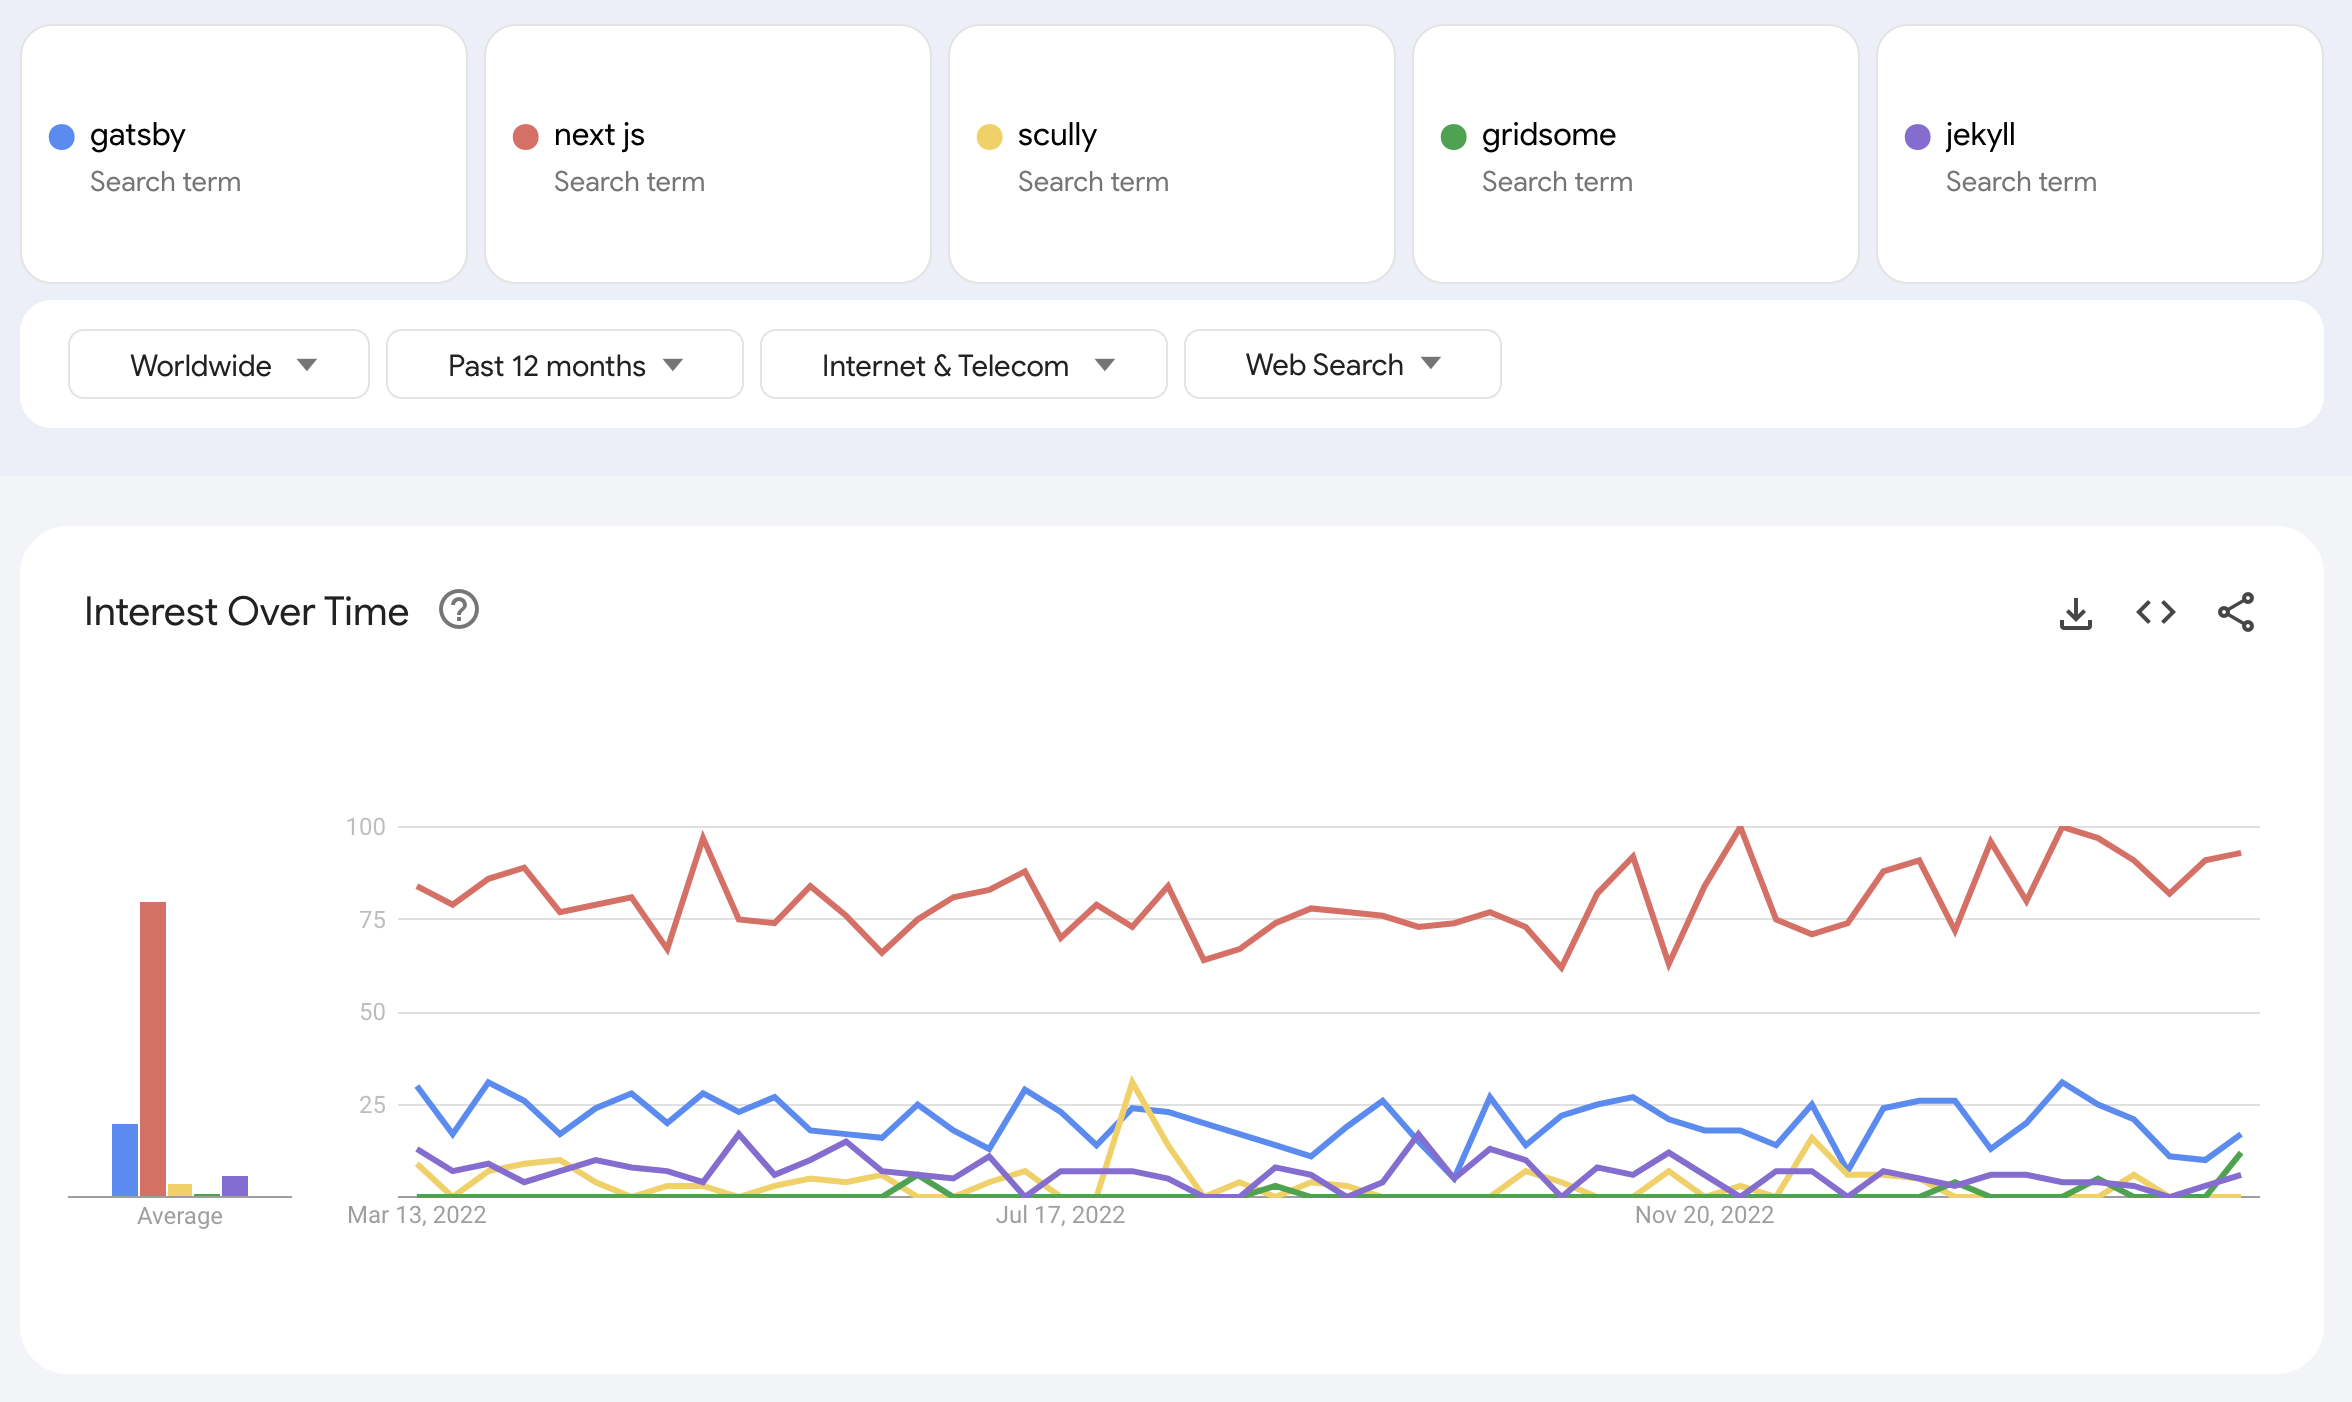
Figure: Google trends for the above SSGs. In a substantial lead is NextJS, followed by Gatsby
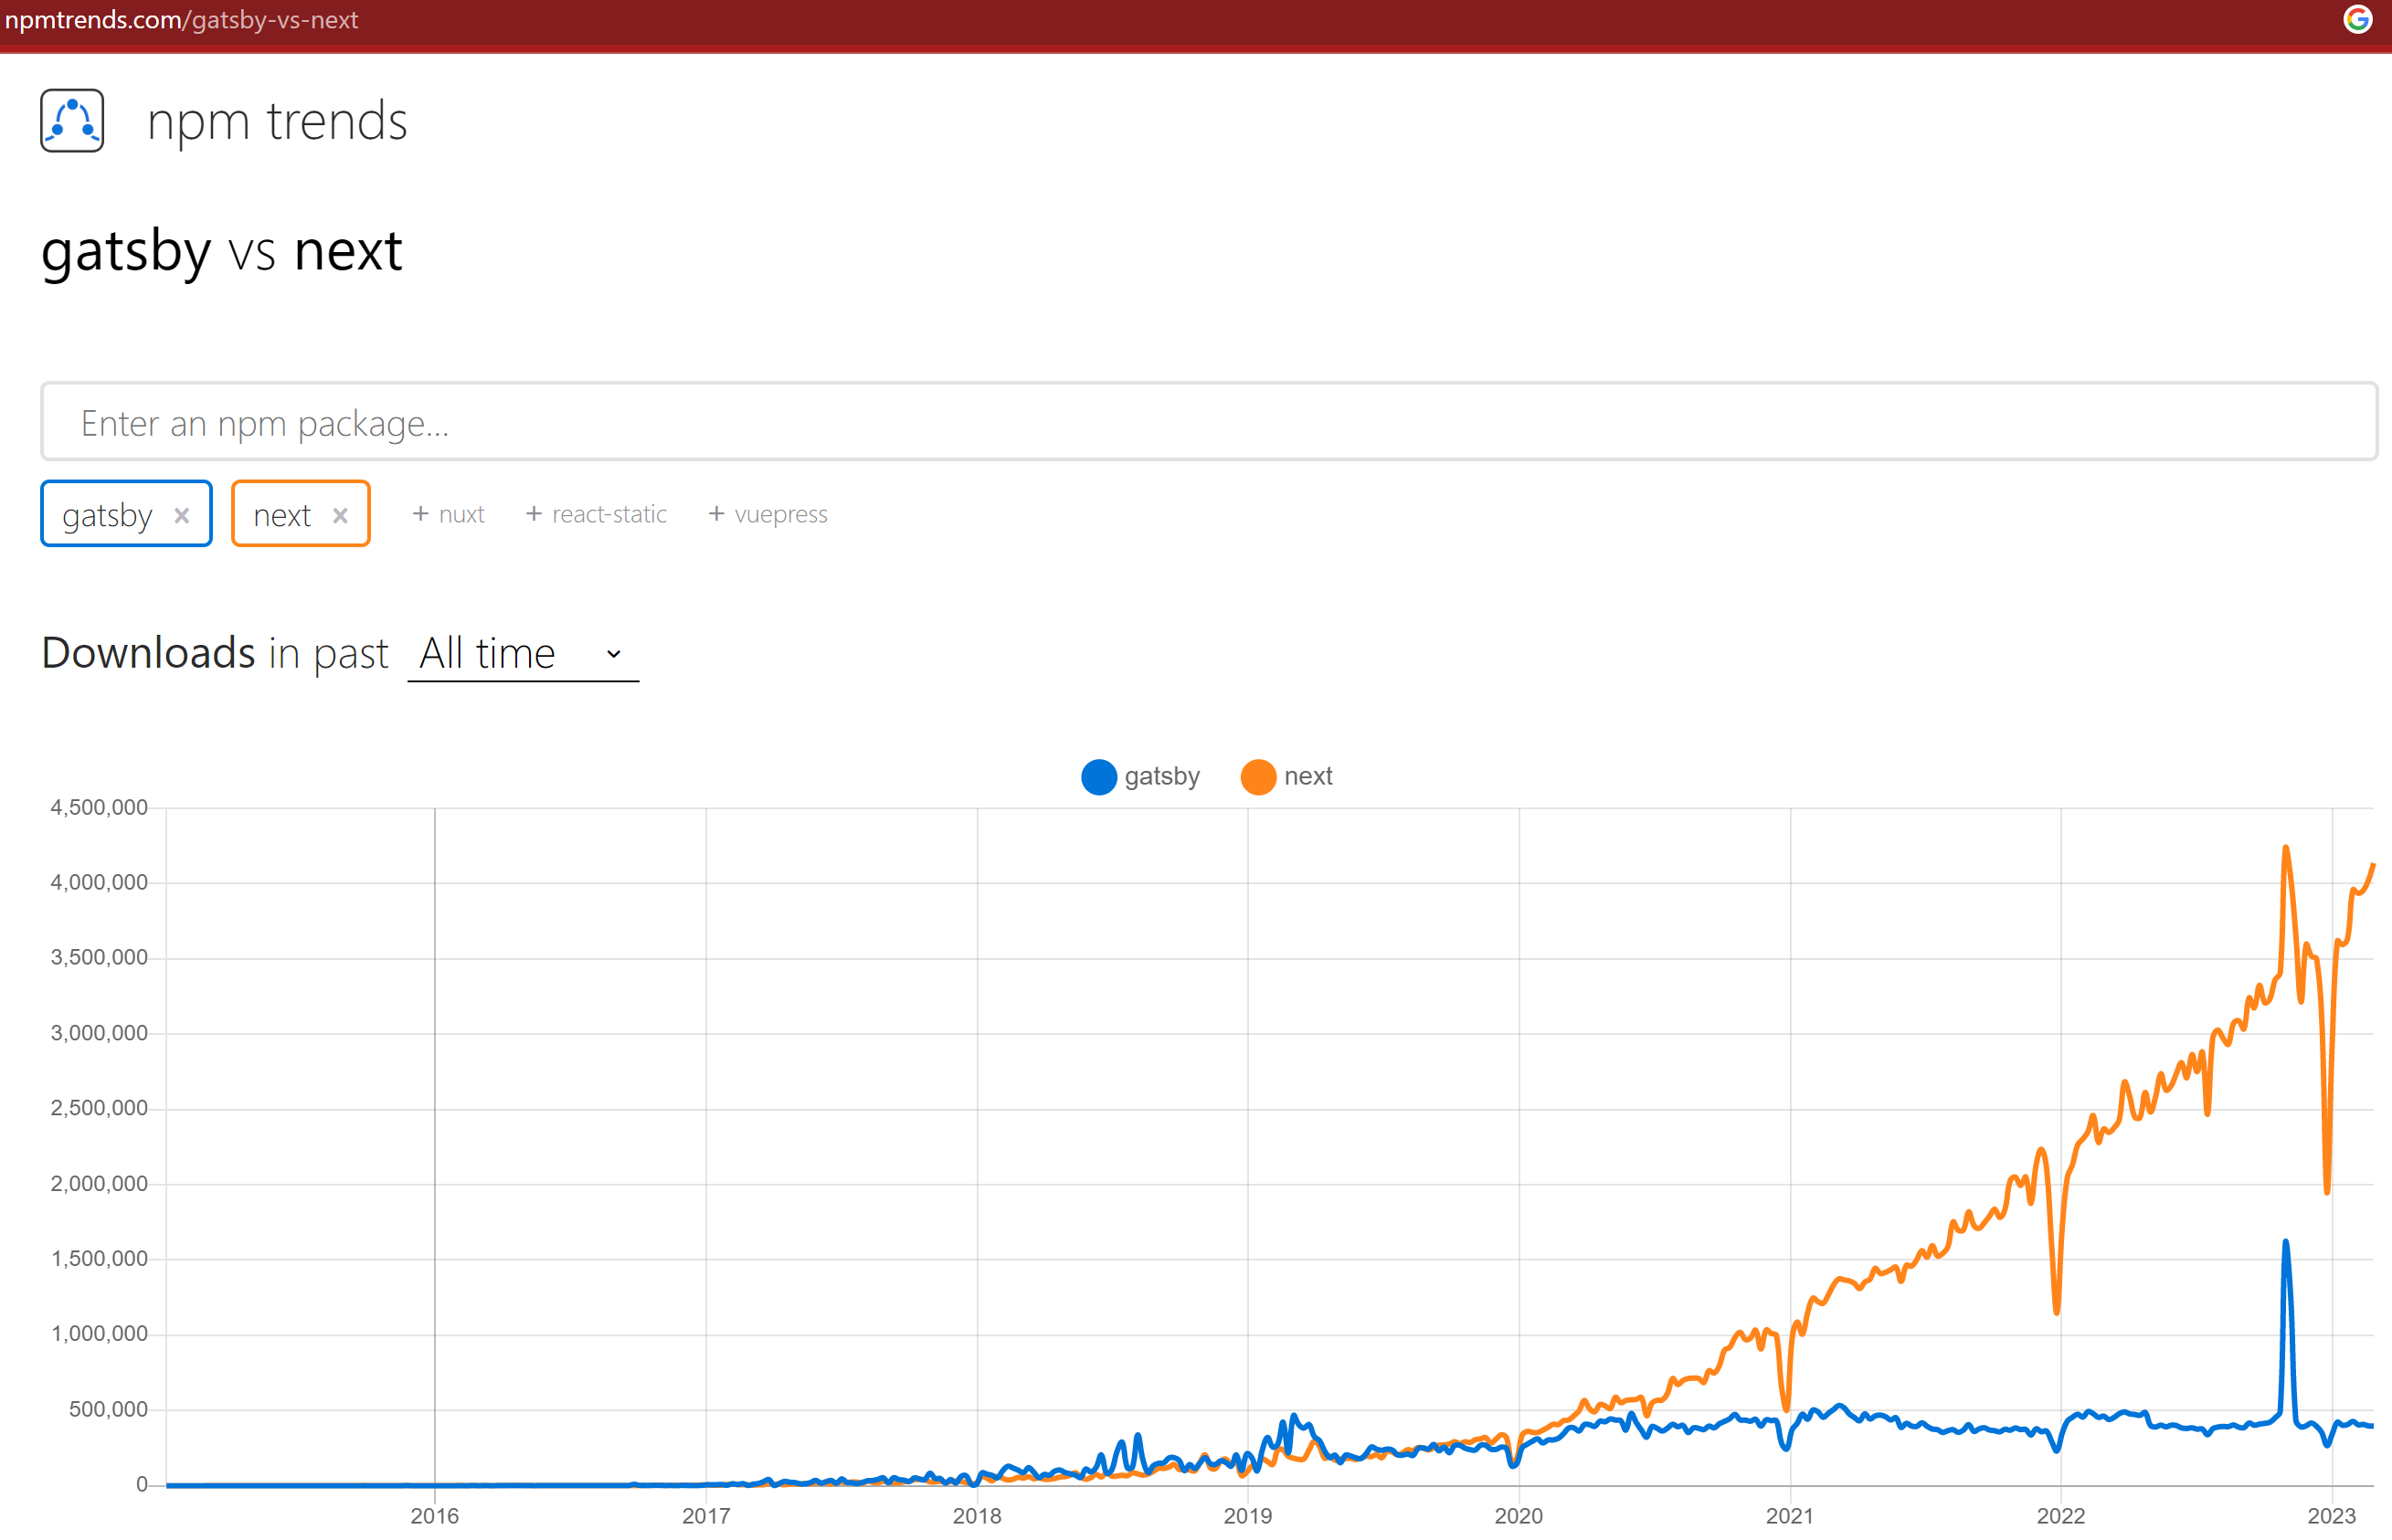
Figure: NextJS and Gatsby are the major competitors that have been duking it out, lately Next.js has exploded in popularity
Two examples of static sites in action are SSW People and SSW Rules.
There are a few hosting options to choose from including:
Name Description Pros Cons Vercel A fast, developer-friendly platform optimized for frontend frameworks like Next.js, with built-in CI/CD and global edge deployment. Vercel is recommended for applications built using Next.js. 🚀 Automatic deployments, fast CDN, Next.js support, serverless functions. ❌ Limited free tier, can be costly for high traffic. Azure static web apps Microsoft's solution for deploying static sites with integrated APIs, authentication, and automatic GitHub/Azure DevOps deployments. 🔄 Integrated with Azure Functions, authentication, GitHub Actions, free tier available. ❌ More complex setup. Azure static storage A simple, cost-effective way to serve static files from Azure Blob Storage with CDN and custom domain support. 💰 Cheap storage costs, integrates with Azure CDN, scalable. ❌ No built-in CI/CD, manual setup needed. Cloudflare A high-performance static site host leveraging Cloudflare’s global CDN, DDoS protection, and edge computing capabilities. 🌍 Free global CDN, DDoS protection, edge functions, fast builds. ❌ Limited build minutes on free tier, less backend flexibility. GitHub Pages A free, GitHub-integrated static site hosting service, best suited for personal projects, documentation, and Jekyll-based blogs. 🆓 Free for public repos, easy integration with GitHub, supports Jekyll. ❌ Limited to static sites, no server-side processing, slower updates. Surge.sh A lightweight, CLI-based static hosting service that’s quick to deploy and great for simple, no-frills web apps. ⚡ Super simple CLI deployment, free tier available, custom domains supported. ❌ Fewer features, no built-in CI/CD, not ideal for large-scale projects. Do you know why Next.js is great?
React is a powerful JavaScript library for building user interfaces. However, it doesn't provide built-in support for server-side rendering (SSR). This lack of SSR can lead to slow website load times and poor search engine optimization (SEO).
That's where Next.js comes in. Next.js is a framework built on top of React that provides several features and benefits for building high-performance websites.
A quick summary of Next.js (pay attention to the first 2.5 min)
youtube: Sklc_fQBmcsVideo: Next.js in 100 Seconds // Plus Full Beginner's Tutorial (11 min)A deeper dive on Next.js
youtube: W4UhNo3HAMwVideo: Theo Browne: Next.js is a backend framework (11 min)✅ Reasons to choose Next.js
Here are some reasons to consider using Next.js instead of React alone:
1. Incremental Static Regeneration
Next.js allows you to create or update static pages after you’ve built your site. Incremental Static Regeneration (ISR) enables you to use static-generation on a per-page basis, without needing to rebuild the entire site. With ISR, you can retain the benefits of static while scaling to millions of pages.
2. TypeScript
Next.js provides an integrated TypeScript experience, including zero-configuration set up and built-in types for Pages, APIs, and more.
3. Internationalized Routing
Next.js has built-in support for internationalized (i18n) routing since v10.0.0. You can provide a list of locales, the default locale, and domain-specific locales and Next.js will automatically handle the routing.
4. API routes
API routes provide a solution to build your API with Next.js. Any file inside the folder
pages/apiis mapped to/api/*and will be treated as an API endpoint instead of a page. They are server-side only bundles and won't increase your client-side bundle size.5. Server-side rendering
Next.js provides built-in support for SSR, which can significantly improve website performance and SEO by rendering pages on the server and sending HTML to the client.
6. Dynamic Import
Next.js supports lazy loading external libraries with
import()and React components withnext/dynamic. Deferred loading helps improve the initial loading performance by decreasing the amount of JavaScript necessary to render the page. Components or libraries are only imported and included in the JavaScript bundle when they're used.next/dynamicis a composite extension ofReact.lazyandSuspense, components can delay hydration until the Suspense boundary is resolved.7. Automatic code splitting
Next.js automatically splits code into smaller chunks, which can improve website performance by reducing the initial load time.
8. Built-in CSS, image, and font optimization
Next.js has built-in support for optimizing CSS, images and fonts. These can help reduce website load times and improve performance.
9. Automatic Static Optimization
Next.js automatically determines that a page is static (can be prerendered) if it has no blocking data requirements. This feature allows Next.js to emit hybrid applications that contain both server-rendered and statically generated pages.
10. MDX
MDX is a superset of markdown that lets you write JSX directly in your markdown files. It is a powerful way to add dynamic interactivity, and embed components within your content, helping you to bring your pages to life.
11. Incremental adoption
Next.js allows developers to add server-side rendering and other advanced features incrementally to an existing React application, making it easy to adopt and integrate into existing projects.
12. Codemods
Next.js provides Codemod transformations to help upgrade your Next.js codebase when a feature is deprecated. Codemods are transformations that run on your codebase programmatically. This allows for a large amount of changes to be applied without having to manually go through every file.
13. Simple hosting
Vercel, the company behind Next.js, provides first-class hosting for Next.js applications. It offers seamless deployment, automatic scaling, and built-in optimizations like edge caching and serverless functions.
14. Advanced caching system
Next.js 15 offers a flexible caching system that lets developers control cache behavior per route or request, optimizing performance and data freshness while reducing server load.
Summary
By using Next.js instead of React alone, developers can reduce the pain points users may experience and build high-performance websites more efficiently. However, it's important to note that Next.js may not be the best choice for every project, and developers should evaluate their project's specific needs and requirements before making a decision.
Do you know how to use NextJS caching system?
<introEmbed
  body={<>
Next.js 15 introduced a more explicit and developer-friendly caching system.
But it's not automatic—caching only activates when you *opt in* using three mechanisms: enabling two flags (`dynamicIO`, `useCache`) in your config and adding the `"use cache"` directive inside a file, a component or a function. This triple-lock prevents accidental caching and gives you fine-grained control over revalidation and tagging.
  </>}
/>
## Why it matters

Without this opt-in model, stale content can easily sneak into your UI. Now, you’re in full control. You decide what gets cached, for how long, and what tags are used for easy invalidation.

<youtubeEmbed url="https://www.youtube.com/watch?v=xWkozeculPo" description="Video: Is Next.js 15 any good? "use cache" API first look (8 min)" />

## How to enable caching introduced by Next.js 15

To start using the new cache layer, you need to activate two experimental flags in `next.config.js`, and then opt in at the file or function level using the `"use cache"` directive:

```javascript
// next.config.js
module.exports = {
  experimental: {
    dynamicIO: true,
    useCache: true
  }
}
```

Then, inside your route:

```javascript
// app/products/page.js
'use cache'

export default async function ProductPage() {
  const data = await fetch('/api/products', {
    next: { tags: ['products'] }
  })
  return
}
```

## Caching API options

Use the built-in functions below to fine-tune caching behavior:

- **`cacheLife(seconds)`**: Sets a time-to-live (TTL), similar to ISR’s `revalidate`.
- **`cacheTag(tag)`**: Associates a label (e.g. `user-123`) to allow grouped invalidation.
- **`revalidateTag(tag)`**: Clears all entries with that tag on next request—ideal for post-write updates.

```javascript
cacheLife(3600)
cacheTag(`user-${id}`)
revalidateTag('products')

export async function POST() {
  await updateDB()
  revalidateTag('products')
}
```

## Important changes with `dynamicIO`

When using `dynamicIO`, some core Next.js behaviors change:

1. `cookies()` and `headers()` become async functions:
   ```javascript
   import { cookies } from 'next/headers'
   const token = (await cookies()).get('token')
   ```

2. Route files are dynamic by default. You must explicitly add:
   ```javascript
   export const dynamic = 'force-static'
   ```
   if you want to guarantee build-time rendering.

## Pro Patterns

Use hybrid caching for best results:

```javascript
'use cache'
export default async function Dashboard() {
  const staticData = await fetch('/api/metrics', { cacheLife: 3600 })
  const liveData   = await fetch('/api/activity', { cache: 'no-store' })
  return
}

cacheTag(`user-${crypto.randomUUID()}`)
```

<figureEmbed figureEmbed={{
  preset: "goodExample",
  figure: 'Figure: Good example - Mixing real-time and cached content gives you performance *and* freshness',
  shouldDisplay: true
} } />


## Additional Notes

- Cache keys are based on build ID + args, so new props auto-generate new cache entries.
- The client router cache uses `staleTime: 0` by default—navigations recheck the server.
- Deploys automatically clear cache, so no need for manual flushing.

You can learn more in depth about how to cache with Next.js in the [official documentation](https://nextjs.org/docs/app/building-your-application/caching).

## Common Pitfalls

Avoid caching components that depend on non-serializable props (e.g. `children`):

```javascript
'use cache'
function SafeCache({ children }) {
  return <section>{children}</section>
}
```

## Debugging Tips

To inspect what was cached or missed:

```bash
NEXTJS_CACHE_ANALYTICS=1 next build
```

This emits a hit/miss report for each route to the console, giving visibility into caching behavior.
Do you know the best CMS solutions for websites?
You don’t want to build solutions from scratch, so take what business value you can from a CMS: don't reinvent the wheel.
A CMS allows business users to build and manage websites without having to write any code.
Top CMS vendors (including eCommerce and websites)
These CMS platforms work really nicely for simple scenarios. If they fit your business case then use them.
Source: WordPress Market Share Statistics (2011-2024)
Top CMS vendors for enterprise websites (.NET based)
When you have a complex business case, you need something more customizable. That's where enterprise CMSs come into play.
- DotNetNuke - (open source / pricing non-transparent)
- Sitefinity - ($$ approx $40k per year)
- SiteCore - ($$ approx $50k per year)
- Umbraco - (open source / pricing non-transparent)
- Kentico Xperience - (formerly Kentico EMS / $$ approx $20k per year)
Source: Top 5 .NET Based CMS Platforms For Your Business (Updated 2023)
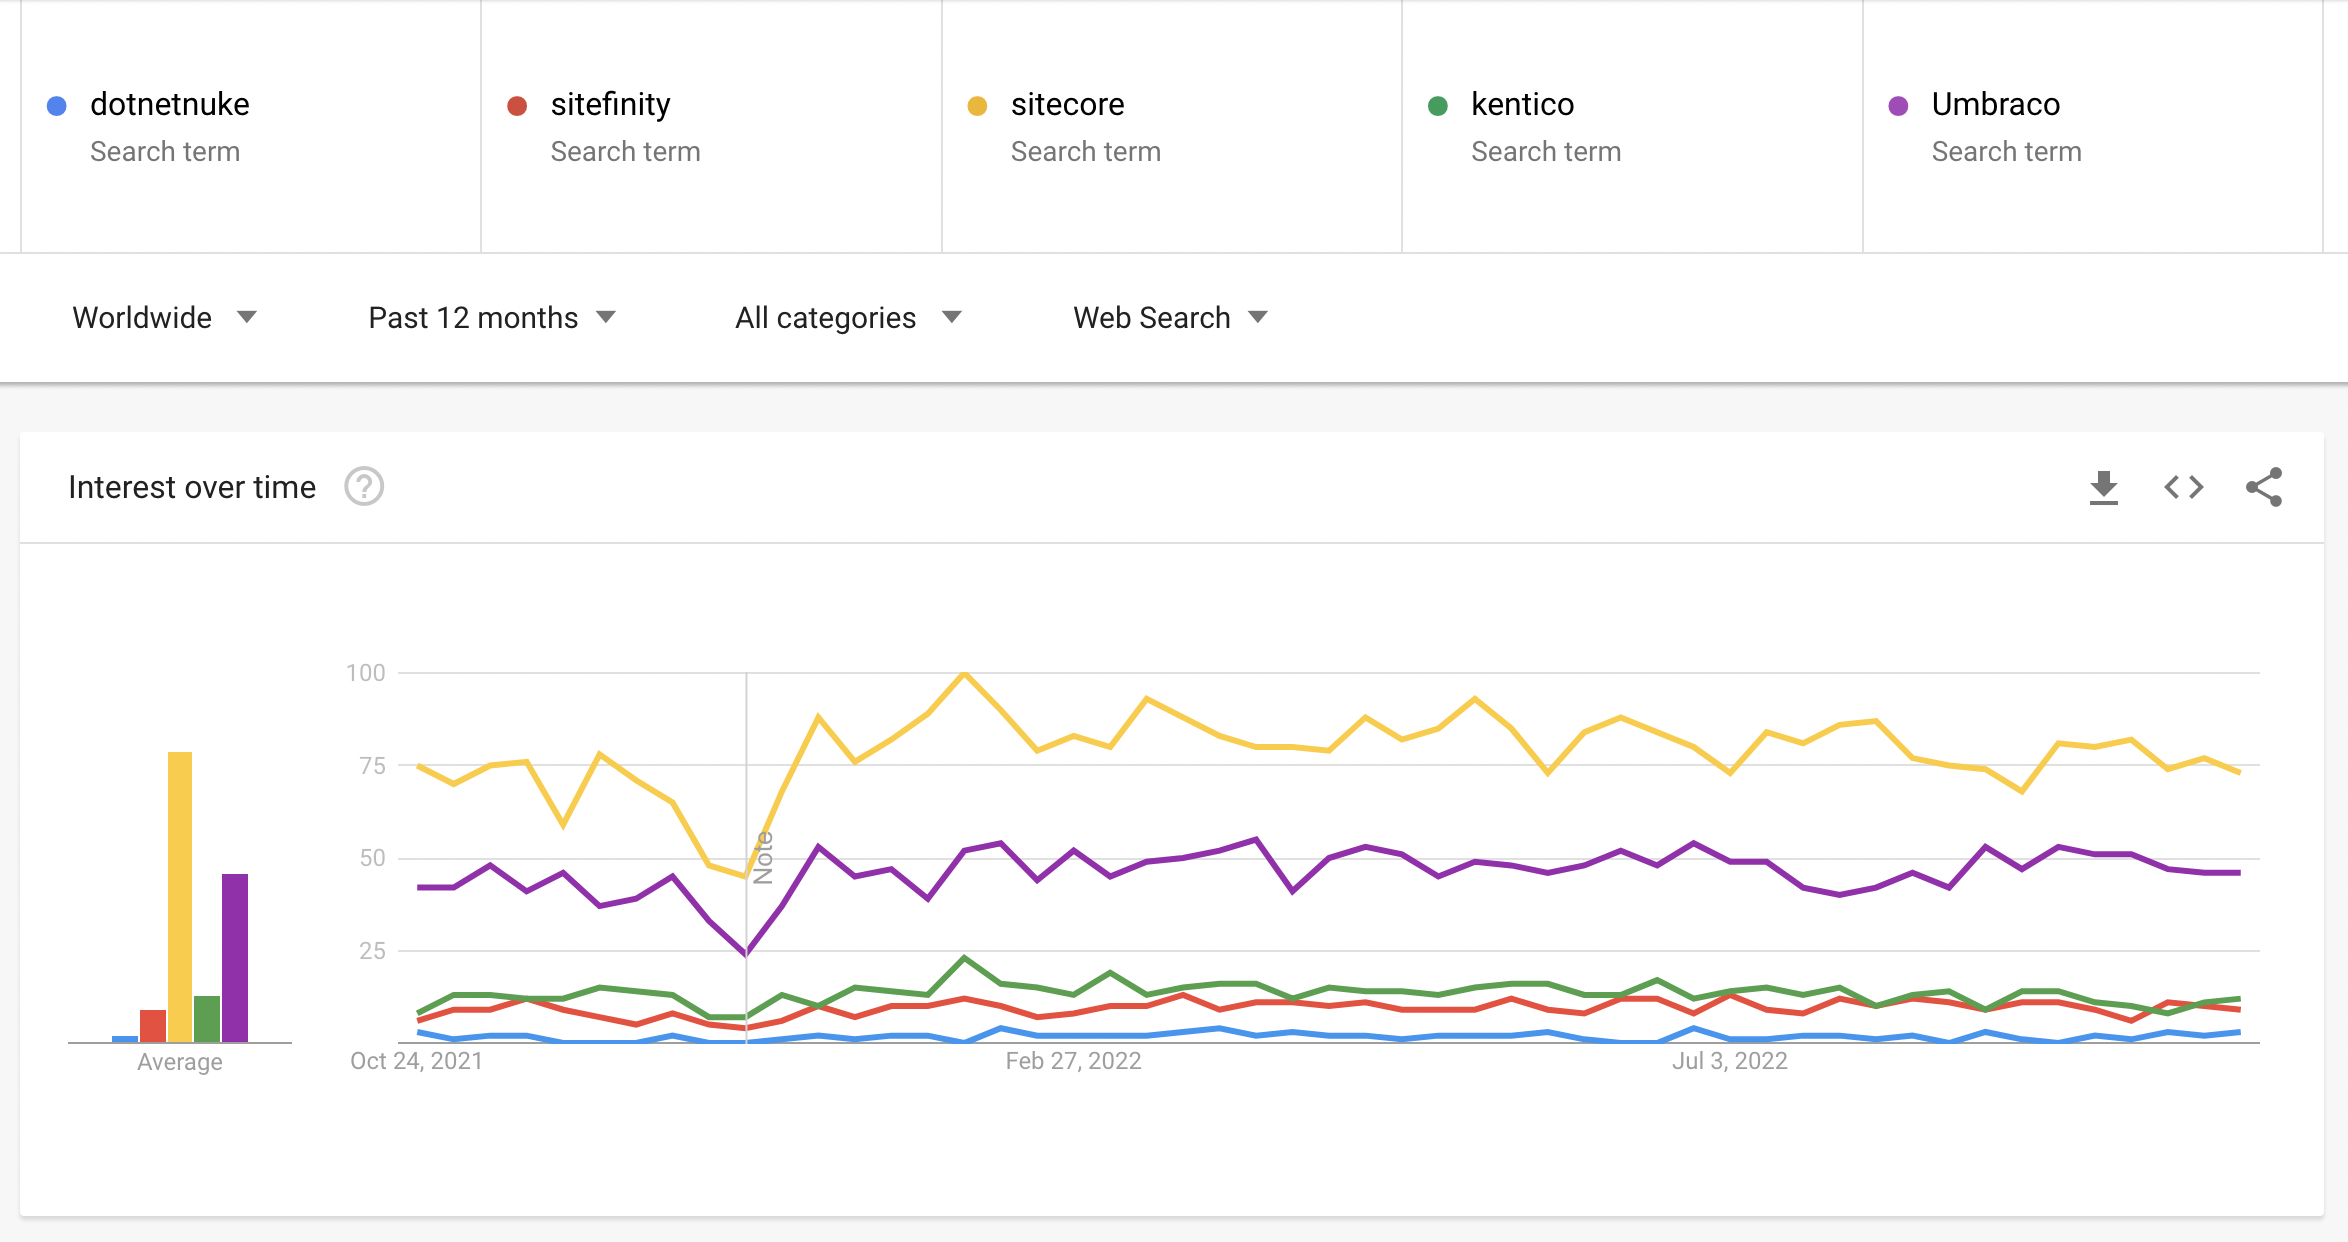
Figure: Google trends of the above .NET CMSs. The leading (but most expensive) is SiteCore, and in second is Umbraco (which is much cheaper)
View current trend information for these products.
Top headless CMS
- WordPress VIP - (pricing non-transparent)
- Sanity.io - (pricing non-transparent)
- Magnolia - (pricing non-transparent)
- Contentful - (pricing non-transparent)
- Arc XP - (pricing non-transparent)
Source: 16 Best Headless CMS For Publishers in 2023
Other headless CMS (.NET based)
- Squidex (open source / free / $ enterprise plan)
- SiteServer (open source / free)
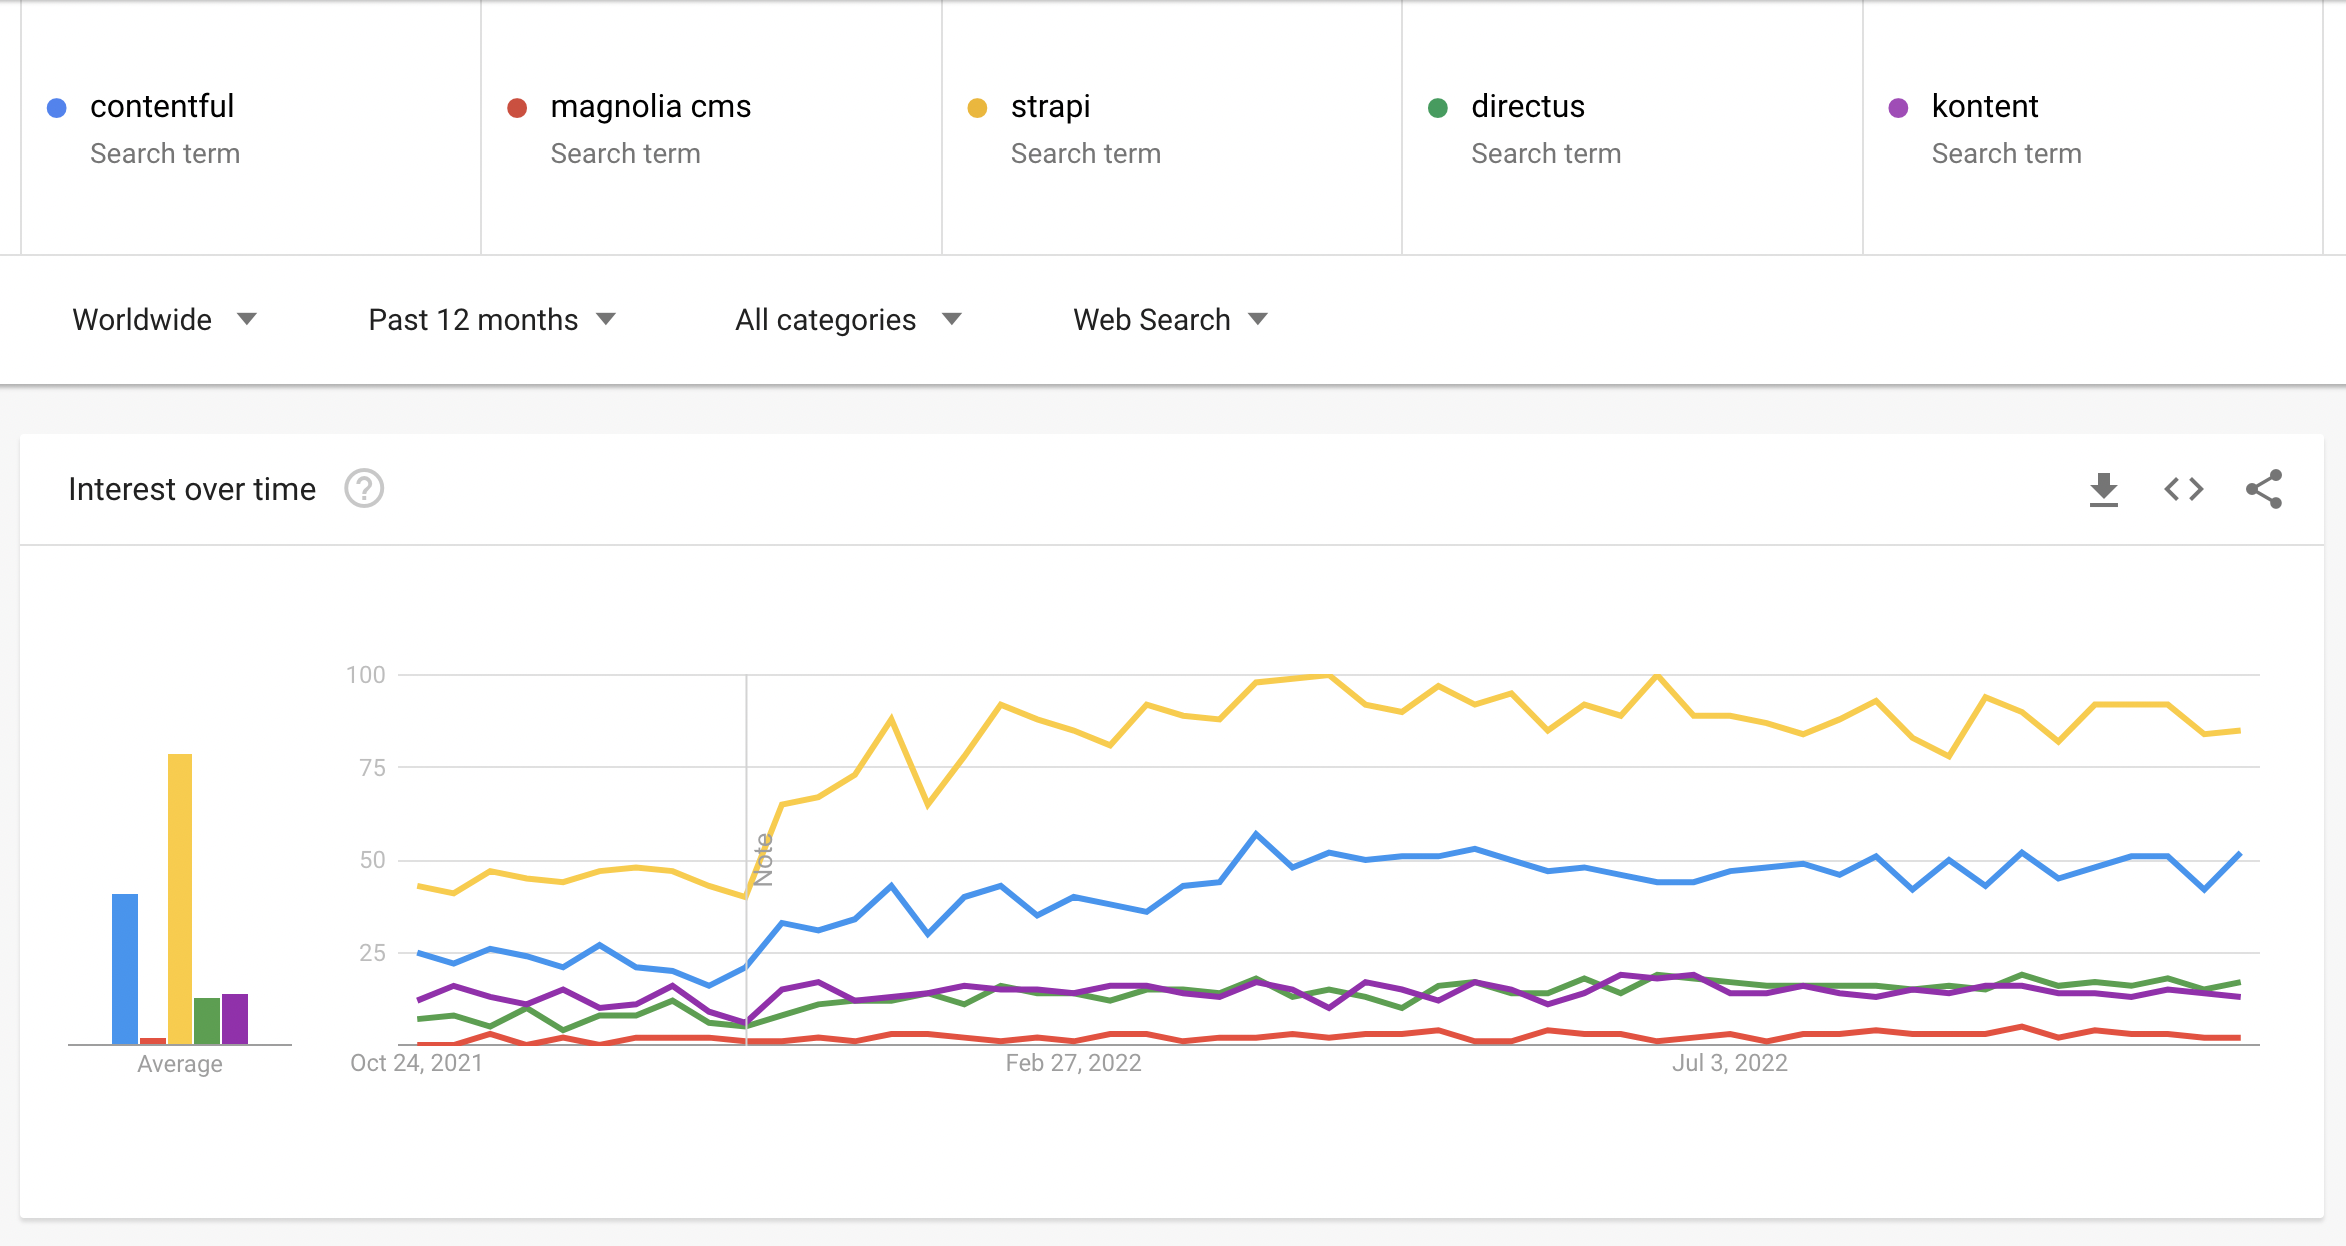
Figure: Google trends of the above Headless CMSs. The leading is the open-source Strapi, which is inexpensive, but not as feature rich as Contentful (second) and Kontent (third)
View current trend information for these products.
Headless CMS vs Traditional CMS
A Traditional CMS is a monolith, which means it has both a front-end and back-end. It uses server side technology like PHP (Wordpress, Joomla, Magento) or ASP.Net (DNN, Umbraco, Sitefinity) and a single database. All pages are served by one or many backend servers.
A Headless CMS deals strictly with the content. Created content is accessed via Application Programming Interfaces (APIs), which gives you full flexibility on how you build the front-end for your website. Headless CMSs are also very appropriate for JAMstack sites: see the State of Jamstack 2021 Report by Kentico for more information.
For example, you can use a Headless CMS with a super fast Static Site Generator (SSG): see the rule on the best static site tech.
Source: UDig - Traditional CMS vs Headless CMS
Traditional CMSs like Sitecore and Kentico Xperience have their place, especially if you have no developers and you’re comfortable with serious vendor lock-in. Headless CMSs and static sites for the win. -Adam Cogan
Here is a breakdown of Traditional CMS architecture vs Headless CMS architecture:
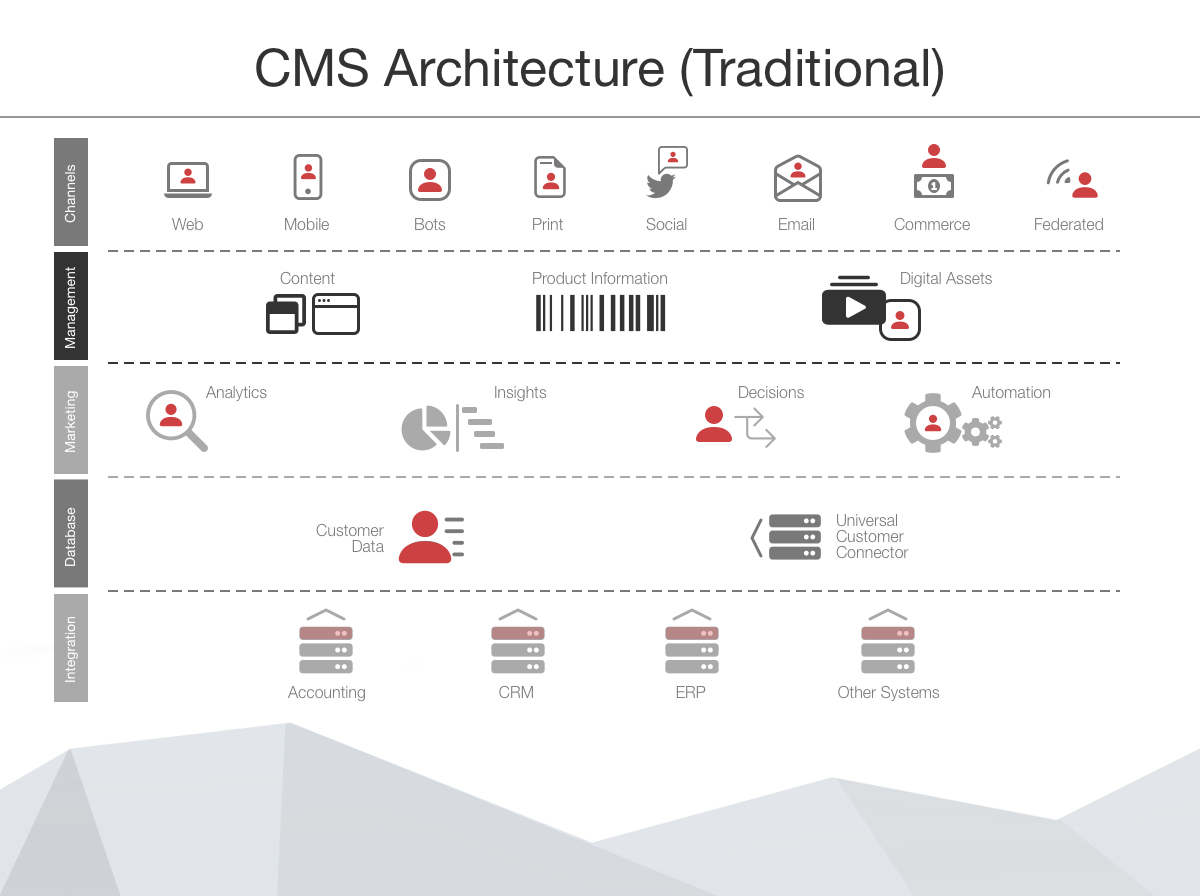
Figure: Traditional CMS Architecture
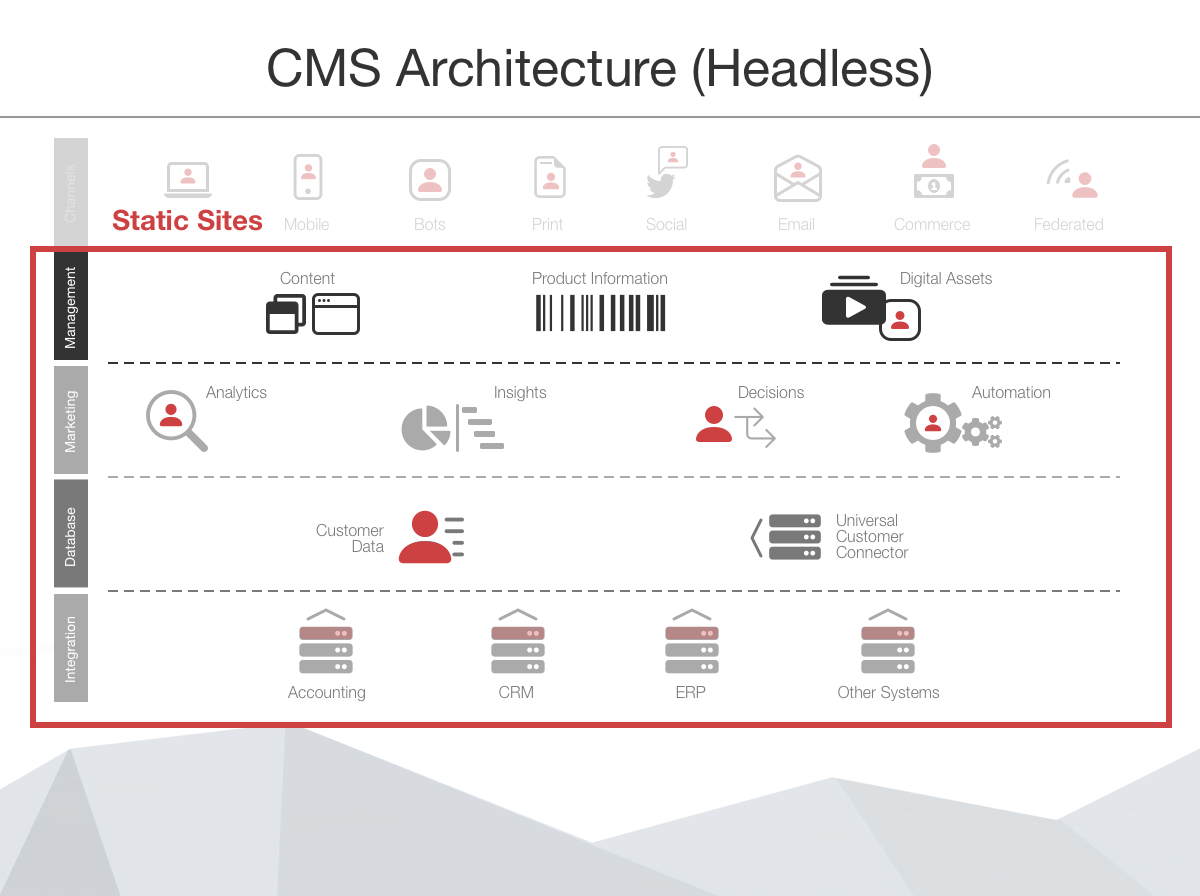
Figure: Headless CMS Architecture
✅ Traditional CMS - Pros
- Simple and fast - For setup and maintenance
- Less reliance on developers - You won't be as reliant on developers to make changes, and may be able to forgo them completely for small-medium projects. More complex CMSs will require developer involvement but non-developers still have some customisation control
- Simple to control look and feel - Using available themes and templates
- Large community support
- Out of the box integrations - Payments, social media, etc
❌ Traditional CMS - Cons
- Performance is not amazing - The frontend is coupled with the backend
- Does not scale very well - All pages render server side, so you will need more servers if you have lots of traffic
- Locked-in - Content is only available on browsers and not on native mobile apps
- Limited flexibility - You are limited to themes and templates, e.g. if you want to build a multi-step form
- You need developers with particular CMS skills - If you have a big website or are using complicated CMS features, you will need CMS developers - e.g. for SiteCore or Sitefinity
- It is not an API first solution
✅ Headless CMS - Pros
- Super fast - Fast initial load time when using Static Site Generator (SSG)
- Scales very well - When using Static Site Generator, and the frontend can be cached via CDN
- Ultimate flexibility with how to use content - Can use a Single Page Application (SPA), Static Site Generator (SSG) or even native mobile apps. Not restricted by themes, templates or vendor, and you can have multiple frontends with 1 headless CMS backend
- Many options to build frontend - NextJs, HUGO. Gatsby, React, Angular, etc. This makes it easier and cheaper to find developers
- Easy publishing - The same content can be published to different platforms at the same time (website, web app, native mobile app)
❌ Headless CMS - Cons
- Very reliant on frontend developers - Anything beyond basic content changes will require frontend dev involvement
- Greater overhead - To maintain the code base, DevOps, etc
- Limited preview functionality - Kontent provides in-context editing via Spotlight, however most Headless CMSs do not. Netlify CMS can help in this case
Hybrid CMS
Some CMSs (e.g. Optimizely offer a hybrid approach including both headless integration and a fully featured UI. As such, you can get the best of both worlds by going down this route. However, pursuing this option comes at a premium with prices matching or exceeding traditional CMSs. An entry level figure for Hybrid CMSs is approximately $50,000 but this figure can quickly increase to several hundred thousand $ as you include add-ons and other features.
Headless CMS Comparison: Kontent vs Contentful
Let's compare two popular CMSs.
Terms:
Content Modelling - The ability to model your website components, and see how they are used in your website Collections - Allows you to manage content dependent on your business and geographical structure. This eliminates the use of silos, which make it more difficult to manage your data
Website optimisation - See the Kontent's useful docs on this topic.
Name Kontent (Recommended) - Video (3 mins) Contentful - Video (1 min) In-Context Editing ✅ Info ❌ Hierarchy Projects Environments Collections Spaces Environments Personalized Experiences ✅ via Uniform ✅ via Uniform SSO and MFA ✅ ✅ GraphQL Support Soon: October 2021 ✅ Localization ✅ ✅ Content Modelling ✅ ✅ Unlimited Content Types ✅ ❌ Content Collaboration ✅ + Simultaneous Editing ❌ Task Management ✅ Info + better functionality ✅ Info Workflows ✅ ✅ Website Optimisation ✅ ❌ Roadmap Transparency Better: feature release roadmap Good: Info Australian Compliance ✅ stored in an Australian Azure Data Center ❌ stored in a United States AWS Data Center Dev/Staging/Prod Data Migration Prod only by default - Add migration script and pipeline Prod only by default - Add migration script and pipeline Email Campaigns Use 3rd party best of breed tool e.g. MailChimp Use 3rd party best of breed tool e.g. MailChimp User Tracking e.g. Leads, funnels External CRM e.g. Salesforce Pardot, Dynamics 365 Marketing External CRM e.g. Salesforce Pardot, Dynamics 365 Marketing Statistics External Analytics e.g. Google Analytics External Analytics e.g. Google Analytics CDN Fastly Cloudfront Developer Friendly ✅ ✅ Pricing Premium: $30,000 pa (cheaper with scaling) Team: $24,000 pa (with Compose + Launch) Assuming you want enterprise features, Kontent is preferred as the Headless CMS of choice over Contentful.
Source: Kentico Kontent vs. Contentful
Dead CMSs
- Microsoft SharePoint for public sites
- CommunityServer.org
Do you use Git-based Content Management Systems (CMS)?
Developers love Git 😍, and while it was originally built as a version control system for source code, it's now used to power all kinds of awesome tools - including Content Management Systems (CMS)! So how is a Git-based CMS different to a traditional CMS platform, and why would you want to use one?
Video: Git-based Content Management Systems | Gordon Beeming | SSW Rules (4 min)Difference between traditional and Git-based CMS platforms
When traditional content management systems (CMS) were designed to cater to the needs of marketers, they prioritized ease of use but often lacked the flexibility crucial for developers. Modern developers, accustomed to continuous integration and continuous delivery (CI/CD) processes inspired by DevOps principles, thrive on workflows that enhance productivity.
Most traditional CMS platforms rely on centralized databases and content storage services that not only impose limitations but also prescribe the overall capabilities of the content repository and the CMS. Conversely, a Git-based CMS offers version control for both content and configuration together - meaning you have much greater flexibility (and speedier development!) when compared with a traditional CMS.
Git-based CMS platforms
Below is a list of some of the most popular tools:
TinaCMS (recommended)
TinaCMS is an open-source CMS that integrates with various static site generators. It's designed to be lightweight and flexible, allowing inline editing and real-time preview.
✅ Pros
- Open-source
- Git-based versioning & workflows
- GitHub Contributions
- MDX Support for rich reusable components
- Editorial Workflows
- Supports Single Sign-On (SSO)
❌ Cons
- Manage Pull Request in GitHub
- Some minor UX issues
- Pricing Tiers
CrafterCMS
CrafterCMS is a headless CMS designed for high-performance content applications. It's not traditionally categorized strictly under "Git-based CMSs," but it does provide Git-based versioning and workflow capabilities, which makes it highly scalable and suitable for managing complex content structures.
✅ Pros
- Git-based versioning & workflows
- Open-source
- Docker Image
- Supports most UI Frameworks
- GraphQL support
- Unlimited Sites, Projects, Users
❌ Cons
- Does not support MDX
- Need a user account
There is also an enterprise version of CrafterCMS that has more features, like Internationalization and Generative AI. However that solution is $$$ Super expensive.
Publii
Publii is a static site generator that offers a desktop app, providing a user-friendly interface for managing content offline. It integrates well with Git and supports syncing with various hosting services. It can get overlooked because it's seen more as a site generator with CMS features rather than a pure CMS.
✅ Pros
- Open-source
- Privacy focused
- Can sync content with git
❌ Cons
- Does not support MDX
- No GitHub contributions
- Desktop Based Only
Contentrain
Contentrain is a headless CMS that offers a Git-based workflow, aligning the content editing process closely with the codebase. It's quite new in the market, and is quite niche (JSON and no GitHub).
✅ Pros
- Pricing is comparable/affordable to most API-based CMSs
- Real-time collaboration
- Git-based versioning & workflows
- Internationalization
❌ Cons
- JSON based content
- No GitHub contributions
- Need a user account
StaticCMS
StaticCMS was designed to work well with static site generators and is a lesser-known brand. StaticCMS is a fork of Decap CMS (previously Netlify CMS).
Update: Static CMS has been archived.
✅ Pros
- Editorial Workflow (in Beta)
- Open Authoring (in Beta)
- GitHub Contributions
❌ Cons
- No MDX support
- No live-preview (markdown preview only)
Do you know the best online documentation site?
Introduction
When it comes to creating, managing, and hosting documentation, choosing the right tool can significantly impact productivity and user satisfaction.
Poor documentation platforms can lead to confusion, inefficiency, and a lack of engagement.
Conversely, selecting the right tool can enhance clarity, collaboration, and overall user experience.
Top Documentation Sites
Here are some of the top online documentation sites:
TinaCMS
Features:
- Git-based
- Open-source
- Inline editing and real-time preview.
- Supports Markdown and JSON files.
- Flexible and customizable with a strong focus on content editing experience.
Use Case:
- Best for developers looking for a headless CMS with a great content editing experience.
GitBook
Features:
- Easy creation of documentation with a Markdown editor.
- Version control and collaboration features.
- Hosting and customizable themes.
Use Case:
- Ideal for teams needing a collaborative platform for project documentation.
ReadMe
Features:
- Focuses on API documentation with interactive and dynamic features.
- Built-in analytics to track usage and engagement.
- Supports code snippets, changelogs, and user authentication.
Use Case:
- Best for creating and managing API documentation with user analytics.
Docusaurus
Features:
- Open-source project by Facebook.
- Easy setup and maintenance of open-source project documentation.
- Uses Markdown and integrates with React.
Use Case:
- Suitable for open-source projects and developers familiar with React.
MkDocs
Features:
- Static site generator geared towards project documentation.
- Written in Python and uses Markdown.
- Various themes and plugins.
Use Case:
- Great for Python developers needing extensive project documentation.
Docsify
Features:
- Lightweight documentation site generator.
- No statically built HTML files; loads Markdown files dynamically.
- Easy integration with existing projects.
Use Case:
- Ideal for lightweight, quick documentation needs.
Hugo
Features:
- Fast static site generator.
- Supports Markdown with many themes.
- Suitable for simple and complex documentation.
Use Case:
- Versatile option for both small and large documentation projects.
Conclusion
Choosing the right documentation site depends on your specific needs, including the type of documentation, desired features, and the development environment.
By evaluating these options, you can select a tool that enhances clarity, collaboration, and overall user satisfaction.
Do you use Web Compiler extension?
You can use Visual Studio's Web Compiler extension to create a bundle.css and test if CSS was compiled successfully.
More information and download at Visual Studio Marketplace.
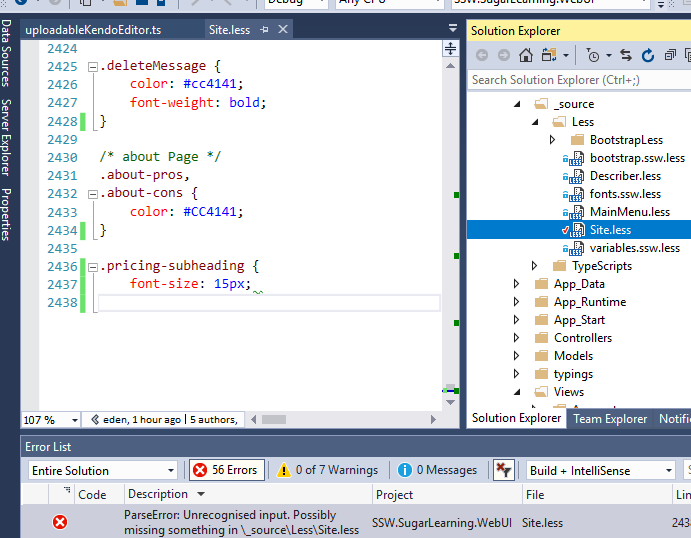
✅ Figure: Web Compiler can find missing curly braces
Unfortunately different kinds of errors, like are not caught.
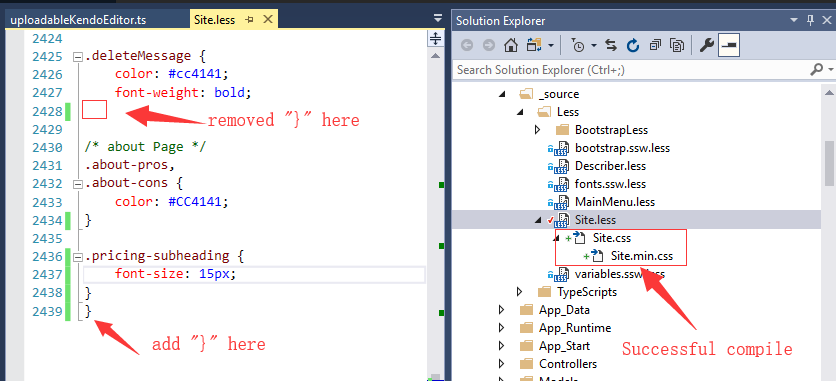
❌ Figure: Curly braces in the wrong place, but still compiled successfully
In addition, Gulp is wrongly successful too:
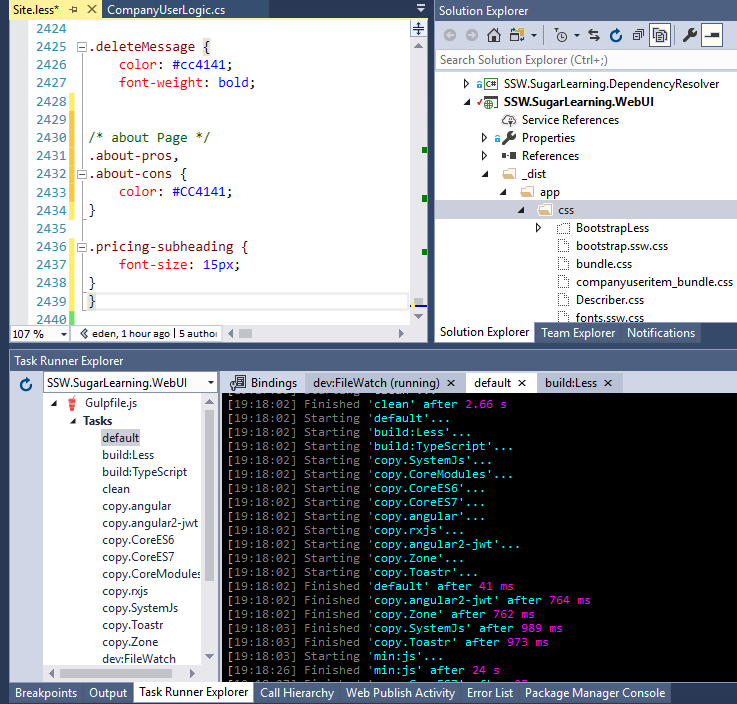
❌ Figure: Gulp couldn't find the curly braces error
Do you keep your npm and yarn packages up to date?
Video: NPM package hell 🔥... How to avoid going insane with [Brook Jeynes](https://ssw.com.au/people/brook-jeynes/) (4 min)NPM packages often get new releases (adding new functionalities, fixing bugs or vulnerabilities). It is important to keep the packages updated as much as possible during the development of your application. The best way to do that is to update all the packages every time you add a new package to your application, and include the
npm outdatedandnpm auditreports in the Sprint Review. These commands are also available with yarn withyarn outdatedandyarn audit.# NPMnpm outdatednpm audit# Yarnyarn outdatedyarn auditRunning
npm outdatedreturns an overview of your packages versions showing:- The current version your project is using
- The wanted version, i.e. the maximum version of the package that satisfies the semver range specified in package.json
- The latest version of the package
The packages output from this command will also show up in different colours:
- Red indicates the package version is below the wanted version
- Yellow indicates the package version is at the wanted version but below the latest version
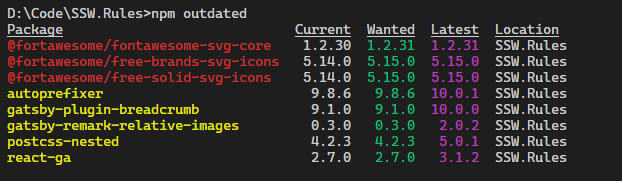
Figure: Use 'npm outdated'
npm auditreturns an audit on your packages for vulnerabilities. It also provides information on how to resolve them.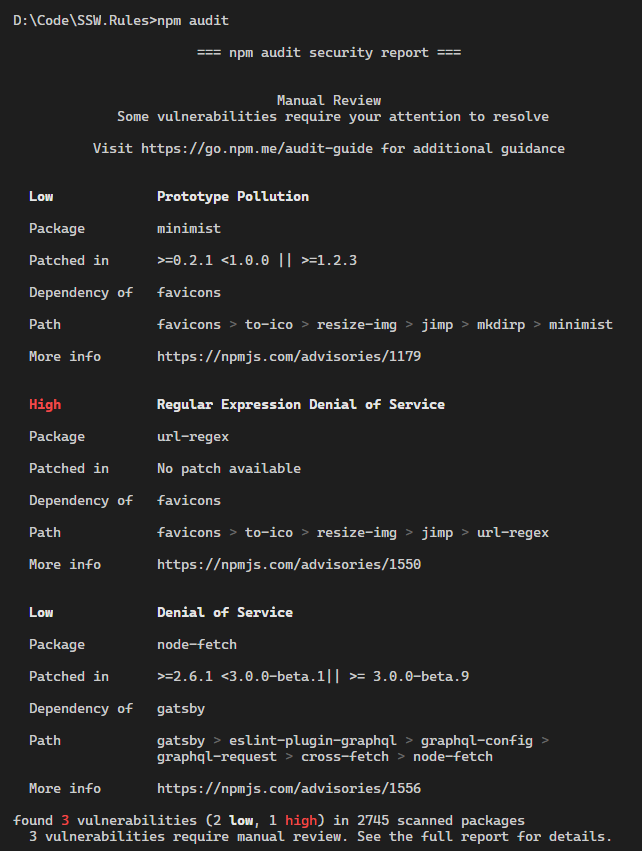
Figure: Use 'npm audit' to discover vulnerabilities in your application
To add a new package, use:
# NPMnpm install package-name# Yarnyarn add package-nameTo update your packages, use:
# NPMnpm update package-name# Yarnyarn upgrade package-nameYarn also has a useful tool called
yarn upgrade-interactivethat allows you to see which packages are outdated, and upgrade them all at once.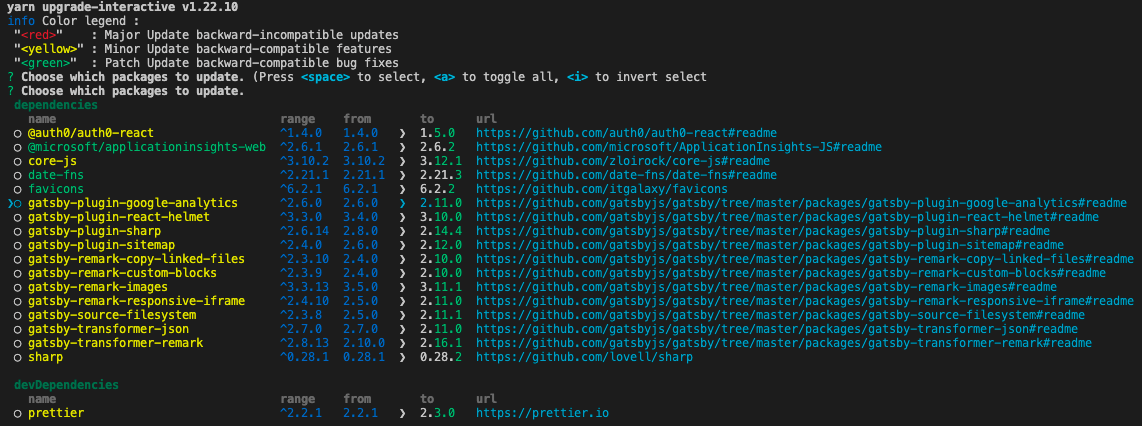
Figure: Using yarn upgrade-interactive
Note: Use
yarn upgrade-interactive --latestto see outdated packages with breaking changes.Do you know what the different symbols mean for npm version?
When managing dependencies in a javascript project, selecting the right versioning symbols like
^,~, or*can make a big difference in your project's stability. This guide helps you understand what these symbols mean and how to use them effectively.Why version symbols matter
Dependency management is critical for maintaining stability, security, and compatibility in your project. Using the wrong symbol can result in unexpected updates, breaking changes, or missing out on important fixes.
Semantic versioning (SemVer) refresher
npm uses Semantic Versioning (SemVer), structured as:
"dependencies": {"react" : "MAJOR.MINOR.PATCH"}- MAJOR: Breaking changes
- MINOR: Backward-compatible new features
- PATCH: Backward-compatible bug fixes
Understanding SemVer helps you understand the common version symbols below. Learn more about semantic versioning
🎯 Symbols cheat sheet
1. Caret (
^)Allows minor and patch updates.
Example:
^1.0.0matches>=1.0.0and<2.0.0.2. Tilde (
~)Allows only patch updates.
Example:
~1.0.0matches>=1.0.0and<1.1.0.3. Wildcard (
*)Matches any version.
Example:
*installs the latest version.What happens behind the scenes?
When you run
npm install, npm resolves the version of the dependency based on the range specified in yourpackage.json. It installs the latest version that satisfies the range and then locks that exact version in thepackage-lock.jsonfile. This ensures future installs use the same version, even if newer versions are released (unless you deletenode_modulesor thepackage-lock.jsonfile and re runnpm install).💡 Best practices
- Use
^(caret) only when you trust the package maintainers - Use
~(tilde) when you want only patch updates for bug fixes - Avoid wildcards (
*) for production projects - Lock exact versions for critical applications to ensure stability
By understanding these symbols, you can avoid unexpected error and keep your project on track! 🚀
For more details about npm version selection and symbols, check out the official npm documentation on semver ranges.
Do you monitor your application for vulnerabilities?
Efficient software developers don't reinvent the wheel and know the right packages to use when monitoring vulnerabilities in both frontend and backend packages. 🔐 Using a bunch of third-party libraries as the supporting building blocks to build modern, high-quality applications became a common practice since they save time and money in full-stack projects.
But this comes with an unexpected side effect: out-of-date packages that must be updated and re-tested, and even worse, vulnerabilities can be introduced!
One of the big challenges for developers to address is when a project has been delivered to a client and gone into maintenance mode. With no developer actively working on the project, if a vulnerability is discovered in a library referenced in the project, no one will be aware of it, and it will cause pain.
However, if you monitor the packages you have installed, and a vulnerability is reported, then as developers, we have a duty of care to inform our clients.
Level 0 - Manual tracking
List all installed packages in a file and cross-check with the advisory board and Google it, and change each lines regularly. Not recommended because this consumes time.
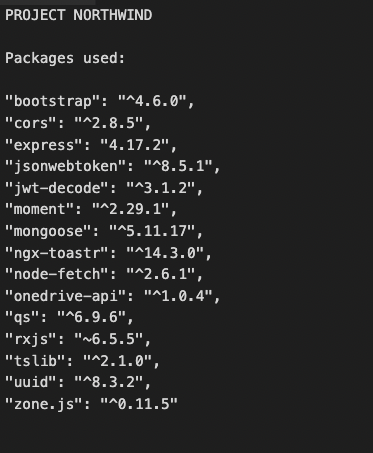
❌ Figure: Bad example - Tracking list of packages manually
Level 1 - Using tools to scan for vulnerabilities
Modern package managers such as npm or NuGet offers a way to check for vulnerabilities in the installed libraries. See Do you keep your npm and yarn packages up to date?
- npm:
npm audit - yarn:
yarn audit - dotnet cli:
dotnet list package --vulnerable
Regularly running this command can give a summarised report on known vulnerabilities in the referenced libraries.
This is an improvement over manual tracking but still requires a developer to check out the latest code and then run the command.
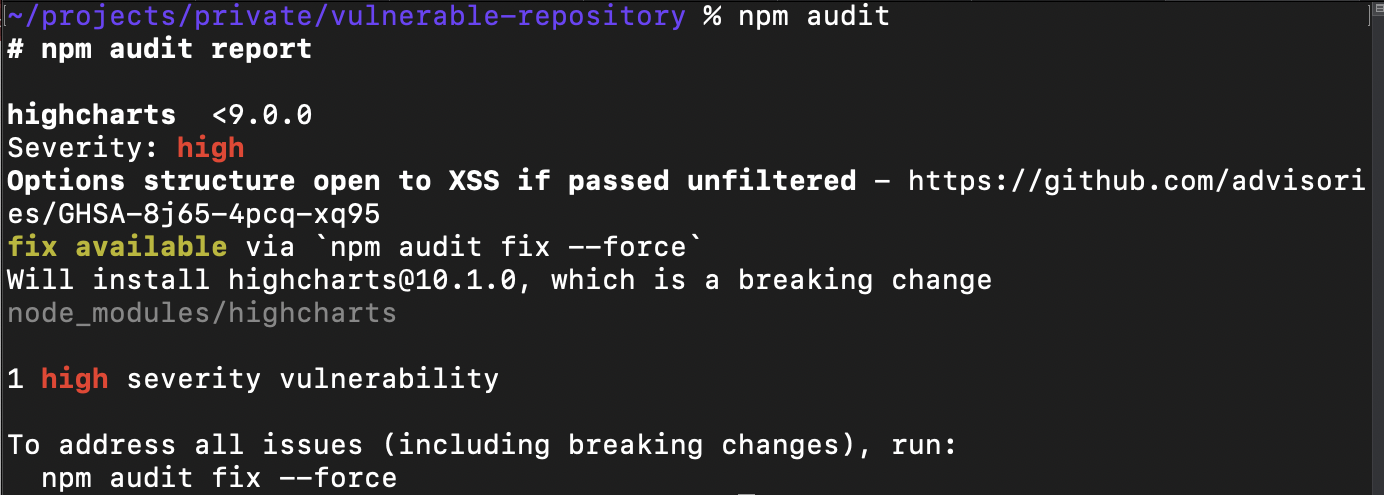
😐 Figure: OK example - This npm audit command informs that there is 1 package with a high severity vulnerability
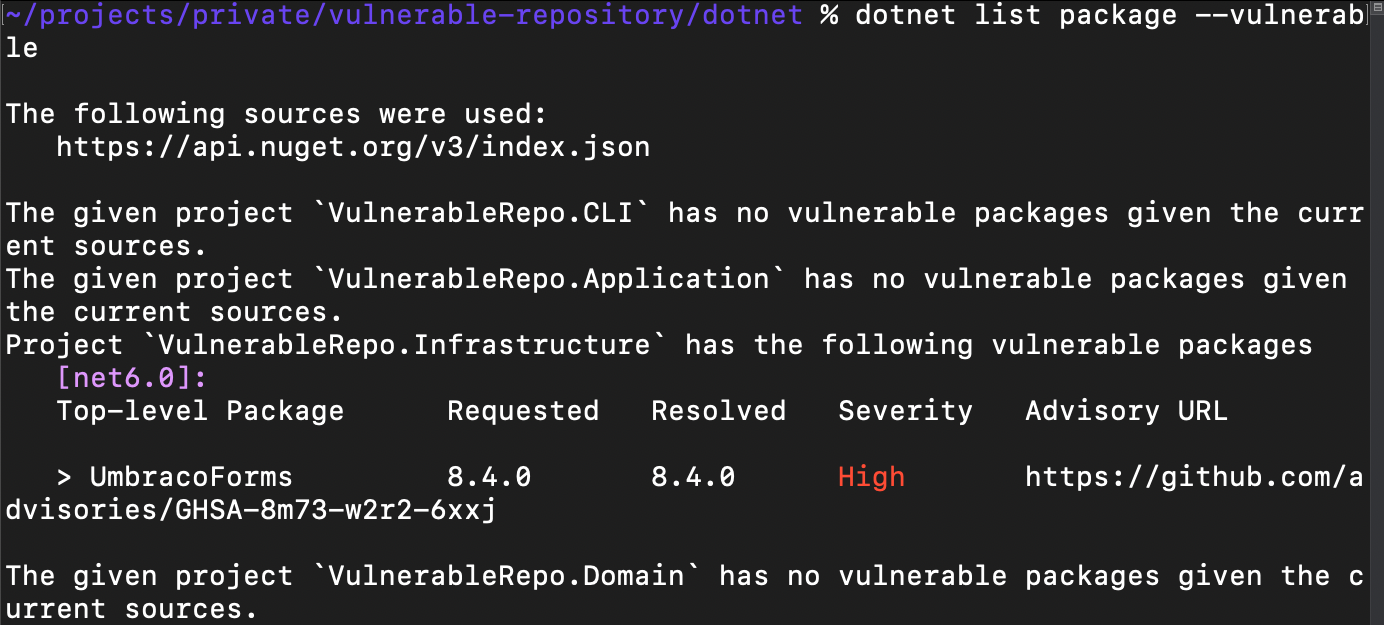
😐 Figure: OK example - This dotnet command informs that there is 1 package with a high severity vulnerability
Level 2 - Automate vulnerability scanning (recommended)
Using 3rd party tools can help you to automate vulnerability scanning.
These tools will alert you whenever there's a security vulnerability detected in the project and optionally raise a PR for it.
Some of the available tools in the market:
- Dependabot - free for all repositories under GitHub, easy to set up in the repository settings (recommended). Used in SSW Rules
- GitHub Enterprise Advanced Security - $ includes Dependabot plus additional features like code scanning. See here for more details.
- Snyk - $
- Sonatype - $

✅ Figure: Good example - Dependabot produces a vulnerability report periodically (and can raise a PR for you)
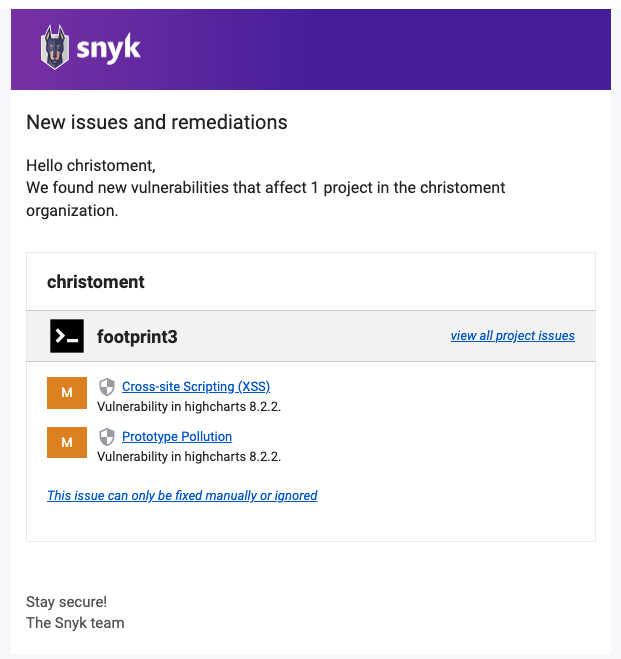
✅ Figure: Good example - Snyk produces a vulnerability detection alert email
Do you perform migration procedures with an approved plan?
A migration from one technology to another is a process fraught with danger. Everyone would love the "upgrade" button to work perfectly but it doesn't. Expect any migration to fail first go. Any statement that "I didn't expect to have any problems" shows inexcusable optimism.
A plan for a migration will typically include:
- Business purpose for migration
- Test migration
- User Acceptance Testing of the test migration
- Rollback procedure
- Decommissioning procedure
Approved plans are mandatory for a migrations such as:
- Exchange Server 2003 to 2007
- ISA Server to a hardware firewall
- Phone system to VoIP
- etc.
Do you know the best ways to manage your bundle size?
Shipping a large JavaScript bundle can be catastrophic for your web app - resulting in longer load times and a poor user experience using a web app. It is very easy for this to be the case when using a web framework such as React or Angular, as adding packages to an already large amount of framework code can result in a bloated JavaScript bundle.
Despite the efforts made by tools like Webpack, Rollup or Vite to optimize your JavaScript bundle, these may not be sufficient if your project has an excessive number of NPM packages. Each package introduces additional code to your bundle, and unnecessary or redundant packages can quickly inflate its size. Identifying and eliminating such packages can help keep your bundle lean and efficient. Here are some tools that can help with this process:
depcheck
Depcheck is a great CLI tool that scans your project to automatically detect unused dependencies in a project, giving you a clear and concise list of unused packages in a repository.
npx depcheck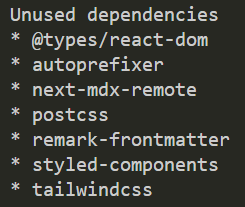
Figure: A list of the unused dependencies in a project
Note: It is important to be mindful when using this tool of packages that are still in use in the project, either in the build steps or otherwise (e.g.
tailwindcssin the example above is not explicitly imported in the project, but is still used behind the scenes).Bundlephobia
Bundlephobia is a great tool for quickly seeing the bundle size of NPM packages. You can find the bundle size of any NPM package by going to the URL: bundlephobia.com/package/{{ PACKAGE_NAME_HERE }}.
You can also upload a package.json file to display a list of packages in your project, allowing you to easily see which NPM packages have the largest size in the project. You can find it at bundlephobia.com/scan.
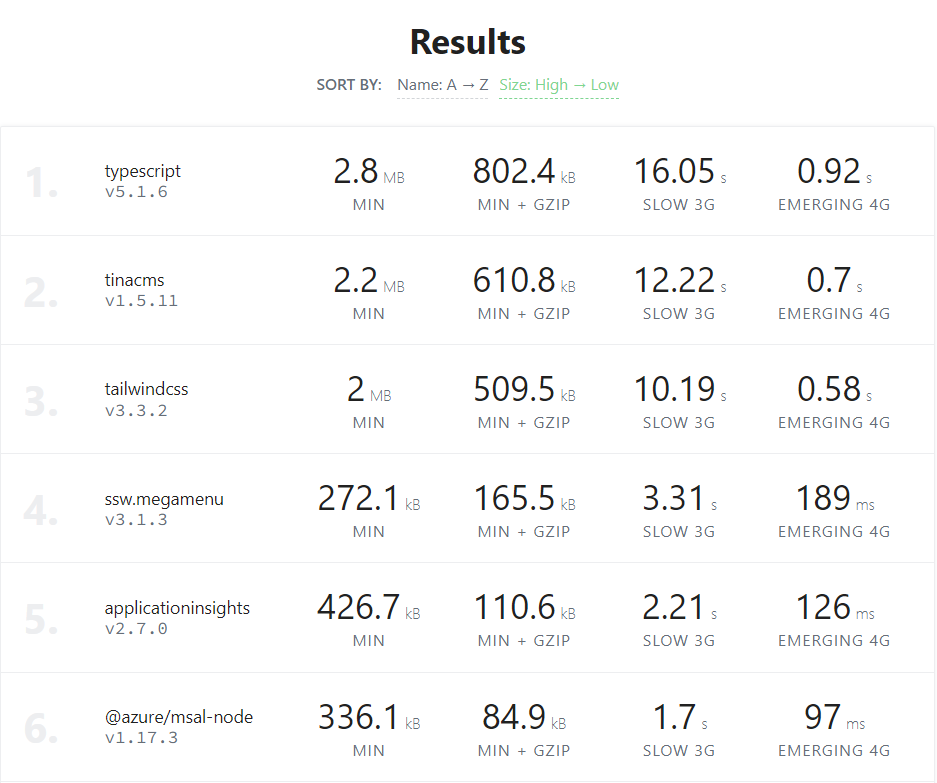
Figure: The list of packages from the package.json file, sorted by size
Note: It is important to understand that not all of the packages in your
package.jsonfile are shipped to the client, this is primarily a tool used to assess specific client-side packages that you suspect may have a large bundle size (for example, some packages may only be used by the server or within the build steps of the project i.e.typescriptortailwindcss).Import Cost VSCode Extension
The Import Cost extension for VSCode, developed by Wix shows the size of each NPM package you import, which can provide useful visual feedback on how large the packages you importing actually are. You search the extension on the Visual Studio Code Extension Marketplace at Import Cost.

Figure: The extension in action - shows you how large each package is, as you import it
Webpack Bundle Analyzer
If your JavaScript project is using Webpack (most React/NextJS projects will be), you can use the NPM package
webpack-bundle-analyzerto easily visualise the size of the NPM dependencies contained in the client bundle.If you are using NextJS, it is advised to use Next's custom implementation of the package -
@next/bundle-analyzer.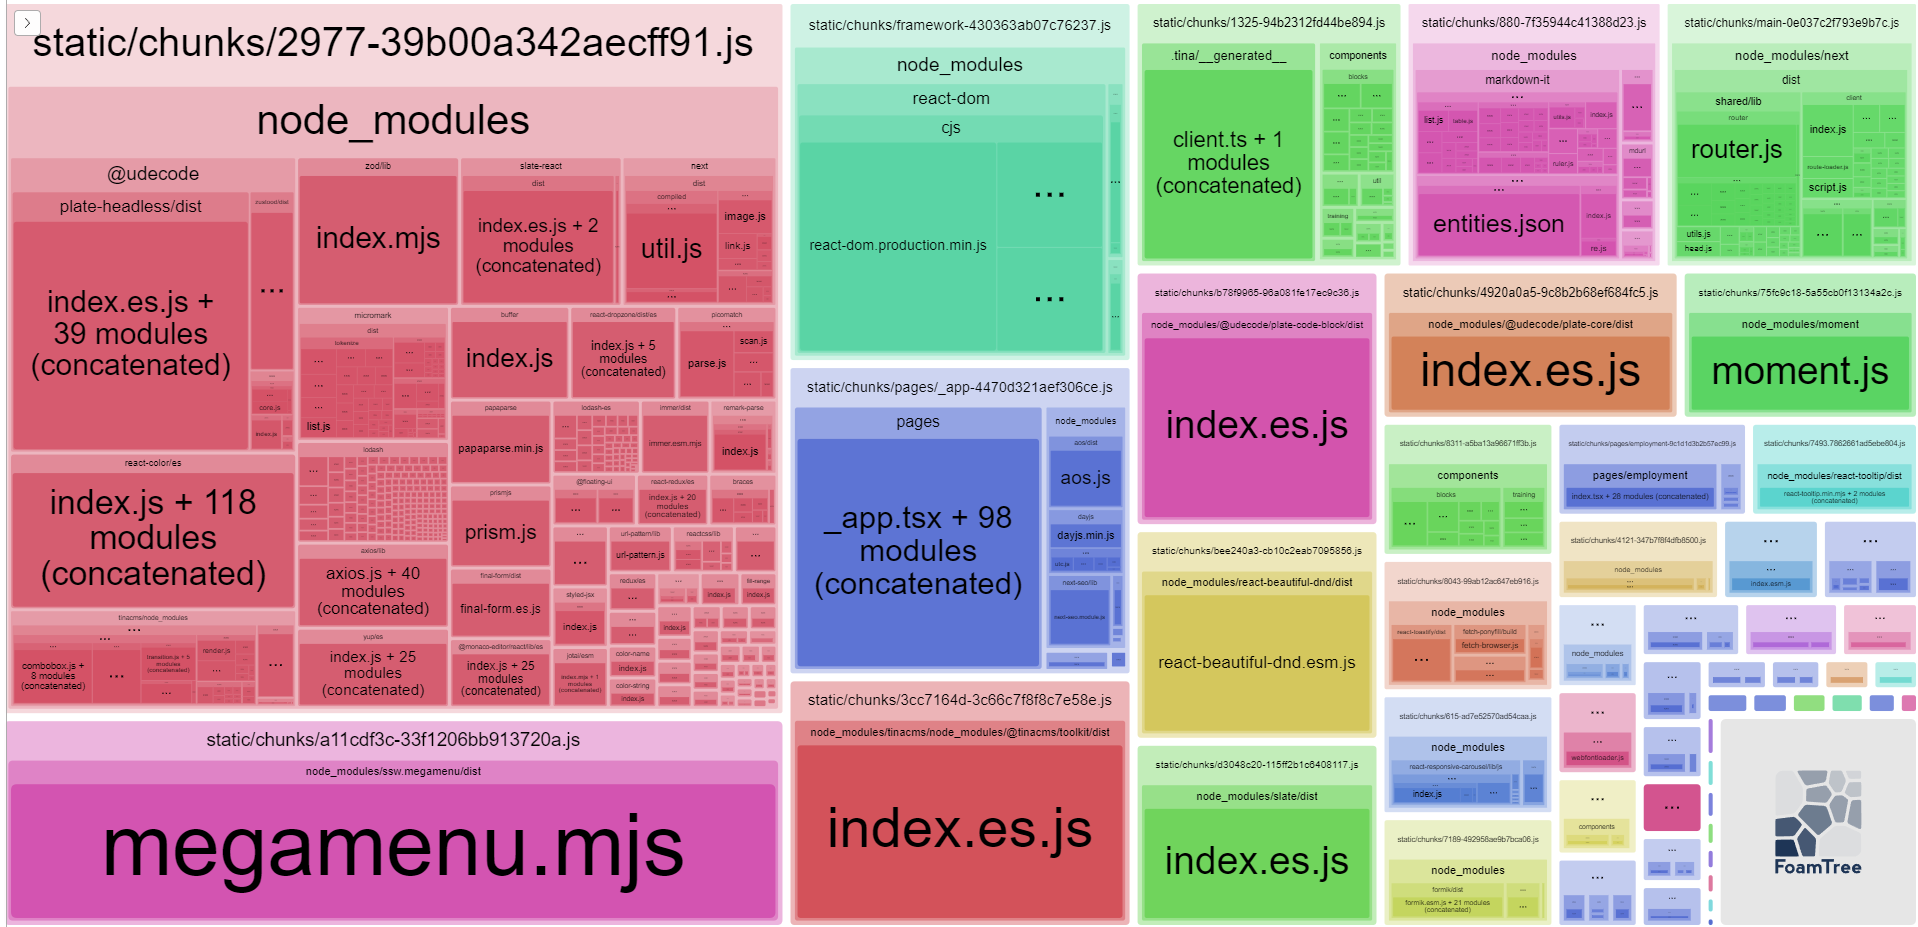
Figure: The bundle map for the NextJS SSW Website
Do you keep your website loading time acceptable?
Nobody Likes a Slow Website. You should optimize the performance of your websites so it loads as quick as possible.
You should use Pingdom Website Speed Test to analyze the load speed of your websites and learn how to make them faster.
Then work to keep it under 3 MB:
Rating Page Size ❌ Unacceptable > 3 MB 👍 OK 1.5 MB to 3 MB (apple.com is 1.5 MB) ✅ Good < 1.5 MB ⭐️ Excellent < 1 MB Do you allow users to comment and rate your pages?
If you have published content on the internet, it's a good idea to allow your visitors to comment and rate your pages. Collecting feedback is a great way to make it easier to maintain your content. You can see which content is out of date, and which content is more highly regarded by your user base. This lets you focus on creating the most relevant content that you can. As well as providing you with feedback, allowing people to participate makes them feel more engaged with your content, broadening your reach.
There are a few ways that you can easily add comments and interactivity such as using widgets from:
Main Options
Giscus
✅ Pros:
- Uses GitHub discussions to store comments
- Uses GitHub login - most people already have this
- Simple and lightweight
- Always free
- Open source
- No tracking scripts
- No ads
❌ Cons:
- No moderation features
Disqus
✅ Pros:
- Moderation features
- Spam protection features
❌ Cons:
- Heavy - adds lots of tracking scripts
- Need a separate login
- Paid (Unless you want ugly ads 🤮)
Other options
- Utterances - Very similar to Giscus, but uses GitHub Issues instead of Discussions. Giscus is recommended over Utterances as using Issues for comments will pollute your backlog.
The following is a Done Video that explains Giscus integration to SSW Rules.
Video: SSW Rules moved from Disqus to Giscus (5min)Do you know the best framework to build an admin interface for Web Apps?
When it comes to developing an admin interface for your web application, choosing the right framework is crucial. The best option often depends on your existing tech stack, the complexity of your application, and the specific needs of your admin users. We'll explore the factors to consider when selecting a framework and provide some top recommendations.
Stick to your existing tech stack
If your application already has an established tech stack, it's generally advisable to stick with it. Maintaining consistency across your application can simplify development, reduce onboarding time for new developers, and make it easier to manage dependencies.
Here are some reasons to stay within your current stack:
- Familiarity - Your team is already comfortable with the tools and languages in use
- Integration - Existing components and services can be more easily integrated
- Reduced overhead - Fewer technologies mean less complexity in your build and deployment processes
However, if your current stack isn't suited for an admin interface, or if there are significant improvements to be made, it might be worth exploring new options.
Evaluating frameworks
When considering frameworks for building an admin interface, keep the following criteria in mind:
- Ease of Use - The framework should allow for rapid development and easy maintenance
- Customizability - Look for options that provide flexibility for unique UI requirements
- Community Support - A strong community can be invaluable for troubleshooting and finding resources
- Performance - Ensure that the framework can handle your app’s data load efficiently
Top trameworks to consider
React / Next.js
React provides a component-based architecture that makes building complex UIs intuitive. With Next.js, you gain additional features like server-side rendering and static site generation, which can improve performance and SEO.
Best for: Applications that require dynamic content and a rich user interface. Ideal for teams already using React for their frontend.
For more information, see our rules:
💡 Tip: Next.js is particularly popular these days as it offers the best experience for prototyping (feature-rich, flexible, zero-config deployment with Vercel), while being perfectly capable of covering most production-grade apps with great performance.
Blazor
Blazor allows you to build interactive web UIs using C# instead of JavaScript. It can be a great choice for .NET developers looking to leverage their existing skills.
Best for: .NET applications where you want a seamless experience across client and server-side development, particularly for teams familiar with C#.
For more information, see our rule:
Angular
Angular offers a robust framework for building single-page applications (SPAs) with a strong focus on scalability and maintainability. It includes powerful features like two-way data binding, dependency injection, and a rich set of built-in components.
Best for: Large applications requiring a structured framework that can handle complex features and extensive data management.
For more information, see our rule: