Rules to Better CRM for Users
Do you know the CRM roadmap?
The Dynamics 365 Release plans provide a snapshot of what Microsoft has been working on in the Dynamics 365 CRM business. You can use it to find out what was recently made generally available, released into public preview, is still being developed and tested, or is no longer developed.
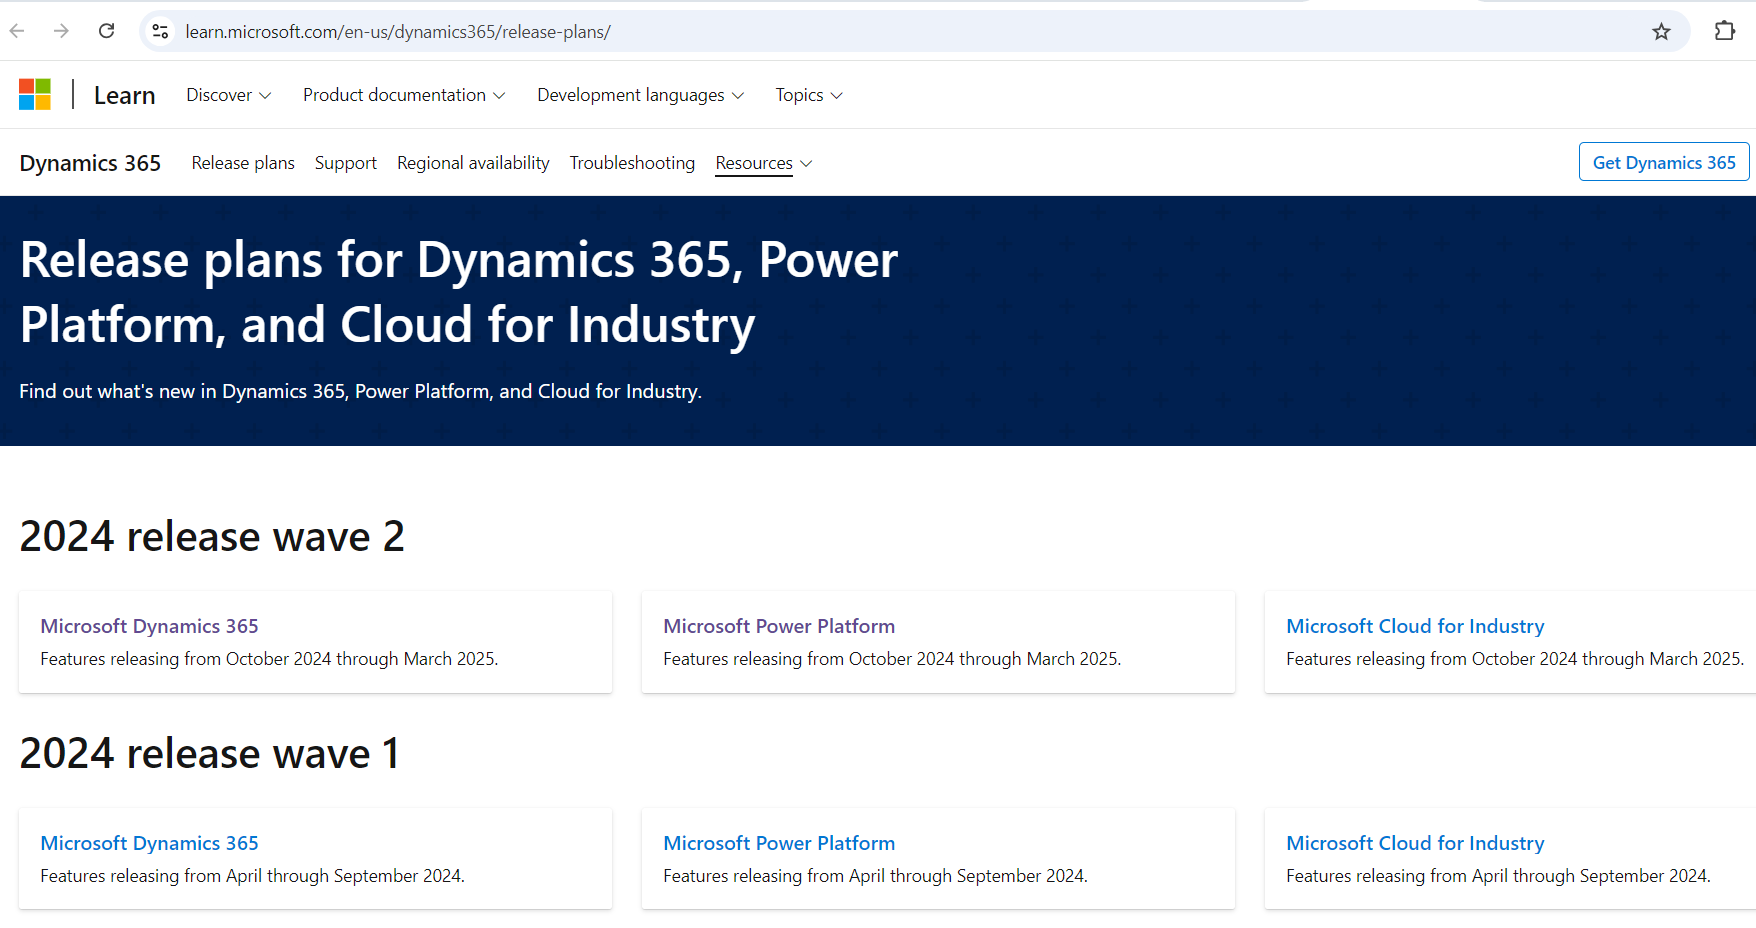
Figure: Find out more at the official Microsoft Dynamics 365 Release plans.
Do you use the official mobile app for CRM?
While there is a web app available, Microsoft has now released a CRM mobile app for Apple, Android, and, of course, their own phone OS. It is only for CRM Online and CRM2013 On-Premise.
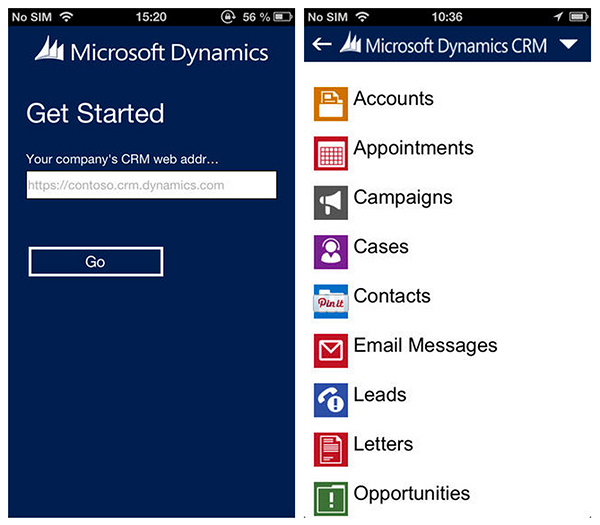
✅ Figure: CRM on your mobile gives you even more accessibility to your important company information
You can download it now for your device (Aussie links):
- Android: Dynamics 365 - Google Play Store
- Apple iOS: Microsoft Dynamics 365 - App Store
Make sure when you download that you're getting the official app released by Microsoft Corporation.
Do you use Dynamics 365 App for Outlook?
We used to use the CRM Outlook Client Plugin for tracking emails and appointments in Outlook. With the latest Dynamics update, now we have another choice, the Dynamics 365 Outlook App, which is much lighter than the plugin.
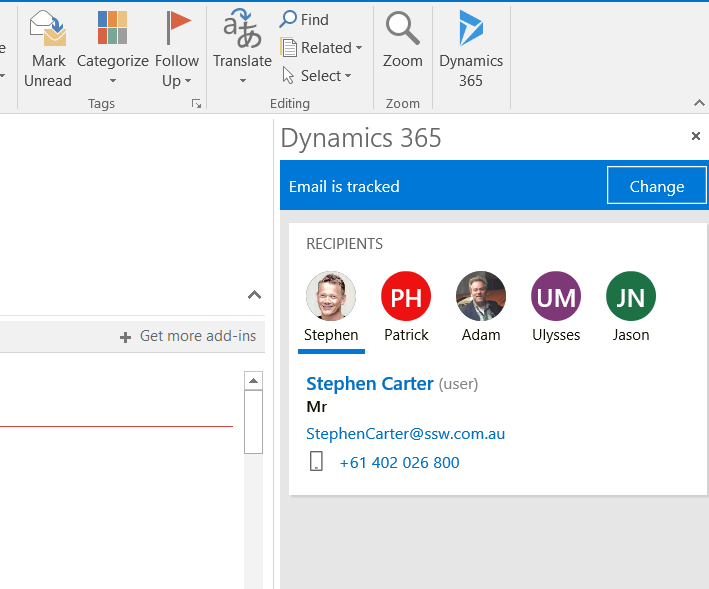
Figure: Track an email in Outlook with Dynamics 365 App
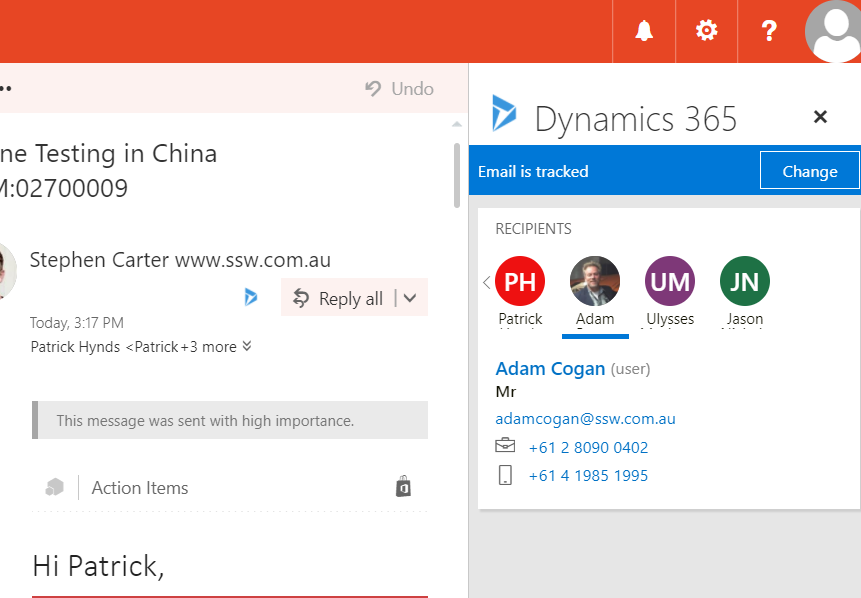
Figure: Track an email in OWA with Dynamics 365 App
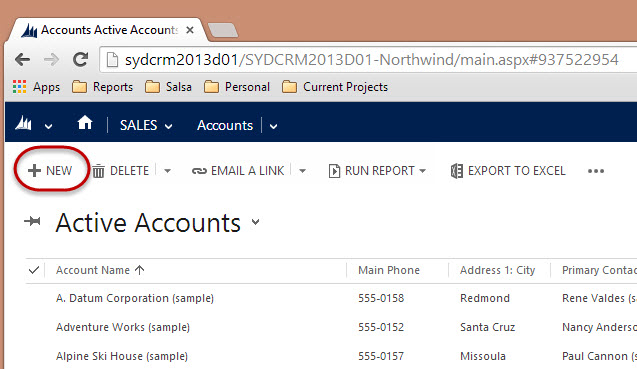
Data Entry - Do you know how to create new Companies?
Although you can create a Contact first, it's better to always create the Company first so you don't get orphan Contacts.
** **
Tip #1: Avoid duplicates - Make sure that there is no existing company before you make the entry.
Tip #2: Generally you should be creating these from leads, as it speeds up the process.

✅ Figure: In MS CRM 2013, click on Sales | Accounts
✅ Figure: Click New, enter the required fields, and save and close
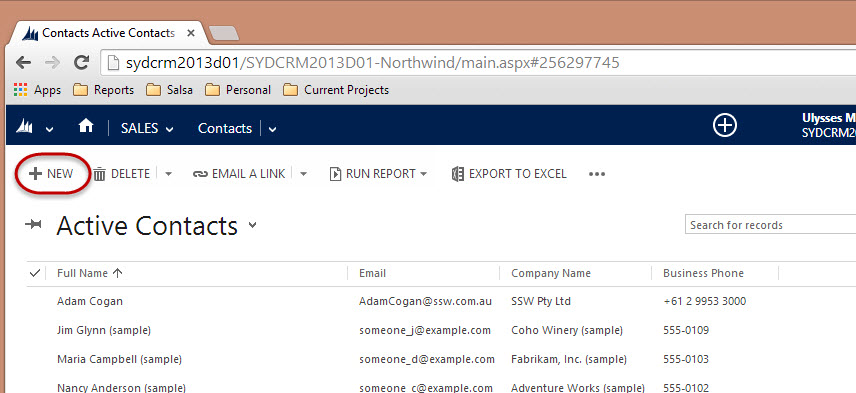
Data Entry - Do you know how to create new Contacts?
Tip #1: Avoid duplicates - Search to see if the Contact already exists before creating it.
Tip #2: Generally you should be creating these from leads, as it speeds up the process.
❌ Figure: Bad Example - Click New, enter relevant contact information, and click "Save and Close"
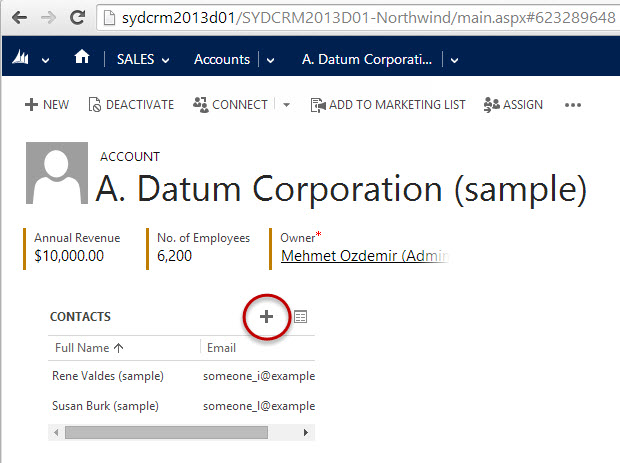
✅ Figure: Good Example - open the Account and create the contact from there
Data Entry - Do you know how to create new Opportunities?
You need to know what's in the sales pipeline, and the way to do that is by entering a potential sale and it's value. ** **
Note: In order to enter new Opportunities into CRM, the company the Opportunity belongs to must already exist.
✅ Figure: In CRM 2013, click on Sales | Opportunities
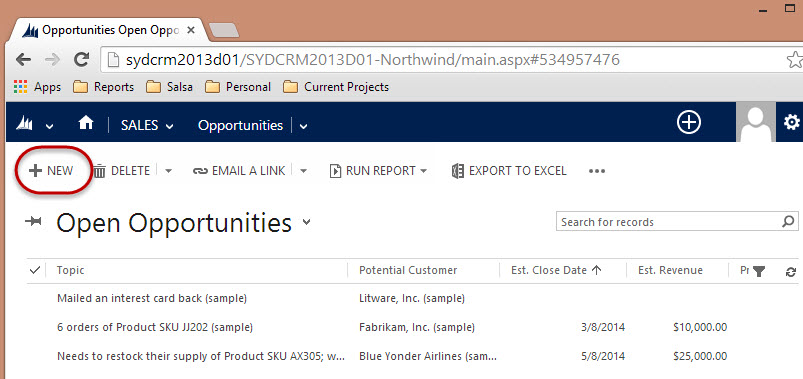
✅ Figure: Click New, enter the Opportunity, especially the $ value and the chance of success
Data Entry - Do you know the quick way to create a Contact, Account, and Opportunity in one go?
CRM 2013 has a nice way of reducing the amount of work needed to create a new Contact, Account and Opportunity. Simply make a Lead, and all three entities will be created in one go.
The process is:
- In CRM, create a Lead.
- Convert it into an Opportunity, Contact and Account using the Qualify button.
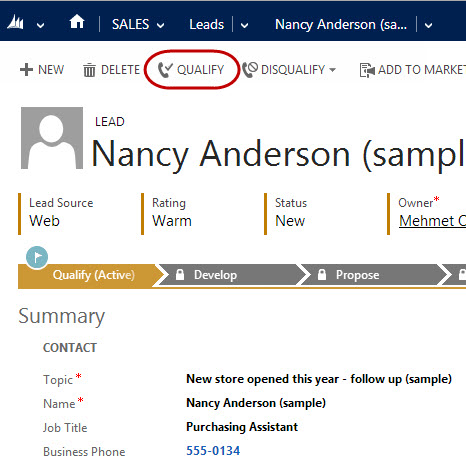
Figure: Create a Lead, then become familiar with the time saving "Qualify" button
Clicking on the "Qualify" button allows the automatic generation of Accounts, Contacts and Opportunities, and also allows you to check for potential duplicates being created.
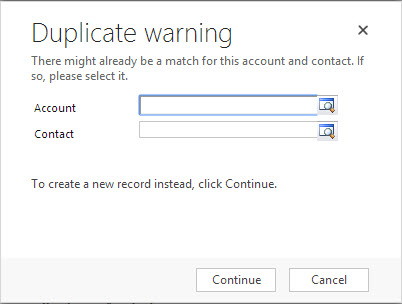
Figure: CRM 2013 also checks for existing records before creating new ones
This will:
- Deactivate the Lead
- Create an Opportunity, Contact and Account
- Automatically link the Opportunity to the Account and the Account to the Contact
- Save you substantial amount of time compared to creating and linking each one manually.
Note: You have just learned that a lead is a transitory thing. There is, however, one other case where you might want to use leads: Do you know the one case where you use a CRM lead?
Sales - Do you know how to follow up an opportunity using CRM Activities?
Once you create an opportunity, you should click the "Add phone call" button to create an activity to call up the client after approximately 1 week. Each time you make this call, you should complete the activity and create a new one to follow up again when appropriate.
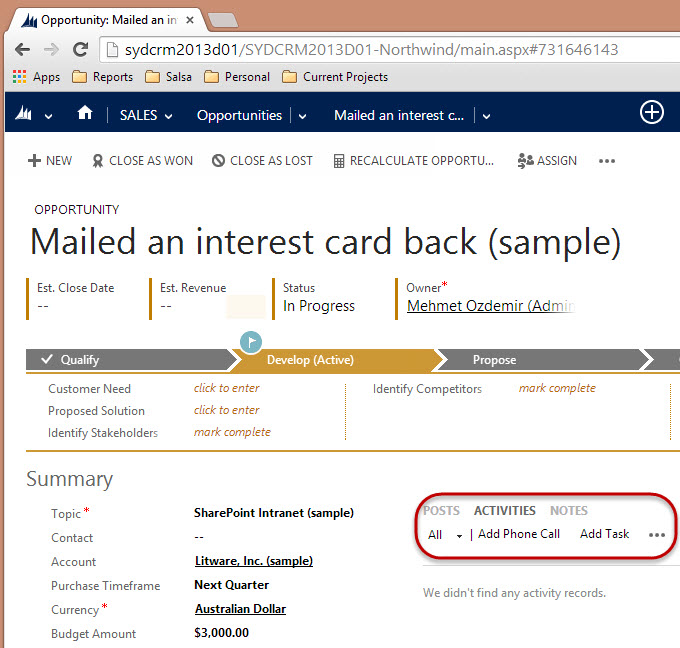
Figure: Use sales activities to follow up an opportunity
You can see your outstanding activities in your CRM workspace homepage, and this should keep you on top of all of your current opportunities.
Make sure you never have an opportunity in CRM without a follow up activity against it; otherwise you're just hoping that they will remember to call you, which is never a good sales strategy.
Note: The alternative to CRM activities is to use FollowUpThen instead as this is much more convenient. The downside is that these are not centralised, meaning that when a salesperson leaves an organisation, their opportunities will need to be handed over manually.
Sales - Do you track all sales related activities in CRM?
Prerequisite: Install the CRM Add-in.
The general principle is that you track important emails as per Do you track important email in CRM?
Microsoft Dynamics 365 allows users to track activities such as appointments, phone calls, emails, etc. This feature can be easily abused by users to record unrelated activities inside CRM. It is difficult sometimes to work out which type of activities should be recorded. These are the types of activities you should track in CRM:
- 01 Appointments: Initial meeting, and follow-up meetings...
- 02 Phone Calls: Any incoming and outgoing sales related phone call (note Dynamics has Skype for Business integration to automatically track outgoing phone calls)
- 03 Emails: Sales related emails
All sales activities should be tracked via CRM as an opportunity, company or contact.
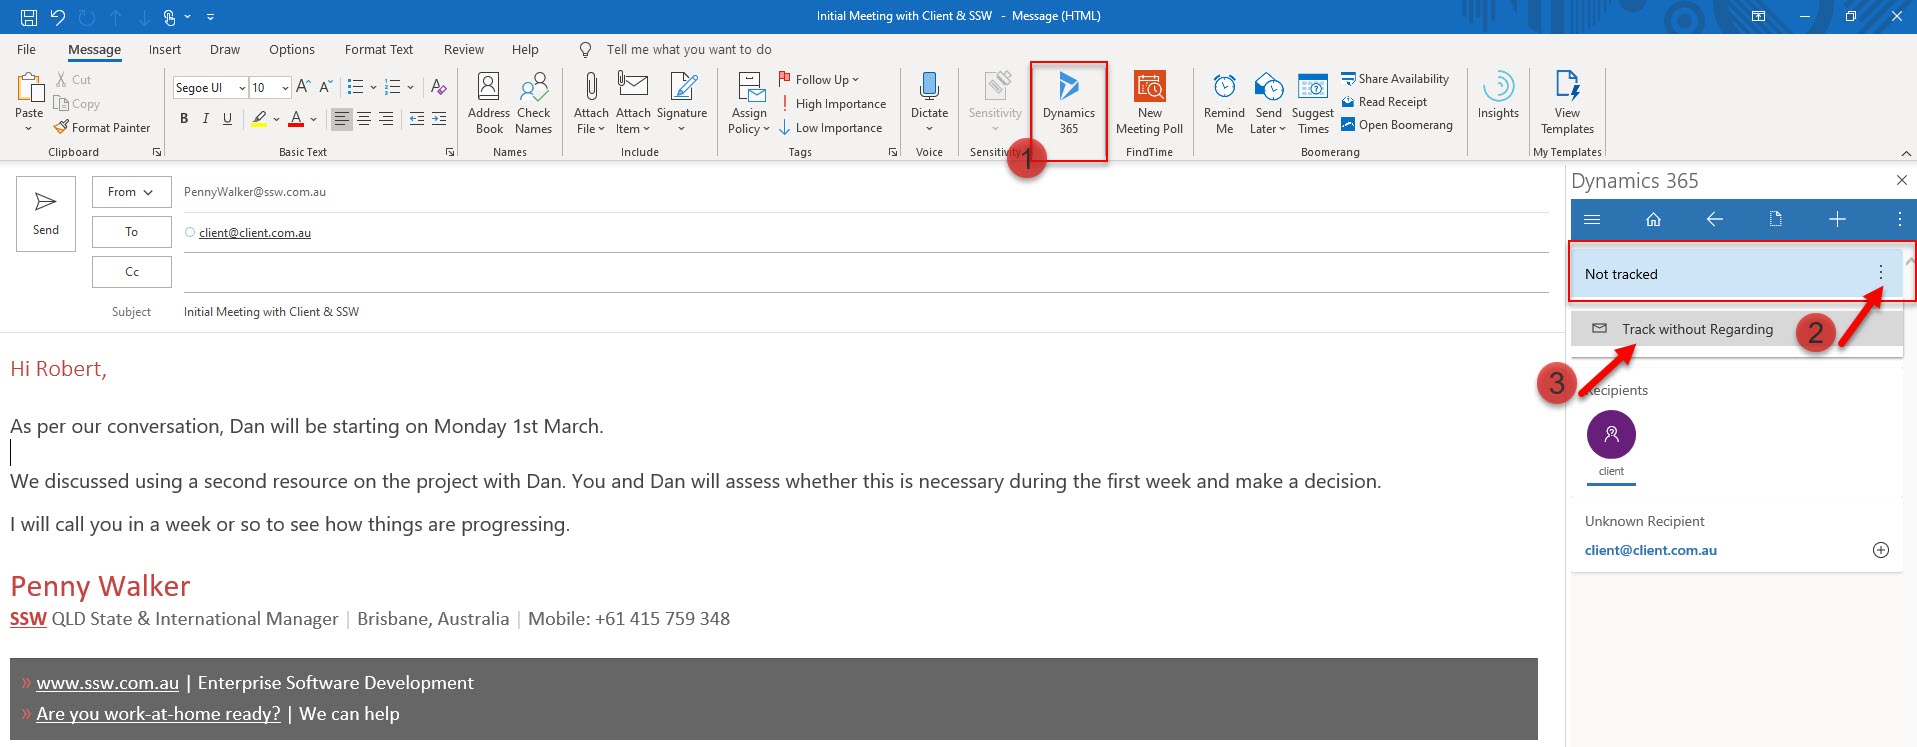
Figure: This email should be tracked in CRM using the Add-in "Track without regarding"
By recording these activities, reports can be created to view:
- The guys doing the most sales activities. E.g. The "Activities" report. This should be printed monthly and posted on the wall. (shown below)
- The history for all sales activities relating to an opportunity. This is useful to review before making a call (but is not necessary if you CC each other).
- Which opportunities have been neglected. This is a custom report and could be useful in a large company where opportunities could slip through the cracks.
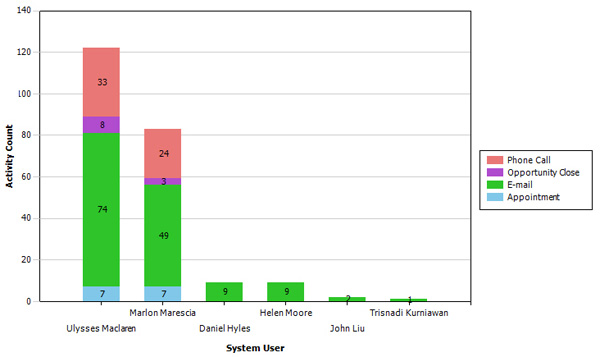
Figure: Activities Report - Ulysses was the hardest worker for this month. Print this and put it on the wall and it will encourage everyone to log their calls
Note: You can see more details on what emails to track in Do you know to hit 'Track' when you receive an important email?
Do you know how and when to deactivate a Company/Contact?
There comes a time when some contacts in your CRM database might just be taking up space and not giving any value. At this point it is best to deactivate them.
- CRM still knows about it so it will still come up for duplicate detection.
- You can still view them if you need to by viewing Inactive companies/contacts.
Hint: When you deactivate a client - put a note in the notes field to say why first.
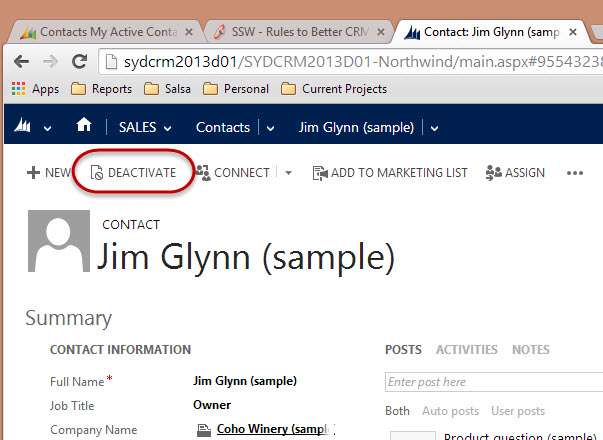 **Figure: Once a contact moves on or their details are no longer relevant, deactivate them
**
**Figure: Once a contact moves on or their details are no longer relevant, deactivate them
**Do you know how to sync your Outlook contacts to CRM?
It can be useful to have the contacts you deal with regularly in your Outlook (for offline access and easy editing).
Contacts that you create or are assigned to you (that have not been deactivated) are your "Active Contacts". By default, these are the only ones that will sync from CRM to your Outlook. You can, however configure this to use any criteria you want to decide which contacts to sync.
To do this, in Outlook, click File | CRM | Options | Synchronization, and click Outlook Filters.
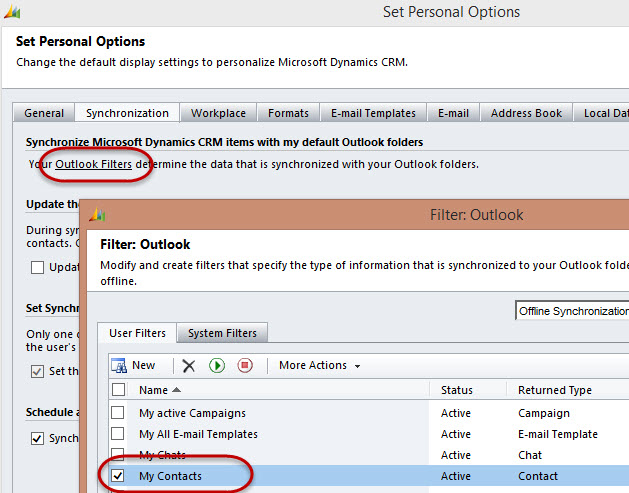
Figure: Contact Synchronization enabled in MS Outlook 2013
In Outlook, you can also choose which of your personal contacts you want to sync to CRM by using the toolbar option "Track" and "Set Parent" (i.e. company).
You now know how to do this, although it is not recommended
If your Outlook syncs to your mobile device, and you have a very large number of active contacts (say more than 1,000), it is not a scalable option to sync from CRM as:
- You may get too many contacts to easily deal with.
- Things like voice recognition (e.g. Siri or Cortana) will find more false positives.
Similar issues happen when you sync all your Facebook contacts. You have too many, duplicates, and a new problem to manage.
Marketing - Do you know the differences between Campaign and Quick Campaign in CRM 2013?
This picture shows a flowchart of Campaigns and Quick Campaigns in CRM 2013:
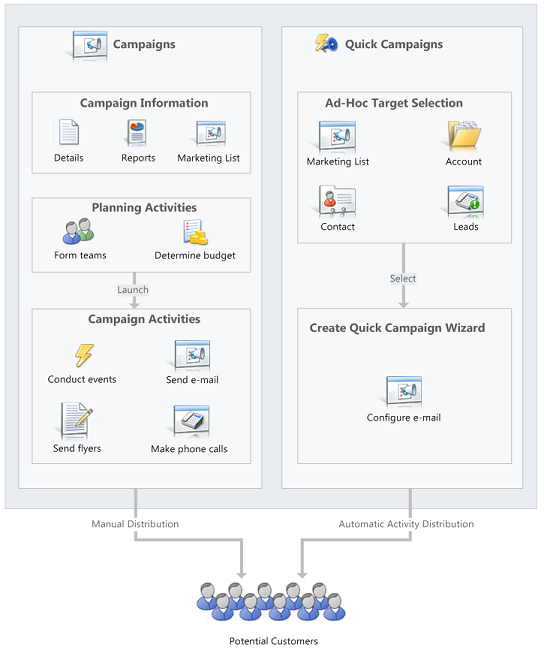
Figure: Campaign VS Quick Campaign flowchart.
A Campaign can extend over a long period of time, with potentially multiple different media types being used for a common purpose. It has extensive meta-data to both plan activities and then show reports on results. e.g.
- A monthly newsletter
- A flyer campaign
- A cold-calling campaign
A Quick Campaign, however, is for a one-off distribution of emails to a targeted group of contacts. e.g.
- Letting your local clients know about an upcoming event by email
Do you know the one case where you use a CRM lead?
It can sometimes be hard to work out when to use a lead vs a contact and company, or even an opportunity.
| Type | Type and Category | | --- | --- | | Called up about a service needed urgently | Contact + Opportunity (hot) | | Called up about a service | Contact + Opportunity | | Qualified Contact (prospect down the line) | Contact | | Someone goes to the website and joins the mailing list | Contact | | Random business cards from TechEd 2013 | Contact + Tag "Tech Ed 2013" | | Uninterested contact | Contact | | Purchased mailing list | Lead |
Figure: There is only one scenario where you would use a lead
It is better to have all your contacts in one place rather than split over 2 separate tables. Leads are not needed except as a data entry tool to help you link new contacts, companies, and opportunities. See Quick Way to create an opportunity, contact and account in one step.
The only legitimate use of leads is for completely unqualified data, e.g.
- You buy a contact database (too large to be able to contact each one of them to qualify)
Do you know when to delete instead of disqualify a lead?
When going through leads to see if they should be converted to an Account/Contact/Opportunity or disqualified, any that do not contain contact details should be deleted instead of disqualified. The reason for this is that there is no benefit having only a name in the system, and it could produce false duplicates later if we were to import or create someone with the same name.
Figure: Delete rubbish lead
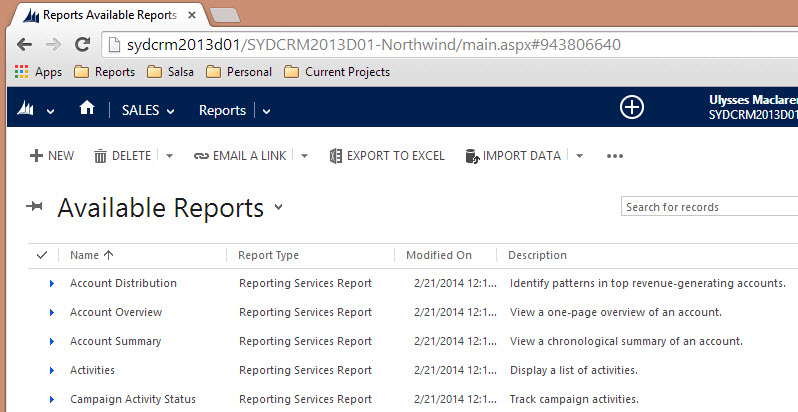
Do you know how to report on CRM data?
The data stored in CRM is useful on two counts. Firstly, it gives you a single source of truth for all customer related data. Secondly, you now have the ability to report on this data.
✅ Figure: 
Figure: Advanced find is the easiest way to filter your data in CRM
✅ Figure: Good Example - You use Advanced Find | Export to Excel, but you’ll always have to re-create your reports each time you need the information. This is fine if you only need the information for a one off purpose like a quick mail out
✅ Figure: Better Example - The better way to do it is through CRM 2013 reports (built in SQL Reporting Services), as this gives you a reusable report you can come back to every time you need it
Scheduling - Do you know how to view the availability of each developer? (Resource Scheduling)
As an Account Manager, you'll frequently be required to find a free resource to put onto a project.
<imageEmbed alt="Image" size="large" showBorder={false} figureEmbed={{ preset: "badExample", figure: 'Bad example - Constantly yelling out "who\'s free?"', shouldDisplay: true }} src="/uploads/rules/scheduling-do-you-know-how-to-view-the-availability-of-each-developer-resource-scheduling/yelling-whos-free.jpg" />Instead of going around and asking everyone “Who’s free next week?”, you should use the CRM Service Calendar.
The calendar provides a one page view of everyone’s availability for a given time period. Here’s what you need to do to access it:
- Go to your company's CRM, e.g. http:// crm.ssw.com.au
- Click Service | Service Calendar
- Choose Month, Week, or Day view to suit your needs
All of the Appointments in the Service Calendar will also sync to the developers' Outlook calendars, keeping them up to date with where they need to be, when.
You have multiple options for ways to fill this data, which you can see in Scheduling - Do you know how to book developers for a project?
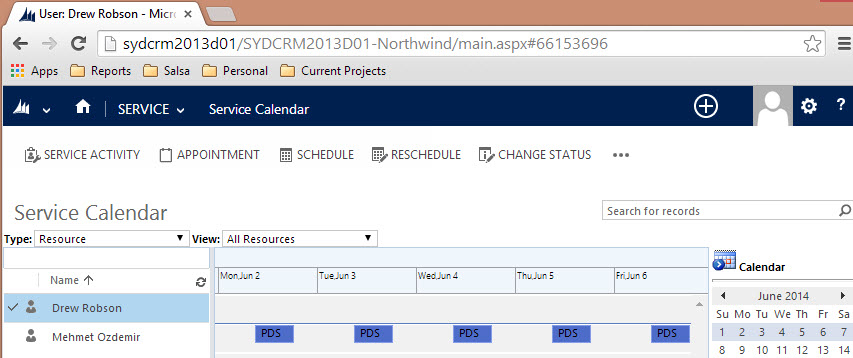
Figure: The Service Calendar in CRM is showing that Drew is available but Mehmet is busy next week
Suggestion to Microsoft: One limitation of CRM is that you cannot send a URL to this page to someone, so they will have to navigate to it themselves.
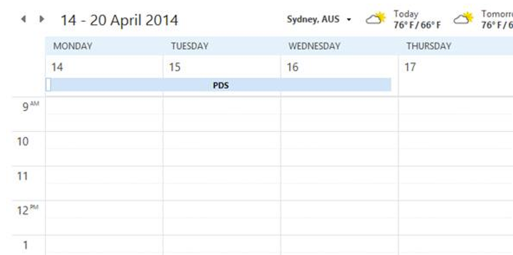
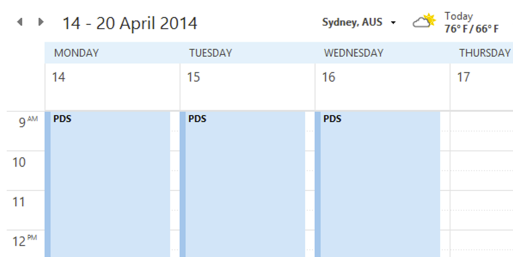
Scheduling - Do you know how to book developers for a project?
<introEmbed
  body={<>
It is the responsibility of Account Managers to book developers for known client work, however anyone can book a developer, including the developer themselves. Also if a developer notices they should be booked, but there's nothing in their calendar, and they can't figure out the below, as a minimum they should ask the Account Manager to book them.

<asideEmbed
  variant="greybox"
  body={<>

**The Rule of the 3 T's**

Before booking developers, make sure you talk to them and check that they are cool with:

* The Time - how long is the project?
* The Tech - what skills are required?
* The Team - who will they be working with?

  </>}
  figureEmbed={{
    preset: "default",
    figure: 'XXX',
    shouldDisplay: false
  }}
/>

To see which developers are available for booking:

<imageEmbed
  alt="Image"
  size="large"
  showBorder={false}
  figureEmbed={{
    preset: "okExample",
    figure: 'OK example - Using the Service Calendar, you can see who is and is not available at a given time',
    shouldDisplay: true
  }}
  src="/uploads/rules/book-developers-for-a-project/service-calendar-crm-online-version-blurred.png"
/>

<imageEmbed
  alt="Image"
  size="large"
  showBorder={false}
  figureEmbed={{
    preset: "goodExample",
    figure: 'Good example - Build a Power BI report to show the CRM data more succinctly',
    shouldDisplay: true
  }}
  src="/uploads/rules/book-developers-for-a-project/bookedindays.png"
/>

There are a few different ways of booking developers for project work, either via Outlook or the browser.
  </>}
/>
### Option 1: Use the Outlook Calendar and "Set Regarding" (recommended)

Prerequisite: [Do you install the Dynamics 365 App?](/install-the-2-add-ins)

This is generally the easiest way for developers to book themselves in as they don't need to leave Outlook and 90% of the steps will already be familiar to them.

1. Create a new Outlook appointment (in the Desktop or Web client) and give it a relevant subject
2. Invite required resources if there are other people working with you or if you're booking for someone else\
   **Note:** If you're booking for someone else, just have them in the "To:" field of the appointment. If you're booking yourself AND someone else, have both of you in the To box
3. Invite the client as optional. If you do this, also make it a Teams Meeting and add your email signature
4. Set the time and location for your appointment
5. Set "Show As" to "Free" (so their Teams Status will not show them as "In a Meeting" all day
6. Set "Reminder" to "None" so you and they don't get spammed by unnecessary reminders
7. Set the recurrence if it’s more than 1 day of work
8. Click "Dynamics 365" on the ribbon which will open a side panel and click on "Set Regarding" then search for the company that you want to book the developers to work on (this is the step that syncs it with CRM)


<imageEmbed
  alt="Image"
  size="large"
  showBorder={false}
  figureEmbed={{
    preset: "default",
    figure: 'A complete appointment booking Brendan to work for SSW for 5 days',
    shouldDisplay: true
  }}
  src="/uploads/rules/book-developers-for-a-project/Dynamics1.jpg"
/>

### Option 2: CRM Activity Appointments

This is a backup option for anyone who doesn't have access to Outlook with the CRM add-in.

1. Create a new appointment in Dynamics 365 Online


<imageEmbed
  alt="Image"
  size="large"
  showBorder={false}
  figureEmbed={{
    preset: "default",
    figure: 'Click Appointment to create a new appointment in CRM',
    shouldDisplay: true
  }}
  src="/uploads/rules/book-developers-for-a-project/Dynamics-Calendar-App.jpg"
/>

2. Set the Subject
3. Select the resources that you want to book
4. Select the client that you want to book the developers to work on
5. Set the location
6. Set the Start and End times
7. If the booking is for more than 1 day, click “Recurrence” and set the frequency

**Tip:** If you do not want them to block your calendar, you can change the organizer and owner to the developer you are booking. It will still track to the Service Calendar, but won't add it to your personal calendar, only the developers.


<imageEmbed
  alt="Image"
  size="large"
  showBorder={false}
  figureEmbed={{
    preset: "default",
    figure: 'A complete CRM Appointment for a 1-day booking',
    shouldDisplay: true
  }}
  src="/uploads/rules/book-developers-for-a-project/Dynamics-Appointment.jpg"
/>

### Adding Tentative Bookings

Sometimes you may want to reserve a consultant for an appointment but are not able to confirm with the client immediately. In this case, create a Tentative Booking which reserves the consultant for the period of the booking without assigning them to the client account. The purpose of a Tentative Booking is to reserve a consultant and trigger a conversation between Account Managers if the consultant is required on confirmed client work over the same period.

To create a Tentative Booking:

1. Follow the same steps above to create the Appointment
2. Instead of choosing a client account for 'Set Regarding', create and use a pre-defined account for the purpose of tentative bookings (E.g.**SSW.PencilledIn**)

**Tip:** Create a "Booked In Days" Report and make the Tentative Bookings display obviously (E.g. a grey color), so Account Managers can easily see it if they need to use that time.

### Adding Internal Bookings

If a developer is needed for non-billable work (e.g. urgent internal work) or travelling to teach public training events, their time should be blocked out so it shows as unavailable for client work.

To book someone for internal work:

1. Follow the same steps as above to create the Appointment
2. Instead of choosing a client account for "Set Regarding", choose your own company (e.g. "SSW").
3. Mention which internal project the developer is working on in brackets (e.g. "SSW - Brady (Rules)")


<imageEmbed
  alt="Image"
  size="large"
  showBorder={false}
  figureEmbed={{
    preset: "default",
    figure: 'Internally \'Booked\' days show as black and \'Pencilled In\' days show as grey',
    shouldDisplay: true
  }}
  src="/uploads/rules/book-developers-for-a-project/2020-03-20_10-49-19.png"
/>

### Deleting Bookings

Cancelling an appointment in Outlook will not delete the appointment from Dynamics 365. Instead, you need to follow these steps:

1. In the appointment, open the Dynamics 365 App
2. Click on the menu next to **Tracked regarding**
3. Click **Untrack**, then **Delete**
4. Wait about a minute for Dynamics 365 to sync, then cancel the appointment


<imageEmbed
  alt="Image"
  size="large"
  showBorder={false}
  figureEmbed={{
    preset: "default",
    figure: 'Outlook | Dynamics 365 App | Click Untrack and then Delete',
    shouldDisplay: true
  }}
  src="/uploads/rules/book-developers-for-a-project/dynamics-untrack.png"
/>

<asideEmbed
  variant="info"
  body={<>
    You can't untrack a single occurrence of a series of appointments - instead, you need to cancel the occurrence and delete the appointment from Dynamics 365 manually.
  </>}
  figureEmbed={{
    preset: "default",
    figure: 'XXX',
    shouldDisplay: false
  }}
/>

### Using a separate Outlook calendar to book appointments

If you have a lot of staff, it can be useful to use a separate calendar to make your bookings - this stops them from covering your everyday calendar and making it hard to read.

Unfortunately, you cannot use a sub-folder to track appointments in Outlook. You need to create a whole new email account and then add it to your Outlook folder.

Using the example of SSW's **crmtimeprosync@** account, this account is used to add appointments to the Service Calendar, and these are then added through the SSWBookings calendar in Outlook:


<imageEmbed
  alt="Image"
  size="large"
  showBorder={false}
  figureEmbed={{
    preset: "default",
    figure: 'Appointments tracked from with Outlook desktop',
    shouldDisplay: true
  }}
  src="/uploads/rules/book-developers-for-a-project/Appointments tracked from Outlook desktop.png"
/>

**Note:** If using a separate Exchange calendar, it's highly recommended to login via Outlook Web Access (OWA) rather than loading it up as a shared calendar in your Outlook Desktop client. This is because it handles multiple users much better this way, and will avoid syncing issues.

### How to set it up

**For OWA**

Open browser’s incognito mode | go to <https://outlook.office.com> | logon with the **crmtimeprosync@** account

**For Outlook Desktop**

Go to Files | Add an account | Restart Outlook once it completes


<imageEmbed
  alt="Image"
  size="large"
  showBorder={false}
  figureEmbed={{
    preset: "default",
    figure: 'Add account to your Outlook',
    shouldDisplay: true
  }}
  src="/uploads/rules/book-developers-for-a-project/Add account.jpg"
/>

Please note you will need to get the password from your enterprise password manager.
Scheduling - Do you know when to use "All Day Events" or start and end times with recurrence?
People are often very inconsistent with how they make appointments. Sometimes they use full days and sometimes they give a start and end time. It's important to be consistent.
For a 1 day appointment
- Bad Example - An all day appointment is not as visible and doesn't tell the client when the developer will arrive and leave.
- Good Example - a start and end time will visibly fill his calendar and also give everyone a shared understanding of when the developer is working.
For multiple day appointments
CRM supports recurring appointments, and this allows for more flexibility in bookings, so you should always use these over using one long appointment for a booking.
This also works better for Service Calendar syncing, as you can see what each person is working on each day.
❌ Figure: Bad Example – If a change is needed on Tuesday’s booking, there will an issue
✅ Figure: Good Example – Easy to alter any individual day as needed
For Leave
Leave appointments are the one time when it's actually useful to have the appointment out of the way up the top in your calendar, so "All Day" appointments are better for this.
Scheduling - Do you have a consistent naming convention for your bookings?
When you look at the Service Calendar, you want to be able to see, at a glance, who is working on what.
To do this, the subject field of appointments should be as follows:
Client [Project] - Name[s]
The project name (in parentheses) is optional and only used if there is more than one project happening simultaneously.
You can have 1 or many names, depending on the booking.
Go to ACME Corp
Work onsite for ACME Corp
Mehmet working at ACME Corp❌ Figure: Bad example - All inconsistent and hard to read
ACME Corp - Mehmet
ACME Corp - Mehmet, Dan
ACME Corp (SharePoint) - Dan✅ Figure: Figure: Good example - Consistent details
CRM2013/2015 - Do you use CRM Business Rules to automate forms?
Prior to CRM 2013 if a CRM user wanted to:
- Show an error message
- Set a field value
- Set business required
- Set field visibility (show/hide fields)
- Lock or unlock a field
They would normally need to get a CRM developer involved to write JavaScript code to automate these actions.
Starting with CRM 2013 (and much improved in CRM 2015), users can now use Business Rules to automate these actions without getting a CRM developer involved.
Take the following Example:
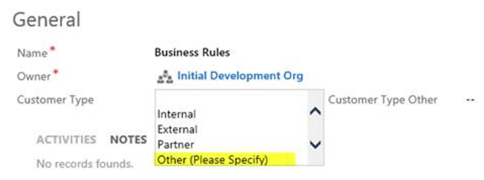
Figure: ‘Customer Type Other’ should be hidden and only displayed when Other is selected
To make this work use the following Business Rules:
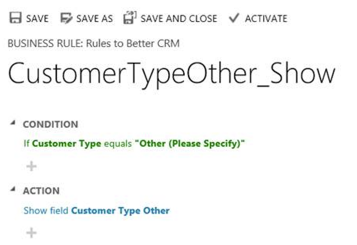
Figure: Show the ‘Customer Type Other’ field when Customer Type equals Other
The flip side of the expression also needs to be set where Customer Type doesn’t equal Other to hide the ‘Customer Type Other’ field (you could also optionally clear this field too)
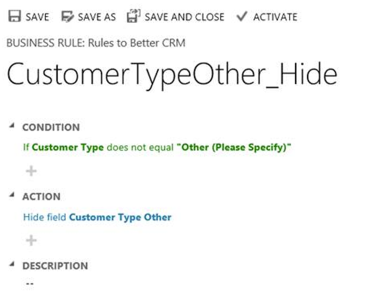
Figure: Hide the ‘Customer Type Other’ field when Customer Type doesn’t equal Other
Finally the last step is to Activate the Business Rules. To activate click the activate button on the top right of the tool bar.
Now the form will look like this:
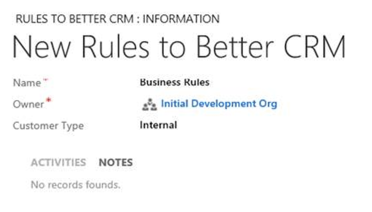
Figure: Great. Now ‘Customer Type Other’ is hidden
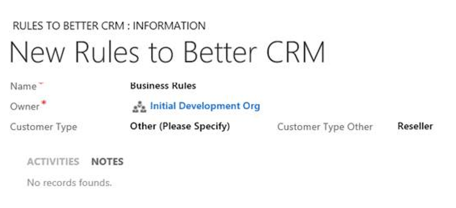
Figure: And on the other side ‘Customer Type Other’ is visible
Note: CRM 2015 further improves on this by introducing the if… else… construct, so instead of creating two business rules (one for show and one for hide), this rule can be reduced to just one.
Do you know how to install SkypePOP on your PC?
All company receptionists should install SkypePOP on your PC.
This will enable you to get Dynamics CRM contact popups on incoming calls, for example:
- Bob Northwind calls you
- His CRM contact will open up in your browser (by default before you pickup)
- You now know exactly what you last talked about (by looking at the recent Activities and Opportunities)
There is one limitation to SkypePOP - forwarded calls won't give you useful information, as SkypePOP will show you the contact details of the person forwarding the call, not the external client. That's why we recommend using SkypePOP the following way:
Only receptionists should have SkypePOP installed.
- An incoming call is taken by the receptionist
- The CRM contact pops up (or a "new contact" form if the number is not already in your CRM):
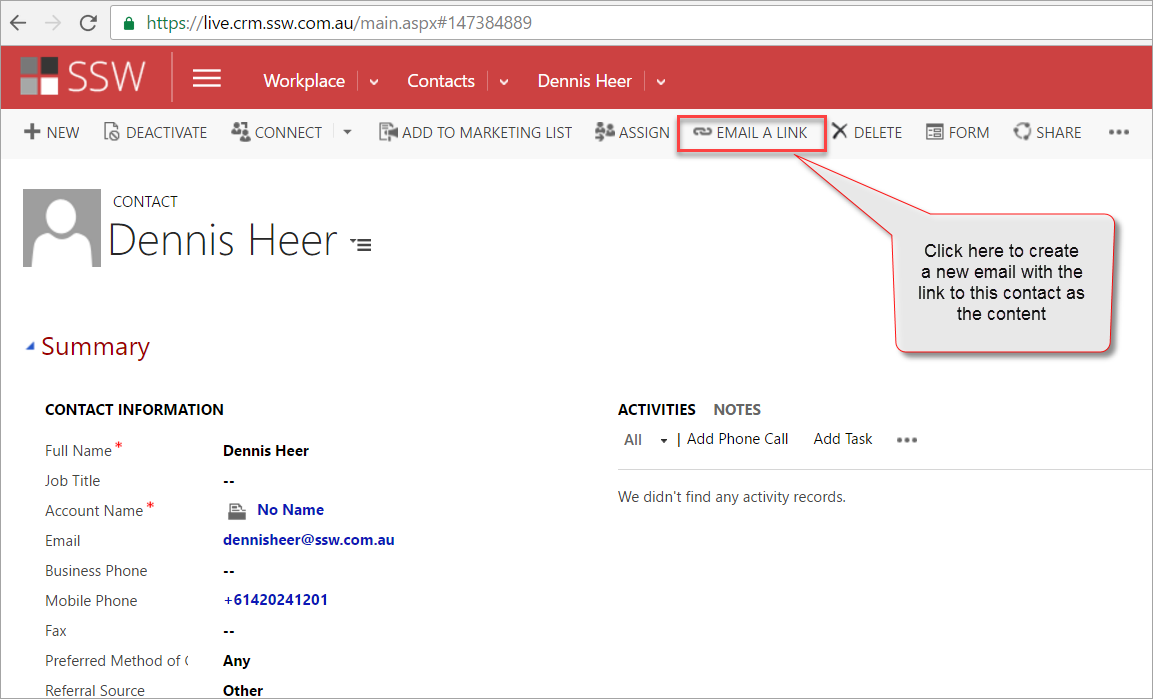
Figure: Example contact popup on our CRM from incoming caller with the number +61420241201
- Send Email
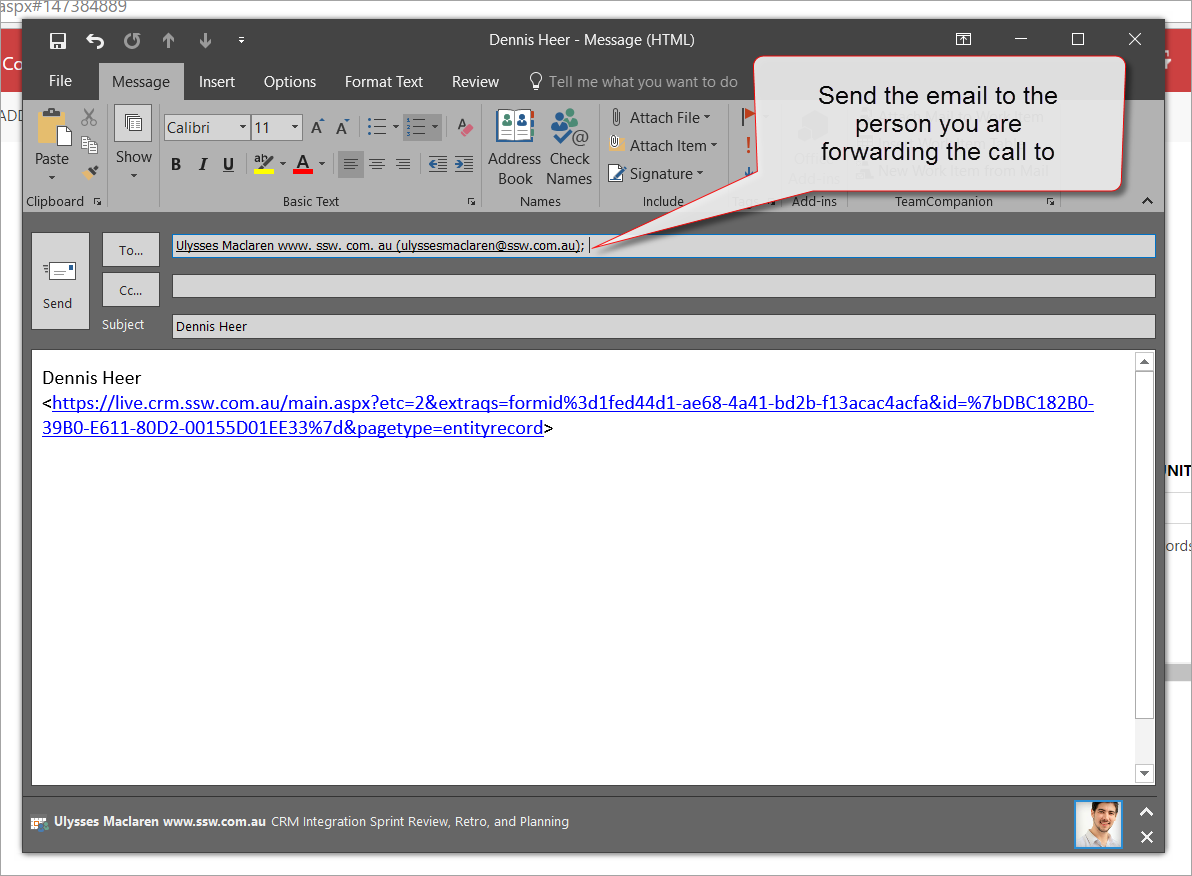
Figure: This email will be created – send it to the person you are forwarding the call to
- Inform the person the call is being transferred to that you have sent him an email with the CRM Contact
- Wow! No one has to open the CRM manually anymore
How to Install SkypePOP
- Download and install SkypePOP
- Open the Connections settings
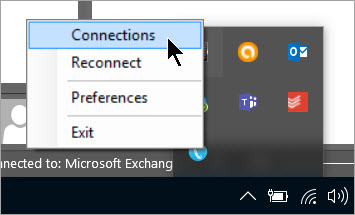
Figure: Right click on the SkypePOP icon in the taskbar
- Add your CRM connection details
Tip: Go to Main | Settings | Customizations | Developer Resources in order to find the address for your CRM
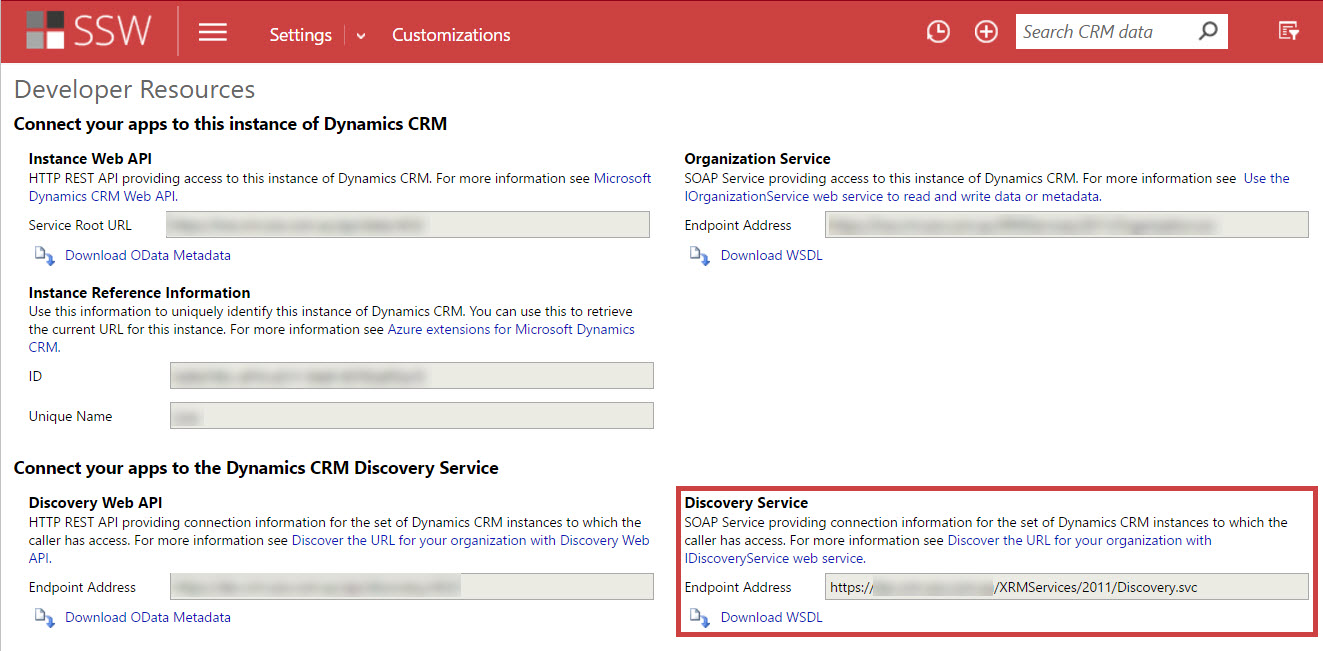
Figure: Copy the Endpoint Address for your Organization Service
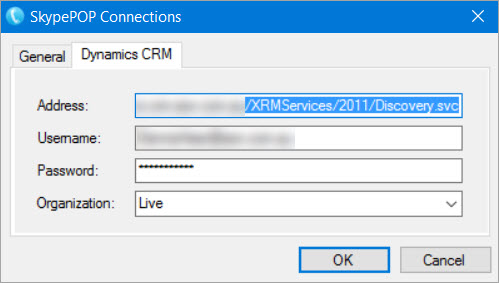
Figure: Enter your CRM Connection Details
- Change the SkypePOP Preferences
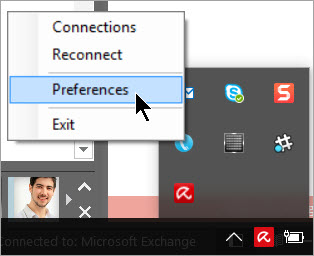
Figure: Right-click on the icon in the taskbar and select 'Preferences'
- Configure the Dynamics CRM settings to something similar to this:
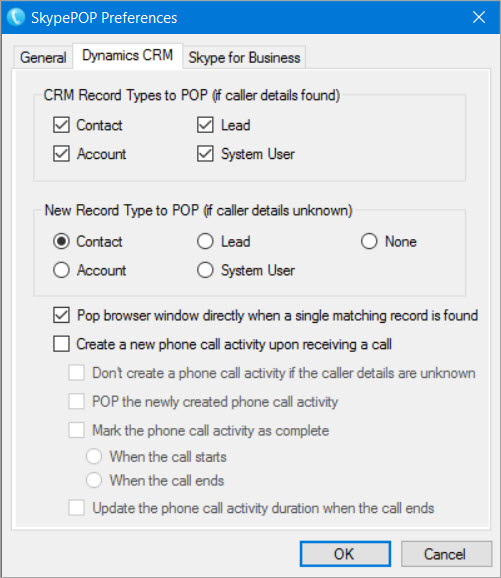
Figure: These are the default SkypePOP settings
- Open Skype for Business
- Review the SkypePOP - Skype for Business settings
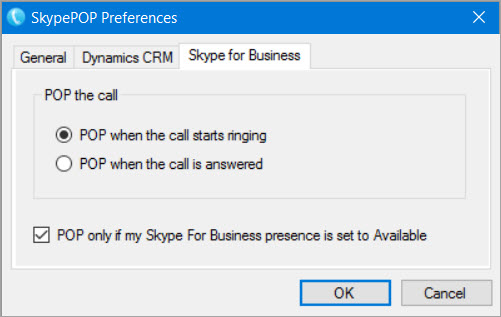
Figure: These are the default Skype for Business settings
- Ensure both Dynamics CRM and Skype for Business are connected by clicking on the tray icon
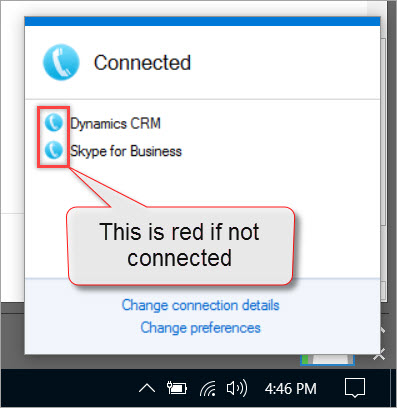
Figure: Check that you are properly connected - blue is success
The SkypePOP demo license will stop working after 5 hours or 5 calls
Tip: Reduce the time used by quitting SkypePOP - you do that by right clicking | Exit on the tray icon
- Restart your PC
- Test with SNOM phone to verify SkypePOP is working correctly
Do you know how to keep CRM Opportunities updated?
Keeping CRM opportunities updated is very important if you want to know how your sales team will perform in the next few months. The challenge is to keep CRM updated without creating extra work for the sales team. If it takes too long then they won't do it and you will be constantly chasing them.
One way to reduce the work of keeping CRM up to date is to use Followupthen. "Follow Up Then" allows users to schedule an email to be sent back to their inbox in a day, 3 hours, 2 weeks, 2 months, etc. by adding an email address like
1day@followupthen.comto the Bcc section of the email.This simple service allows users to be notified the next time they need to contact a client without having to update CRM.
If you do miss any opportunities by accidentally forgetting to set a followupthen, you should have a Power BI report to help you catch any that fall through the cracks.
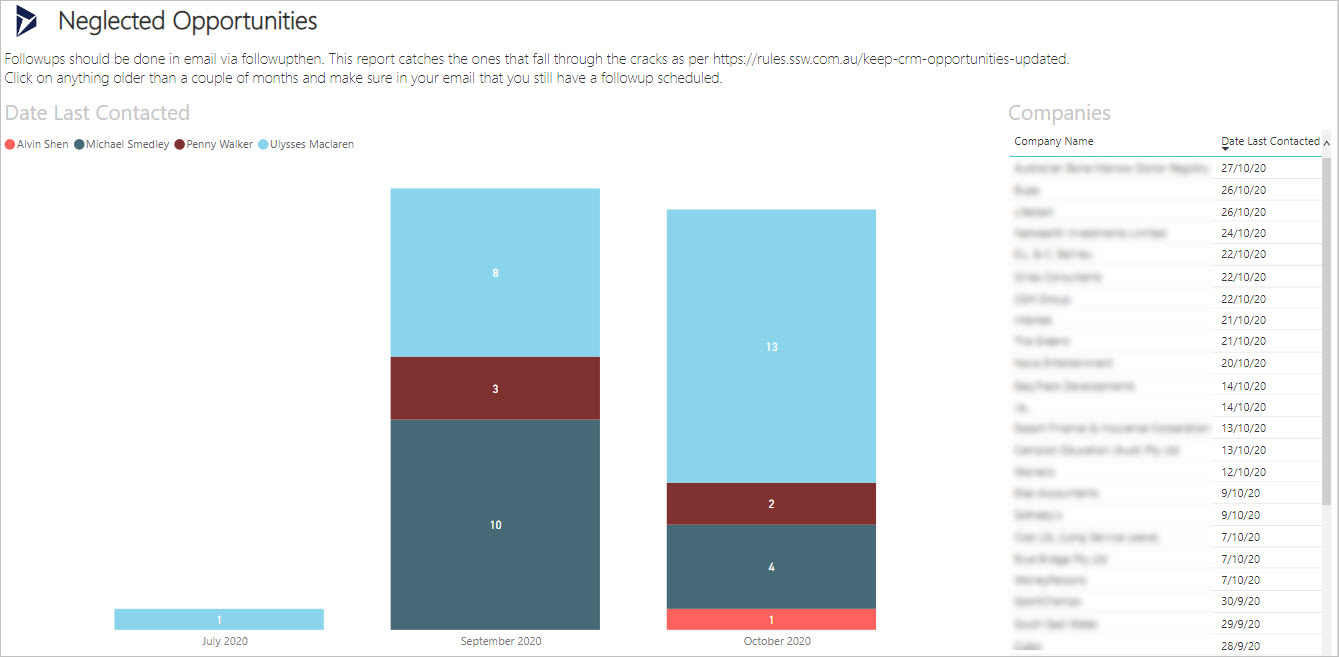
✅ Figure: Good example - It's October now, so most opportunities have been spoken to in the past month or so. You'd click on the item from July here to make sure you've still got a followupthen scheduled for it
Because CRM does not have to be updated often, you may find the opportunities are not kept up to date and your data could get stale. To solve this problem you should require all sales people to update their opportunities before the weekly sales meeting so that they can be reviewed during this meeting in a group.
During this meeting, you should review your hot prospects with your team. As a team you should provide advice to each sales person to help them close their difficult sales.
Do you know how to make lost opportunities more visible?
Losing opportunities is very common for a business. Keeping track of the win/lost ratio is a good start if you want to track how you're doing, but making sure you keep a close look on what you've lost more important why, is critical.
The basics
There are a number of reasons you may lose an opportunity: The project may be cancelled, you may be too expensive or out-sold, or maybe you simply don't have the capacity to cater for bookings.
If you want to report on lost opportunities, the first step is to make sure Sales have the opportunity to do so. Make sure you provide a field with enough options when closing an opportunity:
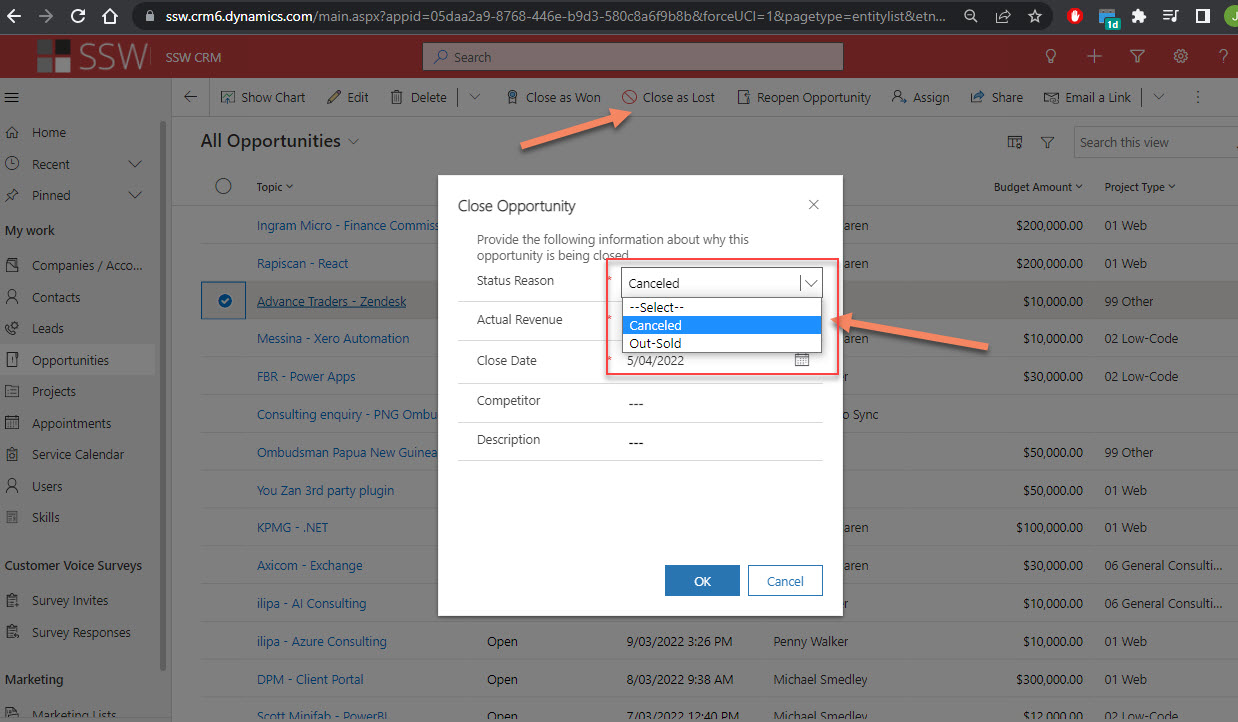
❌ Figure: Only giving a couple options is not enough
✅ Figure: Give at least 4 options
Once the information is stored in CRM, you can then easily report on it, e.g. using PowerBI or any other reporting tool. This provides great insights to make educated business decisions (i.e. "should we hire more?")
Going the extra mile
Reporting is great, but this may come back through your feedback loop a bit too late. If you want to be alerted when you just lost a big opportunity because you don't have enough staff, you can go the extra mile and setup alerting based on conditions.
The best way to do so is to setup a LogicApp to trigger when an opportunity has been lost, setup your filters (e.g. Budget Amount >= $100,000 and Reason = "Not enough staff") and you're done!
Do you know how to send newsletter in Microsoft CRM 2013?
Email newsletters can be sent and responses can be tracked using Microsoft Dynamic CRM 2013:
There is more than one way to distribute a newsletter through CRM, such as through Campaigns and Quick Campaigns. The way detailed below is the simplest method, using Quick Campaigns.
- Find contacts that you will send the newsletters to.
The first time - use Advanced Find in CRM 2013, then save it as a System View. In the example below, we're only interested in New Zealand contacts. Subsequent times - Use the System View , so everyone is using the same list.
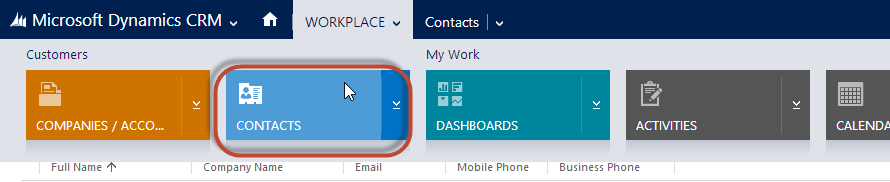
Figure: From the CRM home screen, hover your mouse over “Workplace”, and then click “Contacts” in the menu that drops down
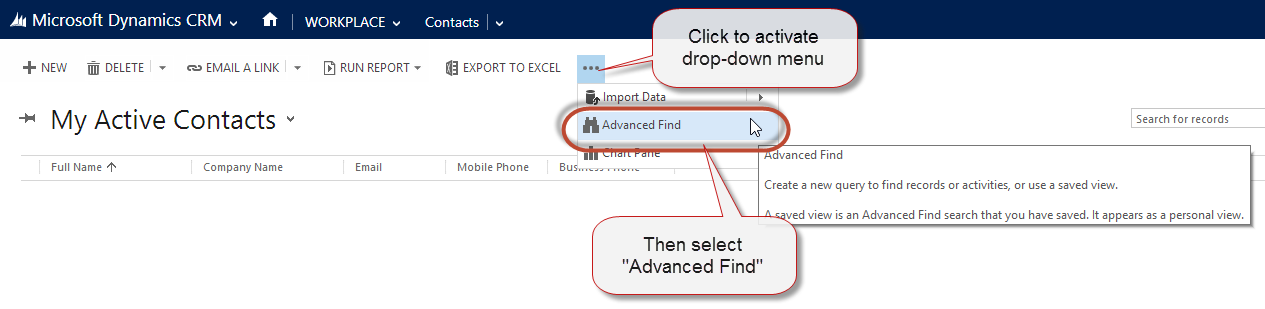
Figure: From the “Activities” page, click “…” | “Advanced Find”. This will activate a pop-up.
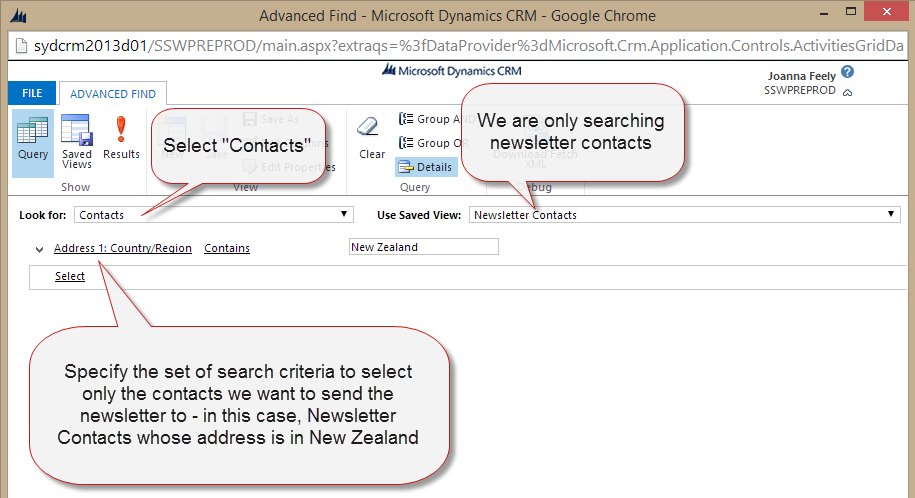
Figure: Select Contacts at Look For and specify a set of criteria to search for newsletter contacts
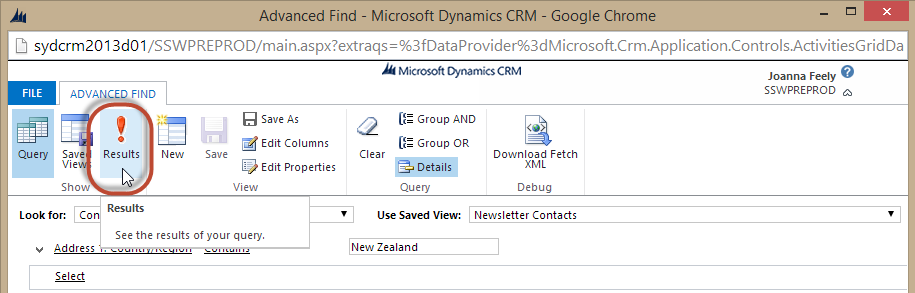
Figure: then select "Results" to bring up contacts which match your search query
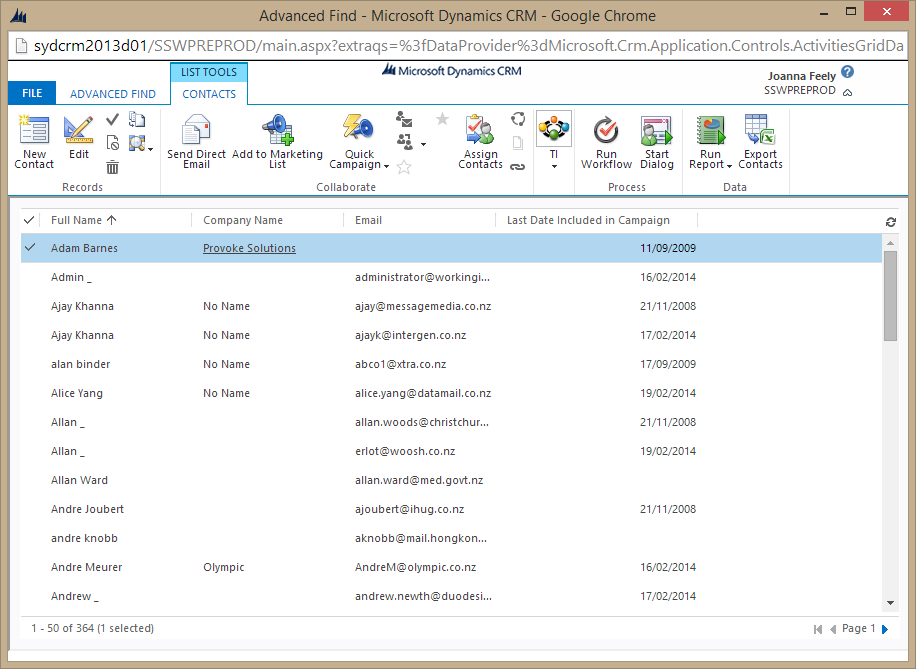
Figure: The result contacts that will get newsletter: these contacts allow us to "Send Marketing Material" and have a New Zealand email address or living country is New Zealand
- First time only, save this as a System View. You will need a SysAdmin for this. 3. Create the newsletter in Microsoft CRM 2013 using a Quick Campaign
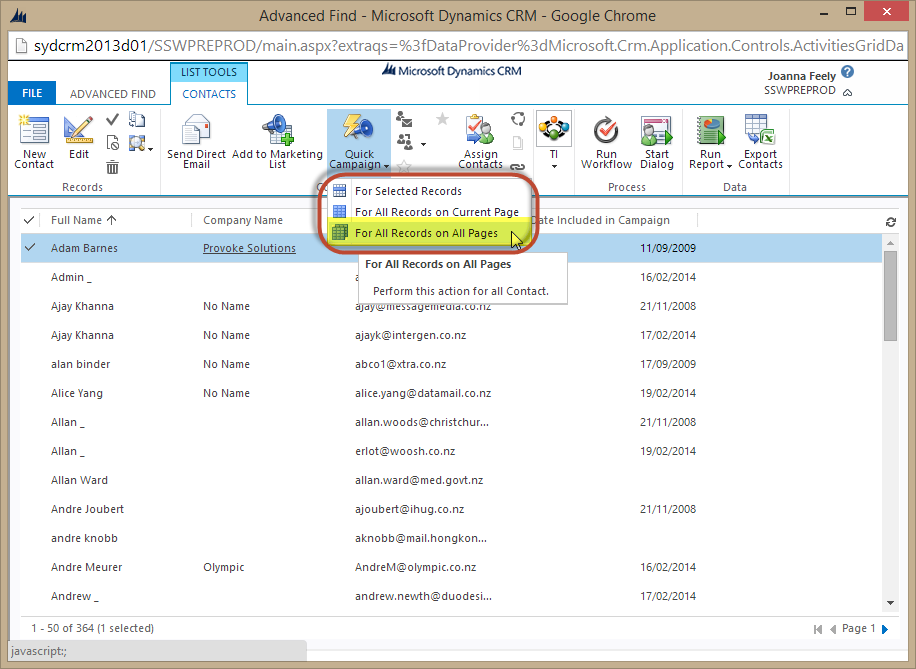
Figure: Select "For All Records on All Pages" to create a Quick Campaign from the current contact list. This will bring up a Quick Campaign Wizard
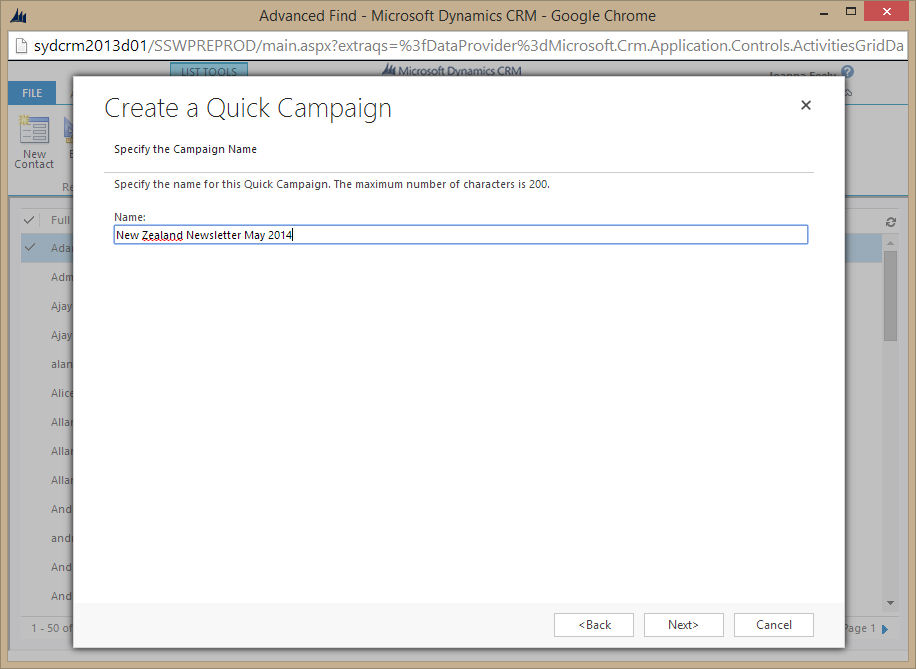
Figure: Click Next and then specify the name of the quick campaign.
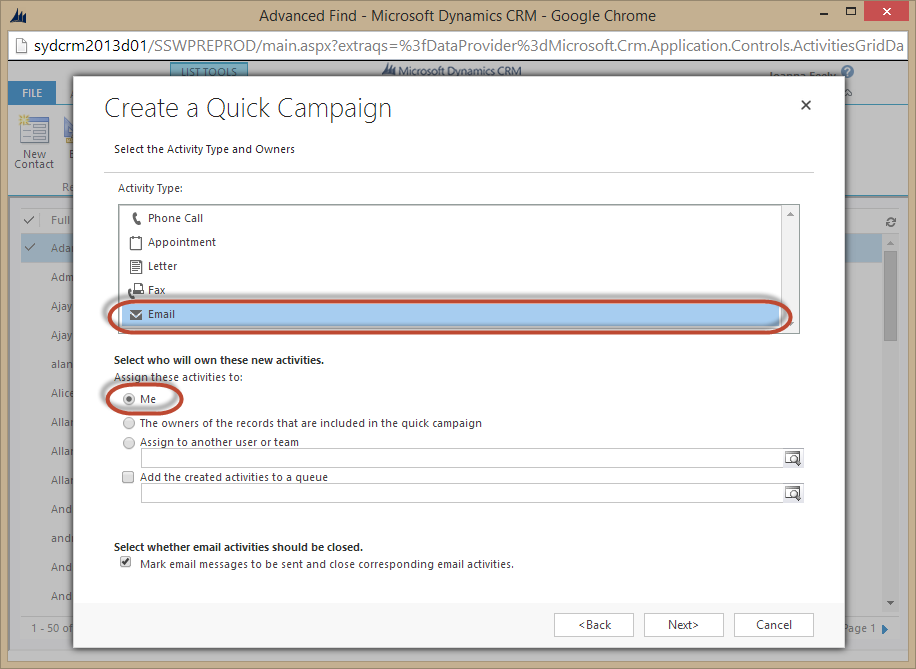
Figure: Select the Activity Type and Owner.
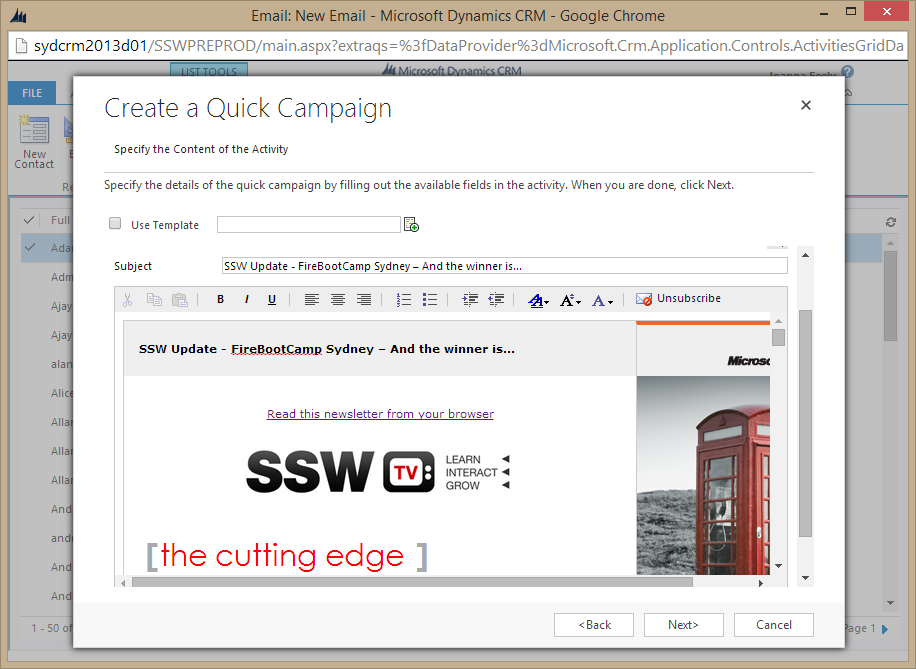
Figure: Fill in newsletter content.
Use your preferred browser to view the content of the newsletter, select all (or use "Ctrl" + "A") and then copy and paste it in the Quick Campaign text area.
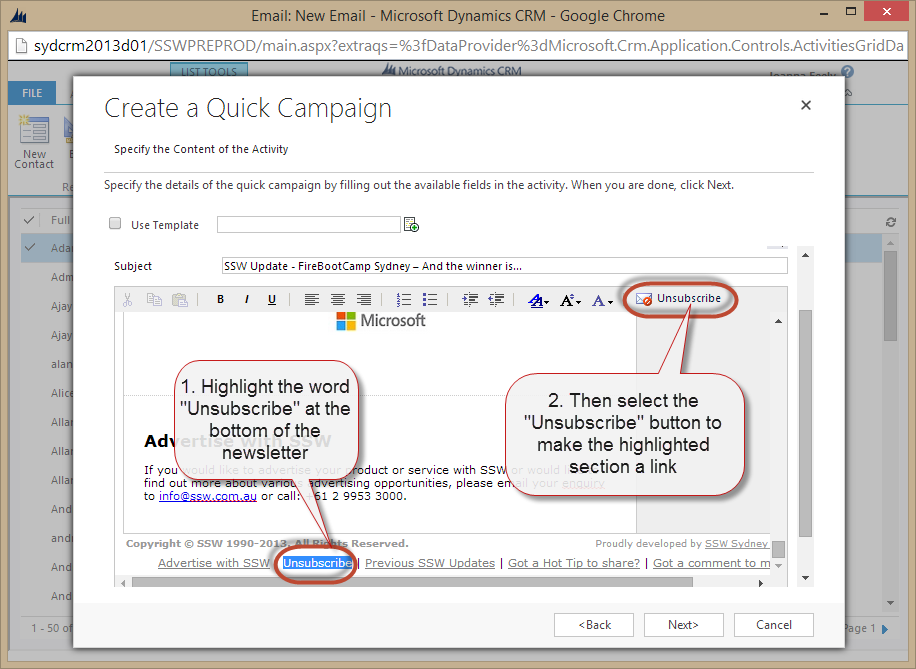
Figure: Highlight the keyword and click the Unsubscribe button to make a link for subscribers to unsubscribe themselves.
- Click Next to create all email activities in Microsoft CRM 2013. 5. Now you have to wait while the emails send out: _ Bad Example - Microsoft CRM Outlook for outgoing email, then you need to open your Microsoft Outlook, so the email activities can be promoted to Outlook and sent out. This method is slow because of the synchronization process between CRM and Microsoft Outlook and you need to leave outlook open during the entire process. _ Bad Example - Email router for outgoing email, then those email activities will be sent out automatically by Email router. This method is our preferred method of sending the newsletter, CRM email router can be configured to send out newsletters immediately and the user doesn't have to open Outlook while the emails are being processed. As per Crm tip of the day (https://crmtipoftheday.com/979/start-planning-farewell-party-for-email-router/) the email router is now deprecated * Good Example - Server side sync for outgoing email, then those email activities will be sent out automatically by server side sync. This method is our preferred method of sending the newsletter, CRM Server side sync can be configured to send out newsletters immediately and the user doesn't have to open Outlook while the emails are being processed.
Do you know how to send newsletters in Microsoft Dynamics CRM 2016?
There are different ways of sending newsletters using the Microsoft Dynamics CRM 2016:
- Campaigns
- Quick Campaigns
- Mail Merge on Marketing Lists
This rule will show you how to send a newsletter using the last method, the mail merge.
By default, Microsoft Dynamics CRM 2016 does not come with good functionality on inserting custom unsubscribe links to your newsletters - that's why we are going to look at how to add a custom unsubscribe link in each email.
Prerequisites:
- Microsoft Dynamics CRM 2016 for Microsoft Office Outlook (Outlook client) is installed and set up
- Microsoft Outlook is running and set up
Option 1 (recommended)
Basic coding knowledge (VBA) required - you will have to configure the macro that generates and inserts your custom unsubscribe link. If you don't feel comfortable doing this, have a look at Option 2 below.
Depending on how many contacts you are going to send the newsletter to, you should think about setting up a VM or using an external provider for sending the emails.
- Go to Main | Marketing | Marketing Lists
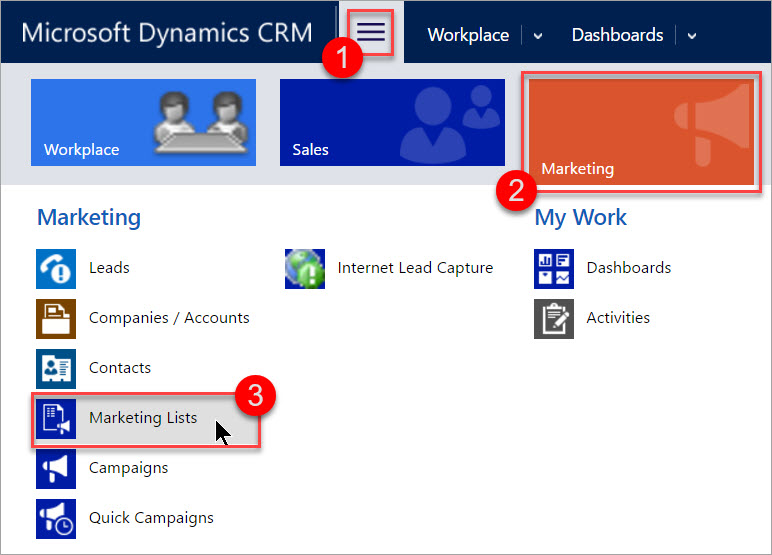
Figure: This is where you can find your Marketing Lists in Microsoft Dynamics CRM 2016
- Open the Marketing List you want to send the newsletter to by clicking on it (you should be using a dynamic list)
- Go to ... | Mail Merge on List Members (in the menu bar)
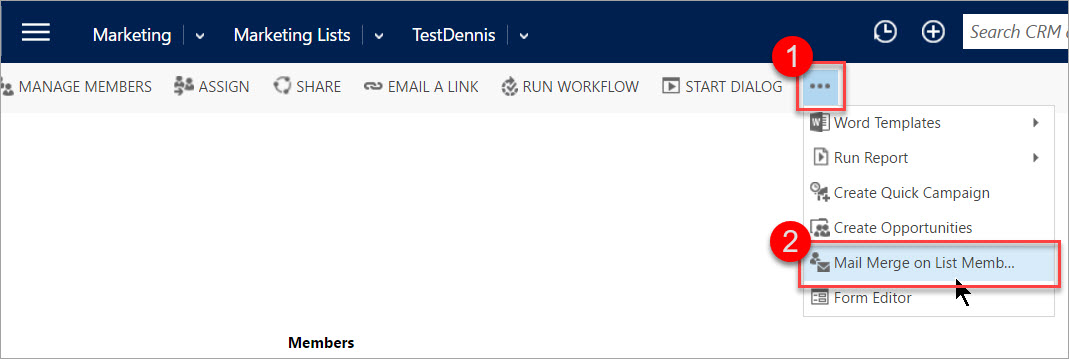
Figure: Click the ellipsis button to reveal the Mail Merge option
- Select Email as the mail merge type, choose your starting document, (optional) select data fields to use, and download the .docx
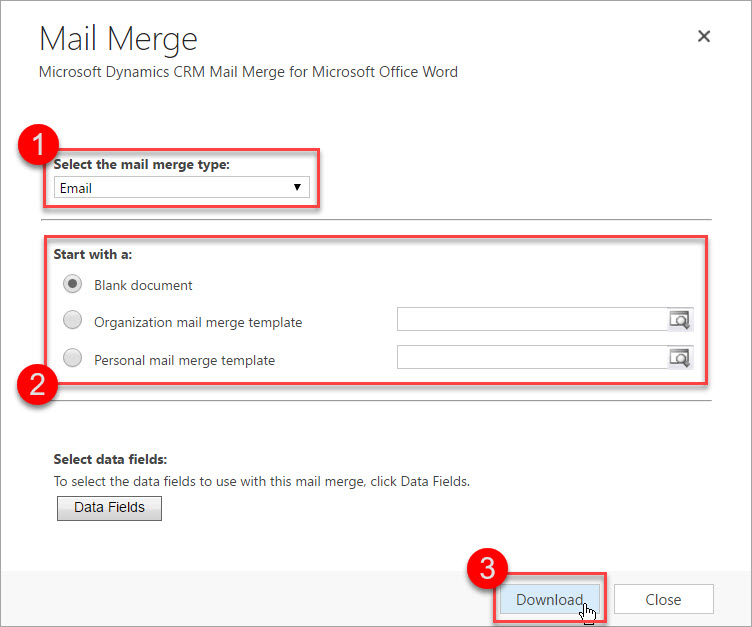
Figure: This is an example of a configuration to start with
- Open the document in Word and follow the instructions in the document to start the Mail Merge
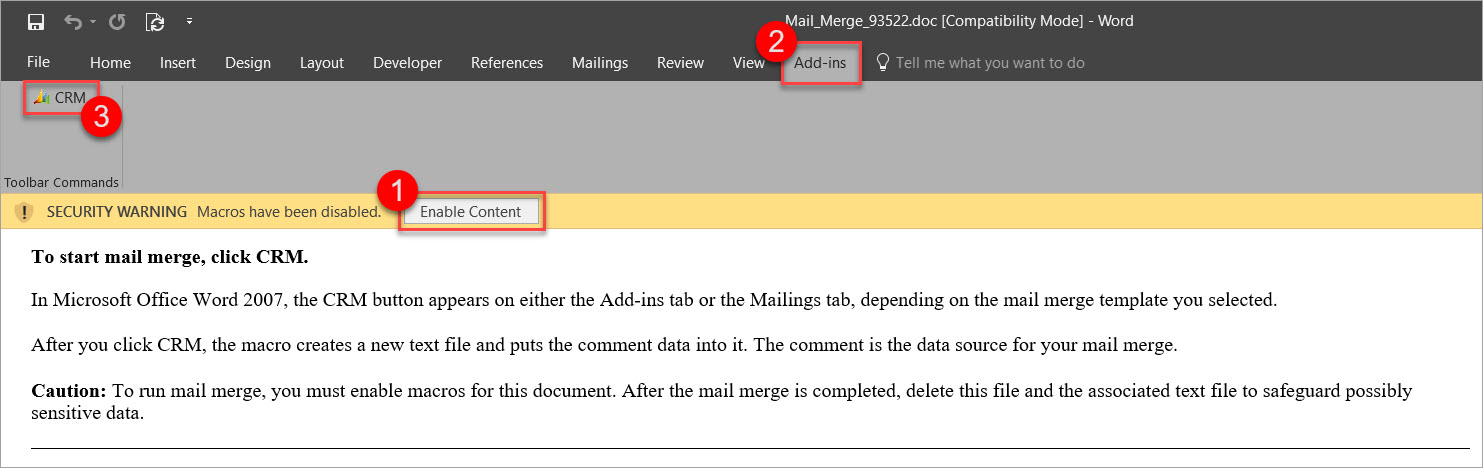
Figure: Follow these steps to start working on the mail merge
- Exclude contacts and press OK
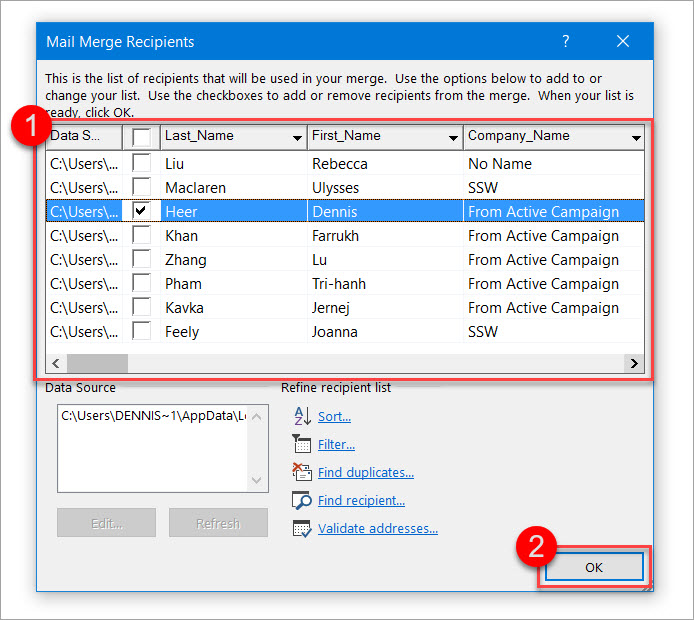
Figure: Choose the recipients for your mail merge and proceed
- Copy and paste your newsletter from Internet Explorer to Word (IE because it seems to not break the style)For a nicer editing experience (especially with HTML newsletter), switch to the Web Layout view by clicking View | (Views) | Web Layout in the ribbon bar.
- If necessary, go to File | (Info) | Convert to update the Word document to the newest version - this will solve styling issues while not breaking the mail merge
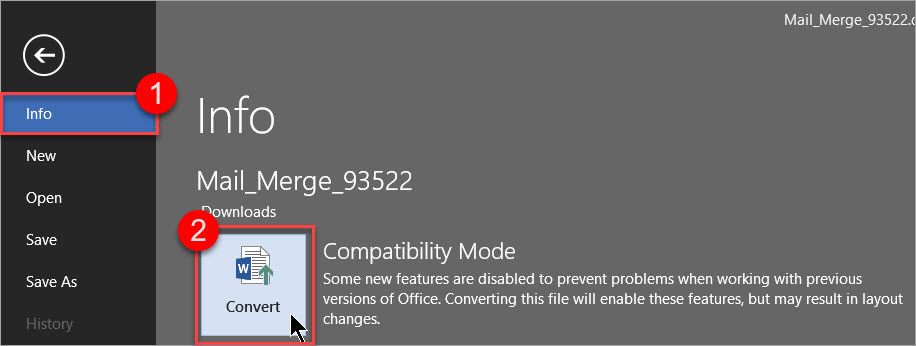
Figure: Convert the mail merge document to the newest version
- Modify and run the following macro to replace the word "UNSUBSCRIBE" in the newsletter with a custom hyperlink.For help on adding a macro to Word see the Microsoft Office Support website.
Sub InsertNewsletterLink()'' InsertNewsletterLink Macro'''Finds and adds a hyperlink where the UNSUBSCRIBE tag is placedWith Selection.Find.Forward = False.Wrap = wdFindAsk.Text = "UNSUBSCRIBE".MatchWholeWord = True.ExecuteEnd WithActiveDocument.Fields.Add Range:=Selection.Range, Type:=wdFieldHyperlink'Switch to alternative view so we can modify the content of the hyperlink "manually"ActiveDocument.ActiveWindow.View.ShowFieldCodes = _Not ActiveDocument.ActiveWindow.View.ShowFieldCodesWith Selection.Find.Forward = True.Wrap = wdFindStop.Text = "HYPERLINK".MatchWholeWord = True.ExecuteEnd WithSelection.InsertAfter " ""https://www.ssw.com.au/ssw/NETUG/Unsubscribe.aspx?email=<<email>>"'Insert word mail merge fields on <<email>> and <<contact>>With Selection.Find.Forward = False.Wrap = wdFindStop.Text = "<<email>>".MatchWholeWord = True.ExecuteEnd WithActiveDocument.Fields.Add Range:=Selection.Range, Type:=wdFieldMergeField, Text:="EMAIL"Selection.InsertAfter "&id=<<contact>>"With Selection.Find.Forward = False.Wrap = wdFindStop.Text = "<<contact>>".MatchWholeWord = True.ExecuteEnd WithActiveDocument.Fields.Add Range:=Selection.Range, Type:=wdFieldMergeField, Text:="CONTACT"Selection.InsertAfter """"Selection.MoveRight Unit:=wdCharacter, Count:=1'Remove the additional MERGEFORMATsFor counter = 0 To 1With Selection.Find.Forward = False.Wrap = wdFindStop.Text = "\* MERGEFORMAT ".MatchWholeWord = True.ExecuteEnd WithSelection.DeleteNext counter'Switch back to normal view so we can change what the hyperlink looks like to the userActiveDocument.ActiveWindow.View.ShowFieldCodes = _Not ActiveDocument.ActiveWindow.View.ShowFieldCodesWith Selection.Find.Forward = True.Wrap = wdFindStop.Text = "Error! Hyperlink reference not valid.".MatchWholeWord = True.ExecuteEnd WithSelection.Text = "UNSUBSCRIBE"Selection.Font.Bold = FalseSelection.Font.Underline = wdUnderlineSingleSelection.HomeKey Unit:=wdStoryEnd Sub- Follow the steps in the mail merge sidebar on the right-hand side of WordIf you are using mail merge fields, like the contact names, you should preview your message for some contacts.
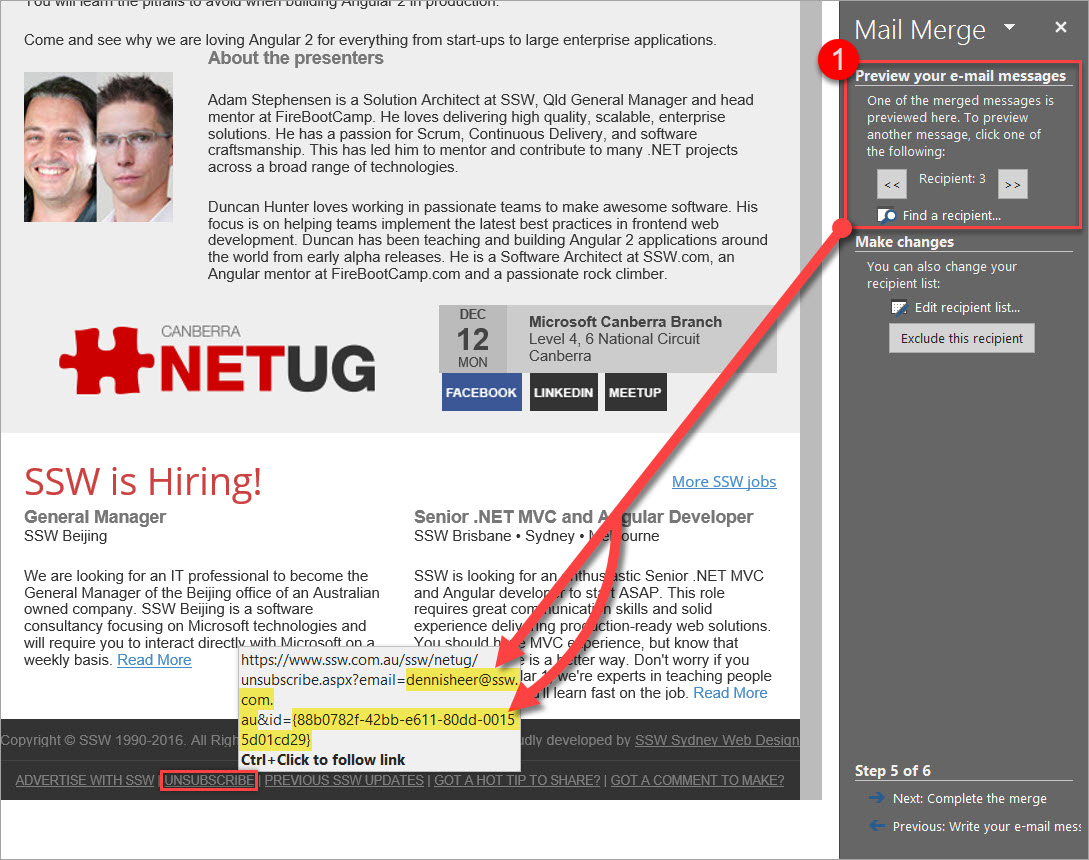
Figure: The highlighted part will change for every recipient
- Send the mail merge newsletter to the email address property of every contact by selecting the following
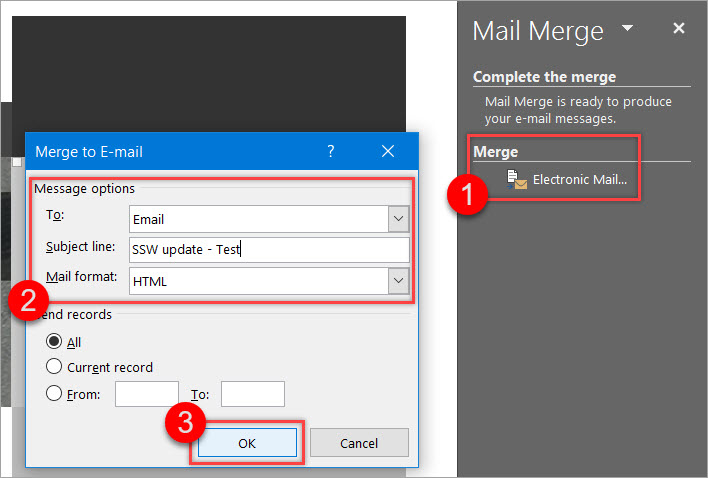
Figure: Example configuration for the email that is about to be sent
Option 2
You don't need any coding knowledge here - but this means you will have to generate your custom unsubscribe link manually and copy and paste it into the mail merge document. Make sure to set it up it correctly before copying.
Do you track important emails in CRM?
Whenever you email a client with a correspondence that relates to an existing CRM opportunity (i.e. an "as per our conversation" about when you think the project would get going etc.) you should track it in CRM so it is centralized and can be seen by anyone else who tries to follow up that opportunity.
The simplest way is when writing or receiving the email in Outlook, click the Dynamics 365 button and then "Track without Regarding".

Figure: Tracking an email in Outlook
Tracking emails in the Dynamics 365 web interface
If you're working directly in the Dynamics 365 web interface, you can also track emails through the auto capture feature. When auto capture is enabled, the system will collect untracked emails for up to 3 days, allowing you to review and track them without returning to Outlook.
To track emails using auto capture:
- Go to the entity record which the email is related to (e.g. a contact, company or opportunity)
- Find the "Timeline" section
- Click the "Track" button (see screenshot below)
This feature is particularly useful when you've missed tracking important emails initially or when reviewing correspondence from your browser.
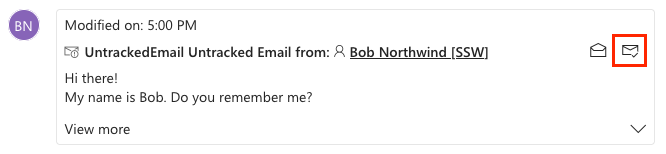
Figure: Look for the "Track" button in the Timeline section of Dynamics 365 web interface to track emails (highlighted in red)
Understanding UntrackedEmail in Dynamics 365
In Dynamics 365, you may notice items labeled as "UntrackedEmail" in your timeline or activities. These are emails that:
- Have been detected by the system's auto capture functionality
- Are potentially relevant to your CRM records
- Have not yet been formally tracked in the CRM system
- Will only remain in the system for a limited time (typically 3 days)
UntrackedEmails appear as suggestions for you to review and decide whether they should be permanently tracked in CRM. This feature helps prevent important communications from falling through the cracks while giving you control over what gets stored in your CRM database.
When you see UntrackedEmails:
- Review them to determine if they contain valuable information
- Use the "Track" or "Track and Set Regarding" options to convert important ones into permanent CRM records
- Ignore irrelevant emails, which will automatically disappear after the retention period
Track all in a thread or just one?
Track all in a thread - except if they're irrelevant (no useful information for anyone), but that's quite unlikely... so basically it is "all tracked"
Note: with the old CRM COM add-in, this was automatic once you tracked the 1st email on the thread, the rest would be auto-tracked. That is no longer the case so you now have to track every email manually
Now you know the general principle, the next step is to determine what activities are worth tracking: Sales - Do you track all sales related activities in CRM?
Do you know how to view changes made to a CRM entity?
CRM provides the Audit History page to show the changes made to a CRM entity, You can use this page for auditing purposes.
When you are browsing an entity, from the menu you will see an Audit History option when you have the permission.
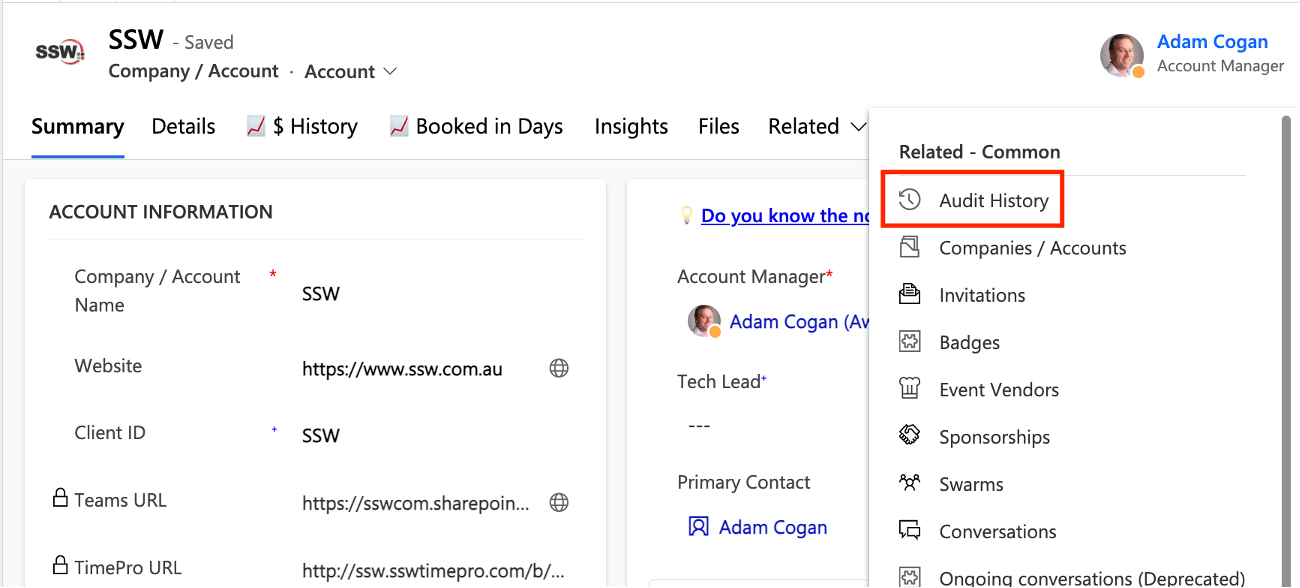
Figure: Audit History Menu
Click the "Audit History" menu item, then you will be able to see the changes made to an entity.
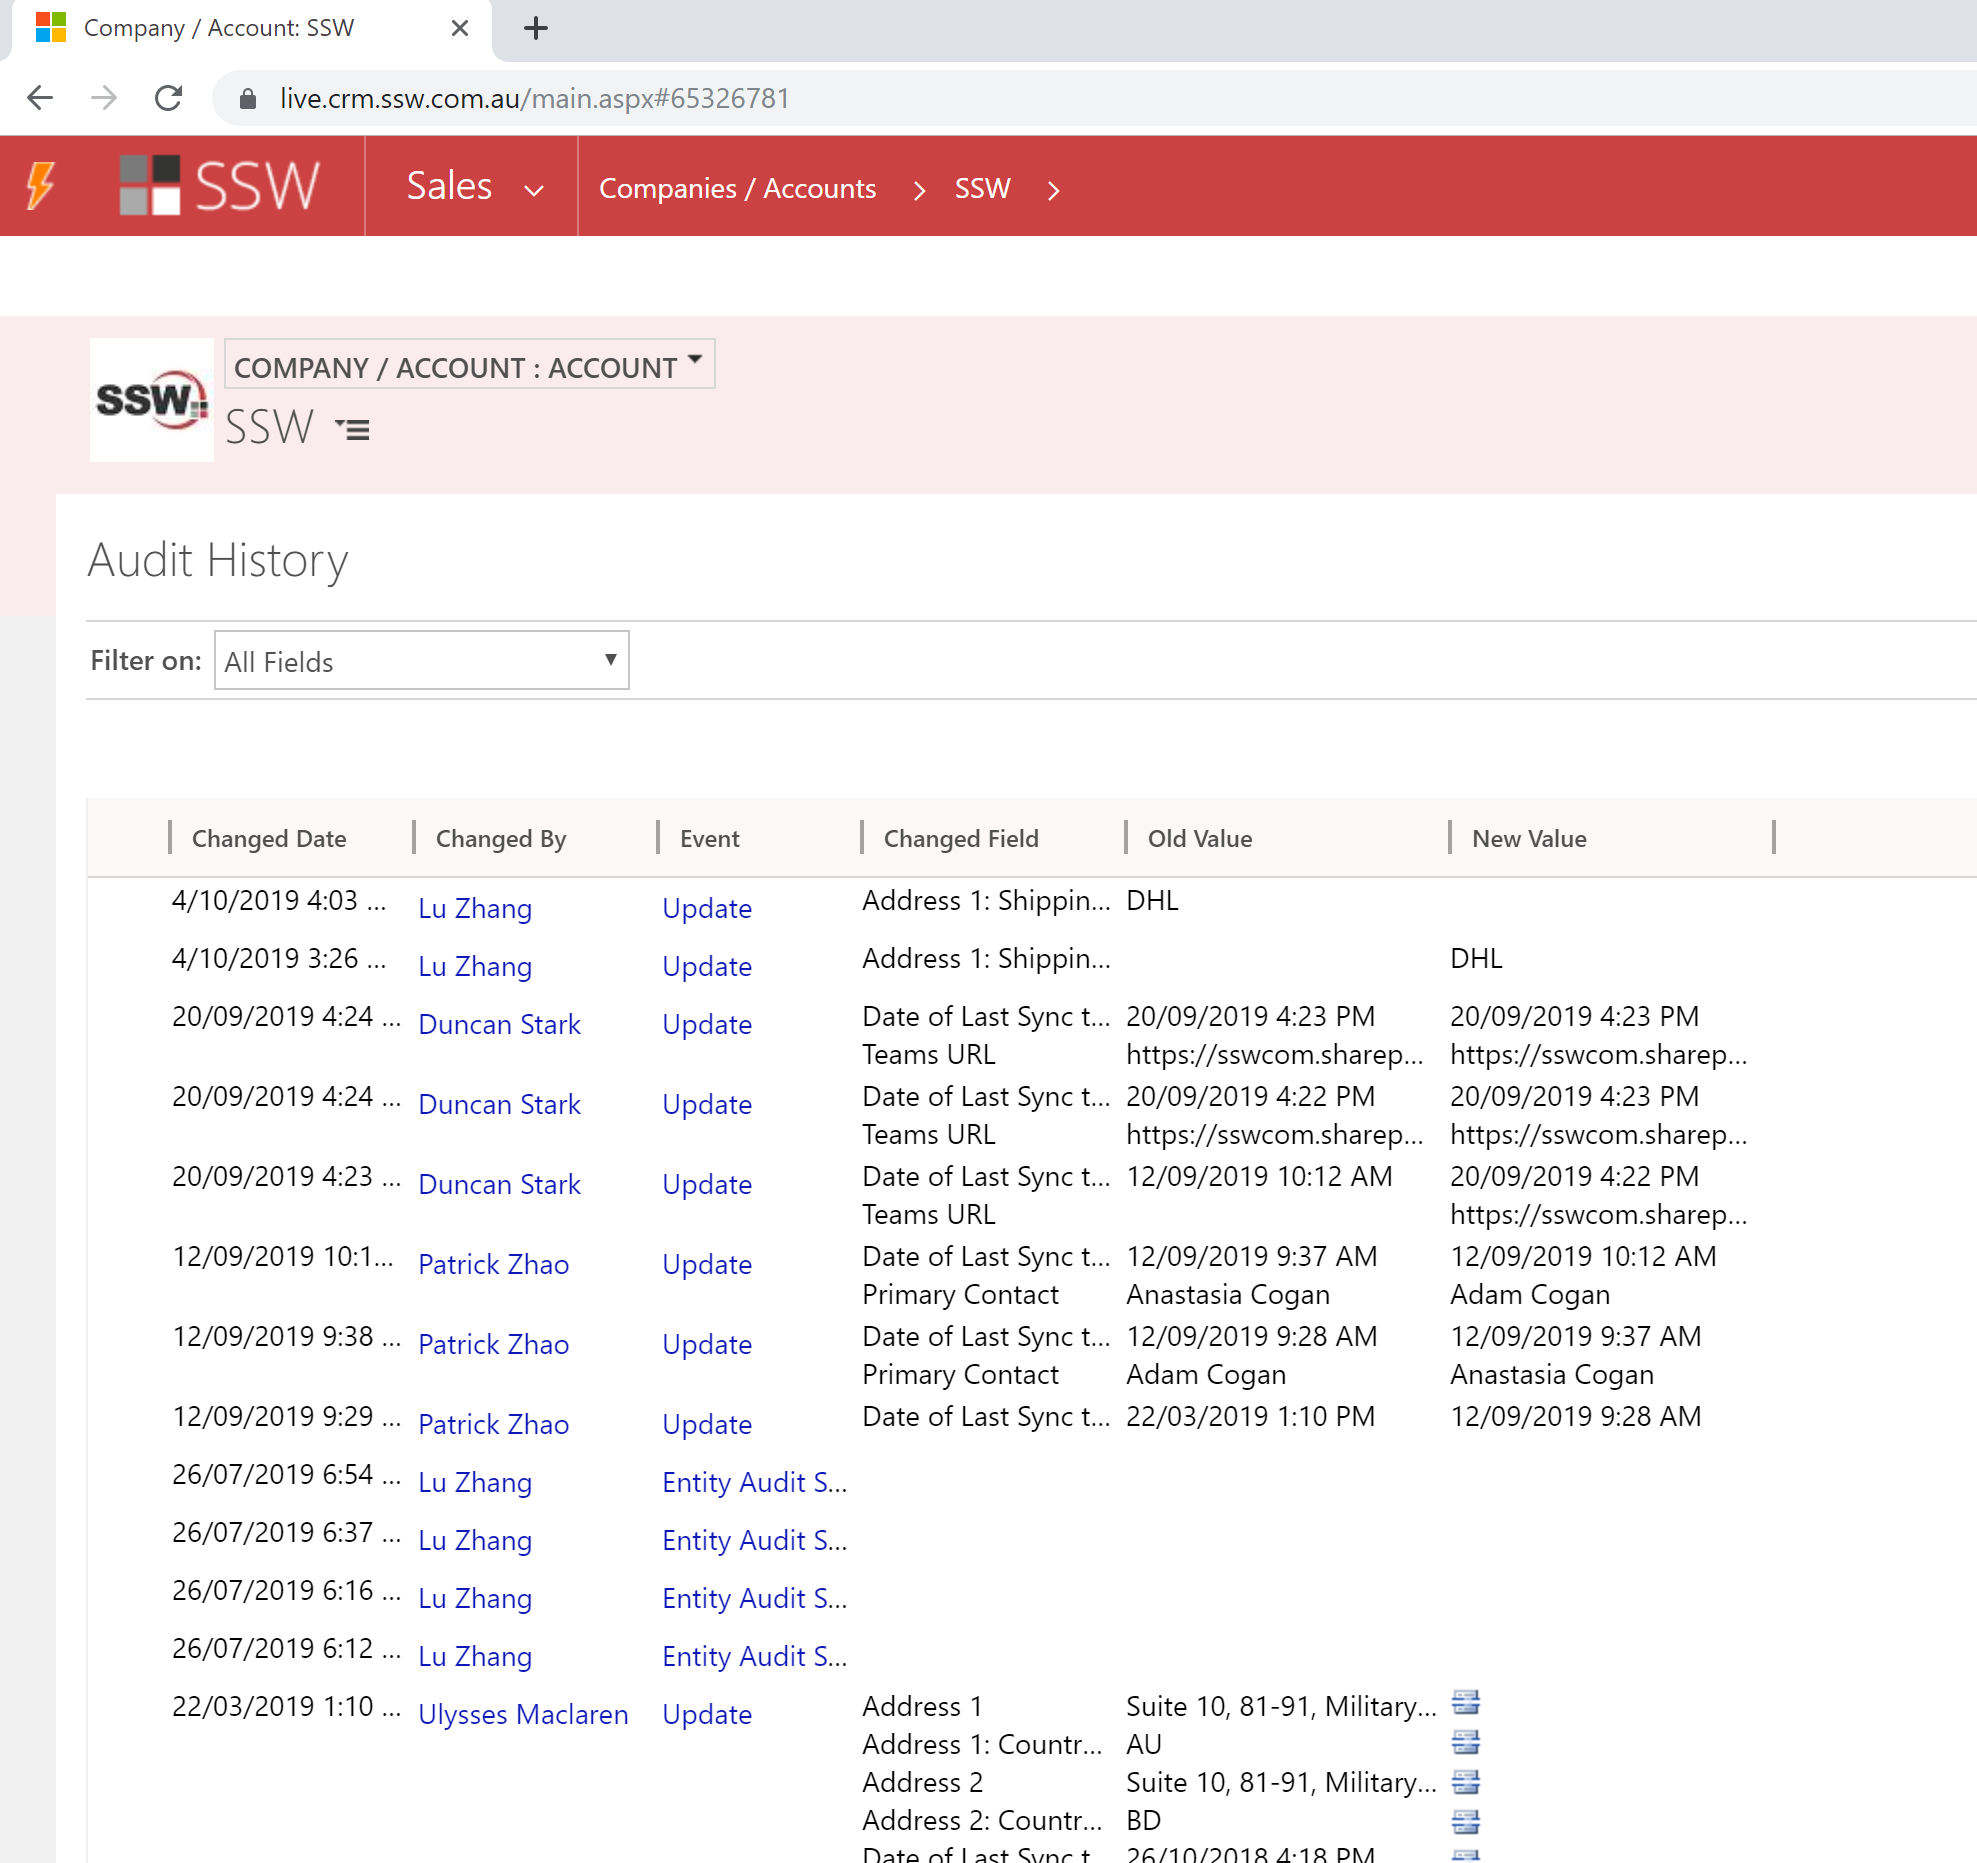
Figure: Showing changes to entity fields with old and new values
Do you merge Accounts or Contacts when you see duplicates?
It’s easy for any CRM system to fill up with duplicate records since people often forget to check if something exists before adding it, or if you have a web form that connects directly, someone may sign up more than once if they forget that they already have
Luckily, it’s very easy in Dynamics 365 to merge duplicates. All you have to do is select the 2 records, and hit the merge button. You can then choose which fields to keep from each record and the subordinate record is deleted.
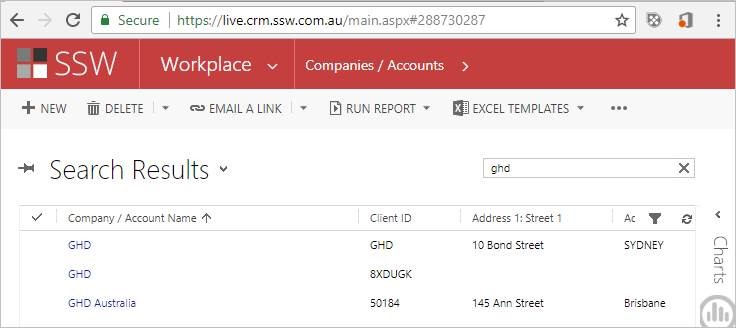
❌ Figure: Bad Example – a developer would not know which record to use to track timesheets against
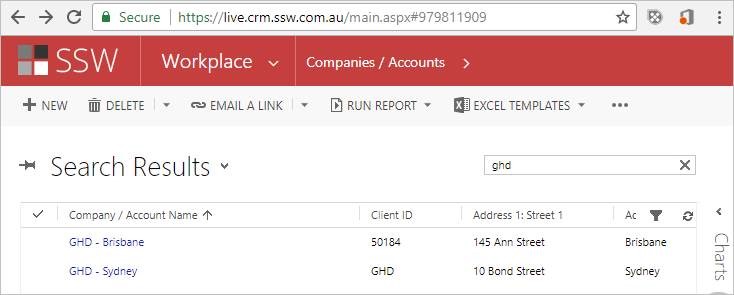
✅ Figure: Good Example – records merged to remove duplicates
Do you know how to find an employee or client's phone number?
As part of induction, employees would have been asked to enter their phone number into their Active Directory profile. That means this will be available in Skype for Business.
You can find SSW Employee phone numbers in two ways:
- Using Skype for Business
- Using CRM